
Are you concerned about indoor air quality but don’t want to spend a fortune on an expensive air purifier? You’re not alone! Many people are looking for affordable ways to breathe cleaner air, and a DIY air purifier utilizing a box fan and furnace filter is a surprisingly effective quick fix. This method can significantly reduce dust, pollen, and other airborne particles.
This comprehensive guide will walk you through building your own air purifier, exploring different filter options, understanding the science behind it, and providing tips for maximizing its performance. We’ll go beyond the basic build, covering potential upgrades, safety considerations, and how to maintain your DIY creation for long-lasting clean air. You’ll be breathing easier in no time!
Materials and Tools Needed
| Item | Quantity | Specifications |
|---|---|---|
| Box Fan | 1 | 20-inch standard box fan (choose one with multiple speed settings) |
| Furnace Filter | 1-4 | MERV 13 or higher (Minimum Efficiency Reporting Value). Look for pleated filters for better surface area. Size: 20x20x1 inch is standard for many fans, but measure your fan! |
| Duct Tape | 1 Roll | Strong, wide duct tape |
| Cardboard (Optional) | As Needed | For reinforcing the filter attachment and sealing gaps |
| Utility Knife (Optional) | 1 | For cutting cardboard |
| Measuring Tape | 1 | To verify filter and fan dimensions |
| Gloves (Optional) | 1 Pair | To keep hands clean during assembly |
Step-by-Step Air Purifier Build Process

Phase 1: Preparation
- Safety First: Unplug the box fan before starting any assembly.
- Measure & Confirm: Measure the dimensions of your box fan’s intake side. Ensure the furnace filter you purchased matches these dimensions. Slightly larger is okay, but too small will leave gaps.
- Filter Orientation: Identify the airflow direction arrow on the furnace filter. This arrow must point towards the fan. The filter is designed to capture particles when air flows in this direction.
Phase 2: Filter Attachment
- Initial Positioning: Place the furnace filter directly against the intake side of the box fan. Center it as much as possible.
- Taping – First Layer: Begin taping the filter to the fan frame. Start with the four corners, using generous strips of duct tape. Ensure a secure bond.
- Taping – Sides: Continue taping along all four sides of the filter, overlapping the tape onto both the filter frame and the fan frame. The goal is to create an airtight seal.
- Reinforcement (Optional): If you notice gaps or the filter feels unstable, use cardboard to create a frame around the filter for added support. Tape the cardboard to the fan and filter.
Phase 3: Sealing & Testing
- Gap Inspection: Carefully inspect all edges of the filter attachment. Look for any gaps where air could bypass the filter. Seal any gaps with additional duct tape.
- Initial Test (Unplugged): Gently shake the assembled unit to check for filter stability. Re-tape any loose areas.
- Plug In & Test: Plug in the fan and turn it on, starting with the lowest speed setting. Listen for any unusual noises or vibrations.
- Airflow Check: Feel the airflow coming from the exhaust side of the fan. You should notice a reduction in airflow compared to running the fan without a filter, but it should still be substantial.
Understanding Filter Ratings & Choosing the Right One
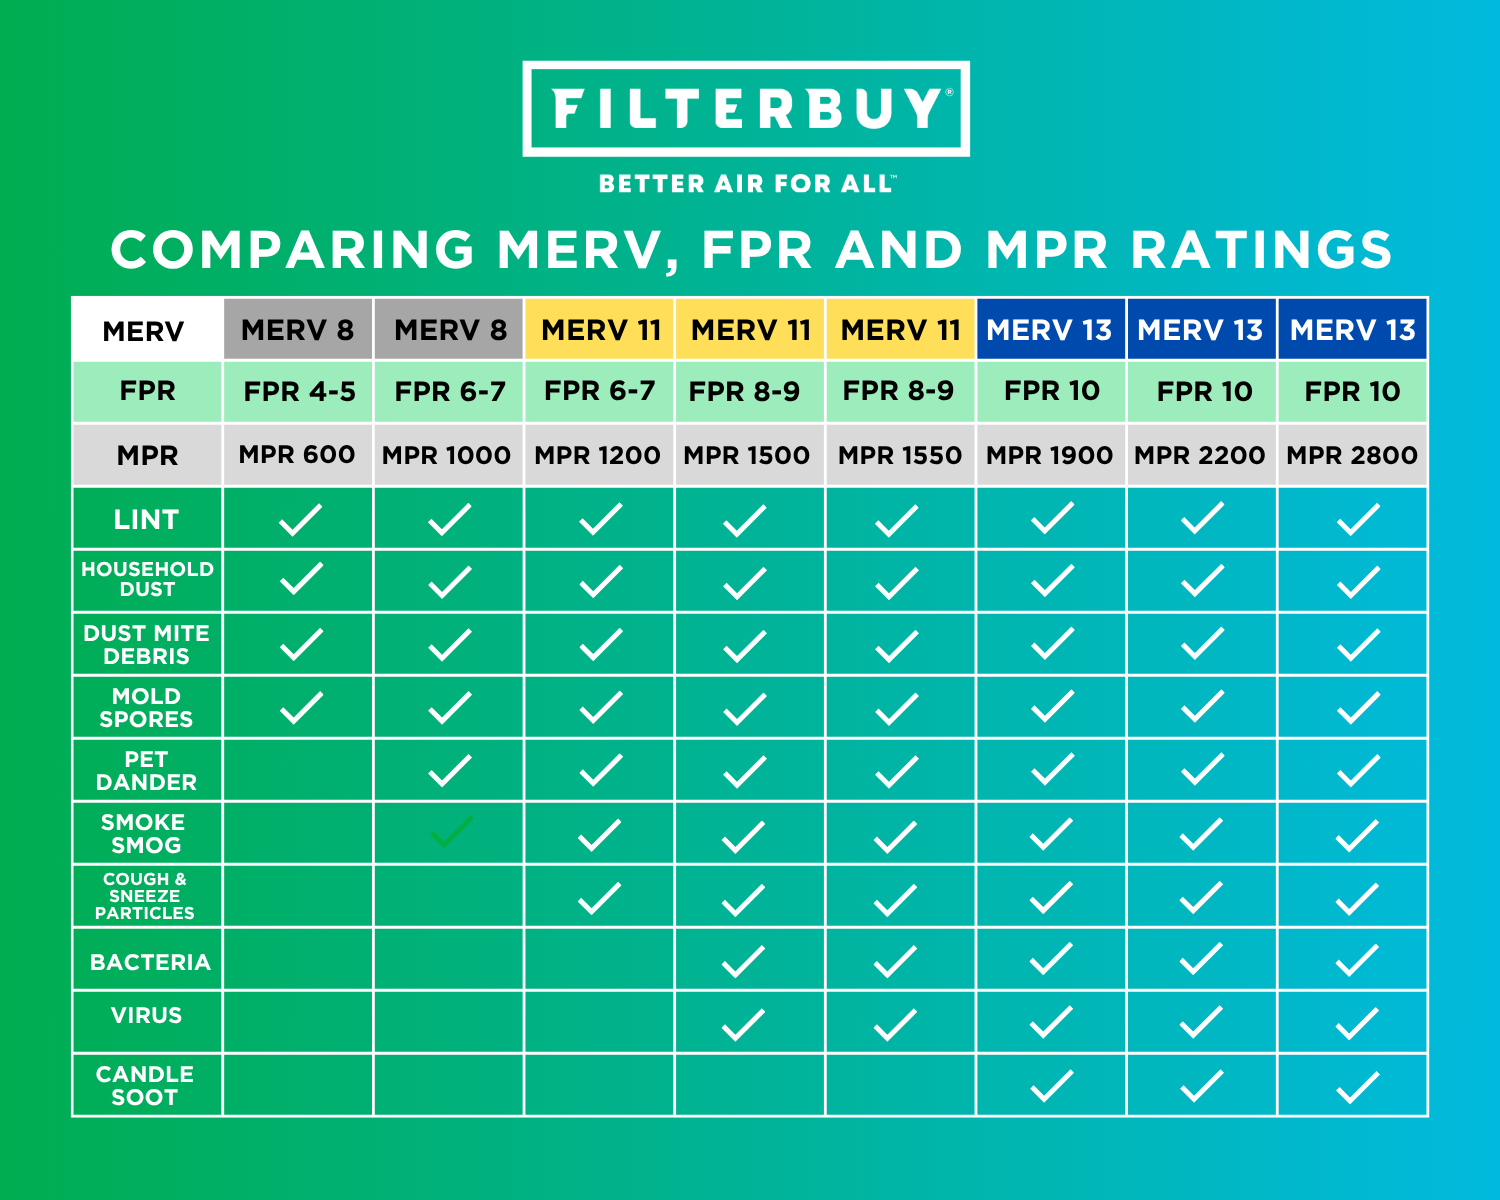
The effectiveness of your DIY air purifier heavily relies on the filter you choose. Here’s a breakdown of MERV ratings:
- MERV 8: Captures dust, pollen, and dust mites. Good for basic filtration.
- MERV 11-13: Captures mold spores, pet dander, and larger bacteria. A good balance between filtration and airflow. Recommended for most DIY builds.
- MERV 14-16: Captures smoke, smog, and smaller bacteria. Provides excellent filtration but can significantly restrict airflow, potentially straining the fan motor.
- MERV 17-20: Hospital-grade filtration. Not suitable for DIY builds due to extremely restricted airflow.
Important: Higher MERV ratings don’t always mean better. Your box fan may not be powerful enough to effectively push air through a very high MERV filter, reducing its overall effectiveness.
Pro Tips for Optimal Performance

- Multiple Filters: For increased filtration, consider attaching multiple filters to the fan intake. This will further reduce airflow but can significantly improve particle capture.
- Pre-Filter: Add a cheap, washable pre-filter (like a cut-to-size electrostatic furnace filter) in front of the main filter to capture larger particles and extend the life of the more expensive MERV filter.
- Fan Speed: Experiment with different fan speeds. Higher speeds move more air but can also create more noise.
- Placement: Position the air purifier in a central location in the room, away from walls and furniture, to maximize airflow.
- Regular Replacement: Replace the filter regularly, depending on usage and air quality. Check the filter monthly and replace it when it appears dirty or clogged.
- Activated Carbon Layer: For odor control, consider adding a layer of activated carbon filter material (sold in rolls) between the pre-filter and the MERV filter.
When to Consider Professional Help
While DIY air purifiers are effective, there are situations where a professionally manufactured unit is a better choice:
- Severe Allergies or Asthma: If you have severe respiratory issues, a HEPA-certified air purifier with advanced features is recommended.
- Large Spaces: DIY purifiers are best suited for smaller rooms. Larger spaces require more powerful and efficient air purification systems.
- Gas & VOC Removal: DIY purifiers are not effective at removing gases and volatile organic compounds (VOCs). A purifier with an activated carbon filter is needed for this.
FAQ
Q: How often should I change the filter?
A: It depends on your environment and usage. Check the filter monthly. Replace it when it appears dirty or clogged, typically every 1-3 months.
Q: Will this really work?
A: Yes! Studies have shown that DIY box fan air purifiers can be surprisingly effective at reducing airborne particles, especially when using a MERV 13 or higher filter.
Q: Is it safe to run a box fan with a filter attached?
A: Generally, yes, but ensure the filter isn’t overly restrictive, which could strain the motor. Monitor the fan for overheating or unusual noises.
Q: Can I use a different type of filter?
A: While you can experiment, furnace filters are the most readily available and cost-effective option. Avoid filters that are too thick or restrict airflow significantly.
Alternative Solutions
If you’re hesitant about building a DIY air purifier, consider these alternatives:
| Solution | Pros | Cons | Best For |
|---|---|---|---|
| HEPA Air Purifier | Excellent filtration, removes allergens, dust, and smoke. Often includes features like auto mode and timers. | More expensive than DIY options. | People with allergies, asthma, or sensitivities. |
| Ionic Air Purifier | Quiet operation, can remove airborne particles. | May produce ozone, which can be harmful. | Small rooms, personal use. |
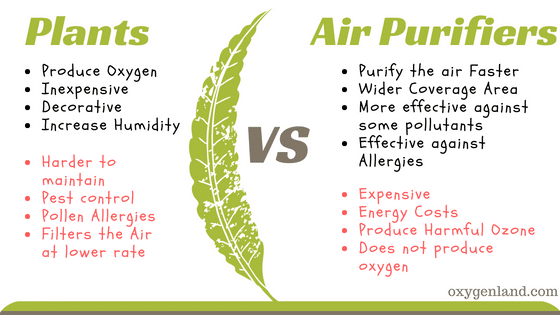
| Plant-Based Air Purification | Natural and aesthetically pleasing. | Limited air purification capacity. | Supplementing other air purification methods. |
Keep Your Air Clean & Breathe Easy
By following this guide, you’ve successfully built a cost-effective air purifier that can significantly improve your indoor air quality. Remember to prioritize filter selection, proper assembly, and regular maintenance.
Don’t let poor air quality affect your health and well-being. Try building your own air purifier today and enjoy the benefits of cleaner, fresher air!
Have you built your own DIY air purifier? Share your experience and tips in the comments below!


