
Are you noticing your Germ Guardian air purifier isn’t performing as well as it used to? A clogged filter is often the culprit, leading to reduced airflow and diminished air quality. Cleaning or replacing your filter is a simple fix that can significantly improve your purifier’s performance. This guide will walk you through how to clean your Germ Guardian filter, restoring your air purifier to its optimal state.
This comprehensive guide goes beyond just a quick rinse. We’ll cover identifying your filter type, step-by-step cleaning instructions for both washable and non-washable filters, troubleshooting common issues, and preventative maintenance to keep your air purifier running efficiently for years to come. By the end of this article, you’ll have the knowledge to confidently maintain your Germ Guardian air purifier and breathe easier.
Understanding Your Germ Guardian Filter
Germ Guardian air purifiers utilize various filter types, each requiring a slightly different cleaning approach. Knowing your filter is the first step to proper maintenance.
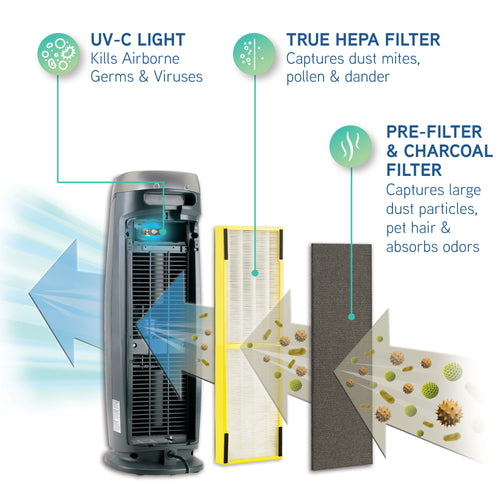
- HEPA Filter (High-Efficiency Particulate Air): Captures 99.97% of dust, pollen, smoke, and other airborne particles. Most HEPA filters cannot be washed and require replacement.
- Activated Carbon Filter: Absorbs odors, gases, and volatile organic compounds (VOCs). Some carbon filters can be refreshed, while others need replacement.
- Pre-Filter: The first line of defense, capturing larger particles like dust, pet hair, and lint. These are typically washable.
- UV-C Light: While not a filter, the UV-C light bulb contributes to eliminating airborne germs and bacteria. It doesn’t require cleaning but may need replacement periodically.
Check your Germ Guardian model’s manual to identify the specific filters it uses. The manual will also indicate whether a filter is washable or requires replacement.
How to Clean a Washable Germ Guardian Filter (Pre-Filter & Some Carbon Filters)
Many Germ Guardian models include a washable pre-filter and some carbon filters that can be refreshed. Here’s how to clean them:
Method 1: Vacuuming (Quick Refresh)
This method is ideal for a quick dust removal.
- Power Off & Unplug: Always disconnect the air purifier from the power source before any maintenance.
- Access the Filter: Open the filter compartment according to your model’s instructions.
- Gentle Vacuuming: Use a brush attachment on your vacuum cleaner to gently remove loose dust and debris from the filter surface. Avoid applying excessive pressure.
- Reinstall: Carefully reinsert the filter into the compartment.
Method 2: Washing (Deep Clean)
This method provides a more thorough cleaning.
Diagnosing the Issue
Determine the level of dirt and grime on the filter. If it’s lightly dusty, vacuuming may suffice. If it’s visibly dirty or emitting odors, washing is recommended.
Fix Steps
- Power Off & Unplug: Disconnect the air purifier.
- Remove the Filter: Open the filter compartment and remove the washable filter.
- Rinse with Lukewarm Water: Gently rinse the filter under lukewarm (never hot) water. Avoid using soap or detergents, as they can damage the filter material.
- Gentle Agitation: If necessary, gently agitate the filter in the water to loosen stubborn dirt.
- Thorough Rinse: Rinse the filter thoroughly until all traces of dirt and debris are removed.
- Air Dry Completely: Allow the filter to air dry completely for at least 24 hours before reinstalling. Never reinstall a damp filter.
- Reinstall: Carefully reinsert the completely dry filter into the compartment.
Testing
Turn on the air purifier and observe the airflow. You should notice an improvement in air circulation.
How to Handle Non-Washable Filters (HEPA & Some Carbon)

HEPA filters and some activated carbon filters are designed to be replaced, not washed. Washing them can damage the delicate fibers and reduce their effectiveness.
Replacement Frequency
- HEPA Filter: Replace every 6-8 months, or more frequently if you have pets, allergies, or live in a heavily polluted area.
- Activated Carbon Filter: Replace every 3-6 months, depending on odor levels and usage.
Purchasing Replacement Filters
- Official Germ Guardian Filters: Available on the Germ Guardian website and through major retailers.
- Compatible Filters: Third-party filters are available, but ensure they meet the same specifications as the original filters.
Preventing Future Filter Clogging & Maintaining Your Air Purifier
Regular maintenance can extend the life of your filters and keep your air purifier running efficiently.
- Regular Vacuuming: Vacuum the pre-filter every 2-4 weeks to remove larger particles.
- Placement: Position the air purifier in an open area away from obstructions to maximize airflow.
- Pre-Cleaning: Regularly dust and clean the surrounding area to reduce the amount of dust entering the purifier.
- Monitor Filter Condition: Visually inspect the filter every month for signs of clogging.
- Run Continuously: Running the purifier continuously, even on a low setting, can help prevent filter buildup.
Pro Tips for Germ Guardian Air Purifier Maintenance
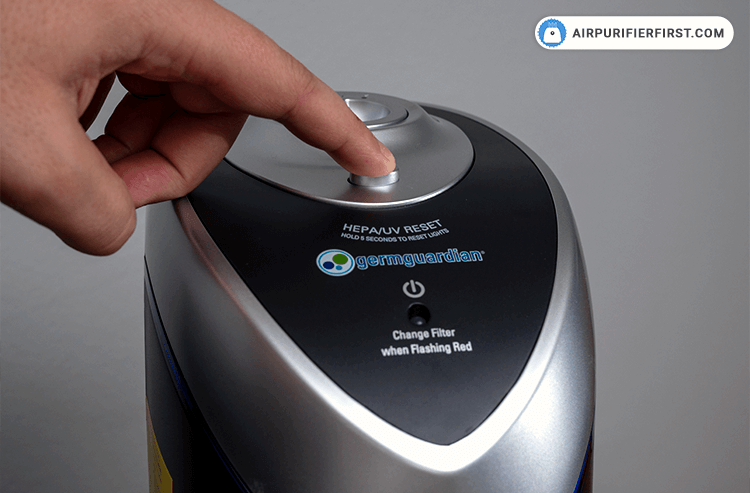
- Filter Reset Indicator: Some models have a filter reset indicator. Reset it after replacing the filter, not just cleaning it.
- UV-C Bulb Replacement: Replace the UV-C bulb according to the manufacturer’s recommendations (typically every 6-12 months).
- Exterior Cleaning: Wipe down the exterior of the air purifier with a damp cloth regularly.
- Airflow Check: Periodically check the airflow by holding your hand near the air outlet. A noticeable decrease in airflow indicates a clogged filter.
- Avoid Harsh Chemicals: Never use harsh chemicals or abrasive cleaners on any part of the air purifier.
- Consider a Second Filter: If you have severe allergies or live in a highly polluted area, consider having a spare set of filters on hand.
When to Call a Professional
- Unusual Noises: If the air purifier is making strange noises, it may indicate a mechanical problem.
- Electrical Issues: If you suspect an electrical fault, immediately unplug the purifier and contact a qualified technician.
- Persistent Odors: If the purifier continues to emit odors even after filter replacement, there may be an underlying issue.
- Model-Specific Problems: If you’re experiencing a problem not covered in the manual, contact Germ Guardian customer support.
FAQ
Q: Can I use soap to clean the washable filter?
A: No, avoid using soap or detergents, as they can leave residue and damage the filter material. Lukewarm water is sufficient.
Q: How long does it take for the filter to dry completely?
A: Allow at least 24 hours for the filter to air dry completely before reinstalling.
Q: What if my air purifier still smells after replacing the filter?
A: Ensure you’ve replaced both the HEPA and carbon filters (if applicable). The odor may be lingering in the unit itself. Run the purifier on high for several hours to help clear it out.
Q: Where can I find replacement filters for my Germ Guardian air purifier?
A: You can find replacement filters on the Germ Guardian website, through major retailers like Amazon, or at home improvement stores.
Q: How often should I replace the UV-C bulb?
A: Typically, the UV-C bulb should be replaced every 6-12 months. Check your model’s manual for specific recommendations.
Get Your Germ Guardian Working Again
By following these steps, you can effectively clean and maintain your Germ Guardian air purifier, ensuring it continues to provide clean, fresh air for your home. Remember to identify your filter type, choose the appropriate cleaning method, and prioritize regular maintenance.
Have you successfully cleaned your Germ Guardian filter? Share your experience and any helpful tips in the comments below!


