Are you concerned about indoor air quality but don’t want to spend a fortune on an expensive air purifier? A DIY charcoal air purifier can be a surprisingly effective and affordable solution. While it won’t match the HEPA filtration of high-end models, it can significantly reduce odors, pollutants, and even some allergens. Let’s start with a quick fix: simply placing an open container of activated charcoal in a room can offer immediate, though limited, air purification.
This comprehensive guide will walk you through building your own charcoal air purifier, exploring different designs, explaining the science behind it, and providing maintenance tips to ensure long-lasting performance. By the end of this article, you’ll have a working air purifier and a deeper understanding of how it improves your indoor environment.
Understanding How Charcoal Air Purifiers Work

Activated charcoal is incredibly porous, giving it a massive surface area. This allows it to adsorb (not absorb) gases, odors, chemicals, and even some particles. The larger the surface area and the more activated charcoal you use, the more effective the purifier will be. A fan is crucial to draw air through the charcoal, maximizing its exposure and cleaning ability.
Why Activated Charcoal?
- Adsorption: Binds pollutants to its surface.
- Odor Removal: Excellent at neutralizing smells from cooking, pets, and smoke.
- VOC Reduction: Helps remove volatile organic compounds (VOCs) from cleaning products and furniture.
- Cost-Effective: Significantly cheaper than many commercial air purifiers.
Method 1: The Simple Box Fan Filter
This is the easiest and most popular method, requiring minimal tools and materials.
Materials and Tools Needed
| Item | Quantity | Specifications |
|---|---|---|
| Box Fan | 1 | 20-inch standard box fan |
| Activated Charcoal | 2-5 lbs | Granular or pelletized, specifically for air purification |
| Air Filter | 1 | 20x20x1 inch, MERV 8 or higher (optional, for pre-filtering) |
| Fabric | 1 yard | Breathable fabric like cheesecloth or landscape fabric |
| Bungee Cords or Straps | 2-4 | To secure the fabric and charcoal |
| Staple Gun (Optional) | 1 | For securing fabric to the fan |
| Scissors | 1 | For cutting fabric |
Step-by-Step Process
- Prepare the Fabric Pouch: Cut the fabric large enough to wrap around the back of the box fan, leaving enough excess to create a pouch for the charcoal.
- Create the Charcoal Pouch: Sew or staple three sides of the fabric together to form a pouch. Leave one side open.
- Fill the Pouch: Carefully pour the activated charcoal into the fabric pouch. Don’t overfill; leave room to close it securely.
- Seal the Pouch: Sew or staple the remaining side of the pouch closed, ensuring the charcoal is contained.
- Attach to the Fan: Place the charcoal pouch against the back of the box fan. Secure it tightly with bungee cords or straps. Ensure the fan blades aren’t obstructed.
- Add Pre-Filter (Optional): Secure the air filter to the front of the fan using bungee cords or straps. This extends the life of the charcoal by capturing larger particles.
- Test and Adjust: Turn on the fan and check for secure attachment. Adjust the straps or cords as needed.
Diagnosing the Issue:
- Low Airflow: Too much charcoal, or a tightly woven fabric pouch.
- Charcoal Dust: Pouch isn’t fully sealed.
Method 2: The DIY Air Purifier Tower
This method creates a more aesthetically pleasing and potentially more efficient air purifier.
Materials and Tools Needed
| Item | Quantity | Specifications |
|---|---|---|
| Plastic Storage Bin | 1 | 18-24 gallon, with lid |
| Activated Charcoal | 5-10 lbs | Granular or pelletized |
| Computer Fan | 1-2 | 120mm or larger, low-noise |
| Power Supply | 1 | To power the computer fan |
| Air Filter | 1 | Cut to fit the bin’s opening |
| Drill | 1 | With various sized drill bits |
| Mesh Fabric | 1 yard | For holding the charcoal |
| Hot Glue Gun | 1 | For securing components |
Step-by-Step Process
- Prepare the Bin: Drill holes in the lid of the storage bin for airflow. Also drill holes for mounting the computer fan(s).
- Create Charcoal Chamber: Line the inside of the bin with mesh fabric, creating a compartment to hold the charcoal.
- Fill with Charcoal: Pour the activated charcoal into the mesh-lined chamber.
- Install the Fan(s): Mount the computer fan(s) to the lid of the bin, ensuring they blow air into the bin and through the charcoal. Secure with hot glue.
- Add Air Filter: Attach the air filter to the intake side of the fan(s), securing it with tape or hot glue.
- Connect Power: Connect the computer fan(s) to the power supply.
- Test and Seal: Turn on the fan(s) and check for airflow. Seal any gaps around the lid to maximize efficiency.
Diagnosing the Issue:
- Fan Not Working: Check power supply and connections.
- Weak Airflow: Fan size insufficient, or charcoal obstructing airflow.
Method 3: The Bucket Purifier

Similar to the tower, but uses a bucket for a simpler build.
Materials and Tools Needed:
| Item | Quantity | Specifications |
|---|---|---|
| 5-Gallon Bucket | 1 | With lid |
| Activated Charcoal | 3-5 lbs | Granular or pelletized |
| Computer Fan | 1 | 120mm or larger, low-noise |
| Power Supply | 1 | To power the computer fan |
| Pre-Filter | 1 | Cut to fit the lid |
| Drill | 1 | With various sized drill bits |
| Mesh Fabric | 1 yard | For holding the charcoal |
| Hot Glue Gun | 1 | For securing components |
Process:
Follow the steps for the DIY Air Purifier Tower, adapting them for the smaller bucket size. Focus on ensuring a tight seal between the lid and the bucket.
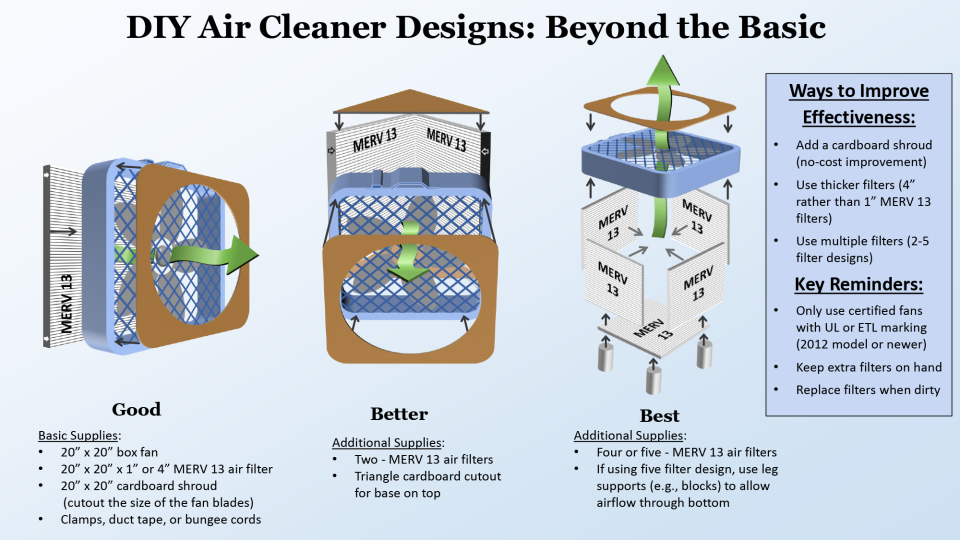
Pro Tips for Optimal Performance
- Charcoal Quality: Use high-quality, activated charcoal specifically designed for air purification.
- Pre-Filtering: Always use a pre-filter to capture dust and larger particles, extending the life of the charcoal.
- Airflow: Maximize airflow by ensuring the fan is powerful enough and the charcoal isn’t packed too tightly.
- Charcoal Replacement: Replace the charcoal every 3-6 months, depending on usage and air quality. You’ll notice reduced effectiveness when it’s time to replace it.
- Placement: Position the purifier in a central location in the room for optimal circulation.
When to Call a Professional
While DIY air purifiers are effective for many situations, consider professional help if:
- You have severe allergies or respiratory problems.
- You’re dealing with mold or other serious indoor air pollutants.
- You need to meet specific air quality standards.
FAQ
Q: How often should I replace the charcoal?
A: Replace the charcoal every 3-6 months, or when you notice a decrease in effectiveness.
Q: Can I use regular charcoal?
A: No. Only activated charcoal is effective for air purification due to its porous structure.
Q: Will this remove all pollutants?
A: No. DIY charcoal purifiers are best at removing odors, gases, and some VOCs. They are less effective at removing very fine particles.
Q: Is it safe to use a DIY air purifier?
A: Yes, as long as you follow safety precautions, such as securing the fan and ensuring proper electrical connections.
Alternative Solutions
If DIY isn’t your style, consider these alternatives:
| Solution | Pros | Cons | Best For |
|---|---|---|---|
| HEPA Air Purifier | High filtration efficiency | Expensive | Allergy sufferers, asthma patients |
| Ionic Air Purifier | Quiet, affordable | Can produce ozone | Small spaces, odor removal |
| Houseplants | Natural air purification | Limited effectiveness | Adding greenery, improving aesthetics |
Keep Your Air Fresh and Clean
Building your own charcoal air purifier is a rewarding project that can significantly improve your indoor air quality. By following these steps and tips, you can create an effective and affordable solution for a healthier home.
Now that you’ve learned how to make a charcoal air purifier, which method will you try first? Share your experience and any questions in the comments below!