Your Aprilaire humidifier sits silent while dry winter air cracks your skin and irritates your throat. No water trickles into the distribution tray, the filter panel stays bone-dry, and furnace cycles complete without adding needed moisture. This frustrating “no water” condition affects thousands of homeowners each heating season, but 90% of cases stem from just three fixable components. By following this precise diagnostic sequence, you’ll pinpoint why your Aprilaire humidifier isn’t getting water and restore proper humidity within an hour.
Confirm Your Exact Water Flow Failure
Before grabbing tools, verify you’re dealing with a true water supply failure. No water flow means your evaporative panel remains completely dry even after 10+ minutes of furnace operation. You’ll hear the blower running but detect zero water movement through the system.
Critical symptoms to confirm:
– Water panel shows no dampness after extended furnace runtime
– Zero audible click from solenoid valve during operation
– Humidistat set to maximum with no response
– Previously functional unit suddenly stopped working
If your humidifier only runs during test mode but not automatically, you’re likely experiencing normal humidity threshold logic—not a mechanical failure.
Solenoid Valve and Water Supply Diagnosis

Why Your Solenoid Valve Clicks But No Water Flows
That distinct click when your humidistat activates should signal water entry, but mineral deposits inside the valve body often block flow. When you hear the click but see no water, mechanical obstruction is the prime suspect. Calcium buildup jams the internal diaphragm, preventing water passage even with proper electrical activation.
Immediate verification test:
1. Disconnect water lines at the solenoid valve
2. Apply 24VAC directly to valve terminals
3. Observe for water flow through the valve body
If water still doesn’t flow during direct activation, replace the solenoid valve immediately—cleaning rarely restores full function. Use OEM part numbers A2012-S118 (legacy) or A2012-S150 (current) for guaranteed compatibility.
Saddle Valve Replacement Beats Cleaning Every Time
That small brass valve clamped to your copper pipe is the most common failure point. After years of service, calcium deposits narrow its internal passage until water flow stops completely. Never waste time descaling—the tiny orifice makes effective cleaning impossible.
Replacement protocol:
– Close saddle valve and disconnect humidifier water line
– Open valve to check for steady stream (weak dribble = failure)
– Install full-port ball valve with 1/4″ compression fitting
– Use professional brazing for permanent copper line connection
This $15 upgrade takes 15 minutes versus hours of futile cleaning attempts and provides reliable service for decades. Crucially, it allows future humidifier maintenance without shutting off your main water supply.
Humidistat and Electrical System Verification
Bypass Humidistat Failure With This 2-Minute Test
Your humidistat acts as the traffic controller for water flow. For manual models (600M), rotate the dial to maximum—you must hear a distinct click as internal contacts close. No click means immediate humidistat replacement.
Definitive electrical test:
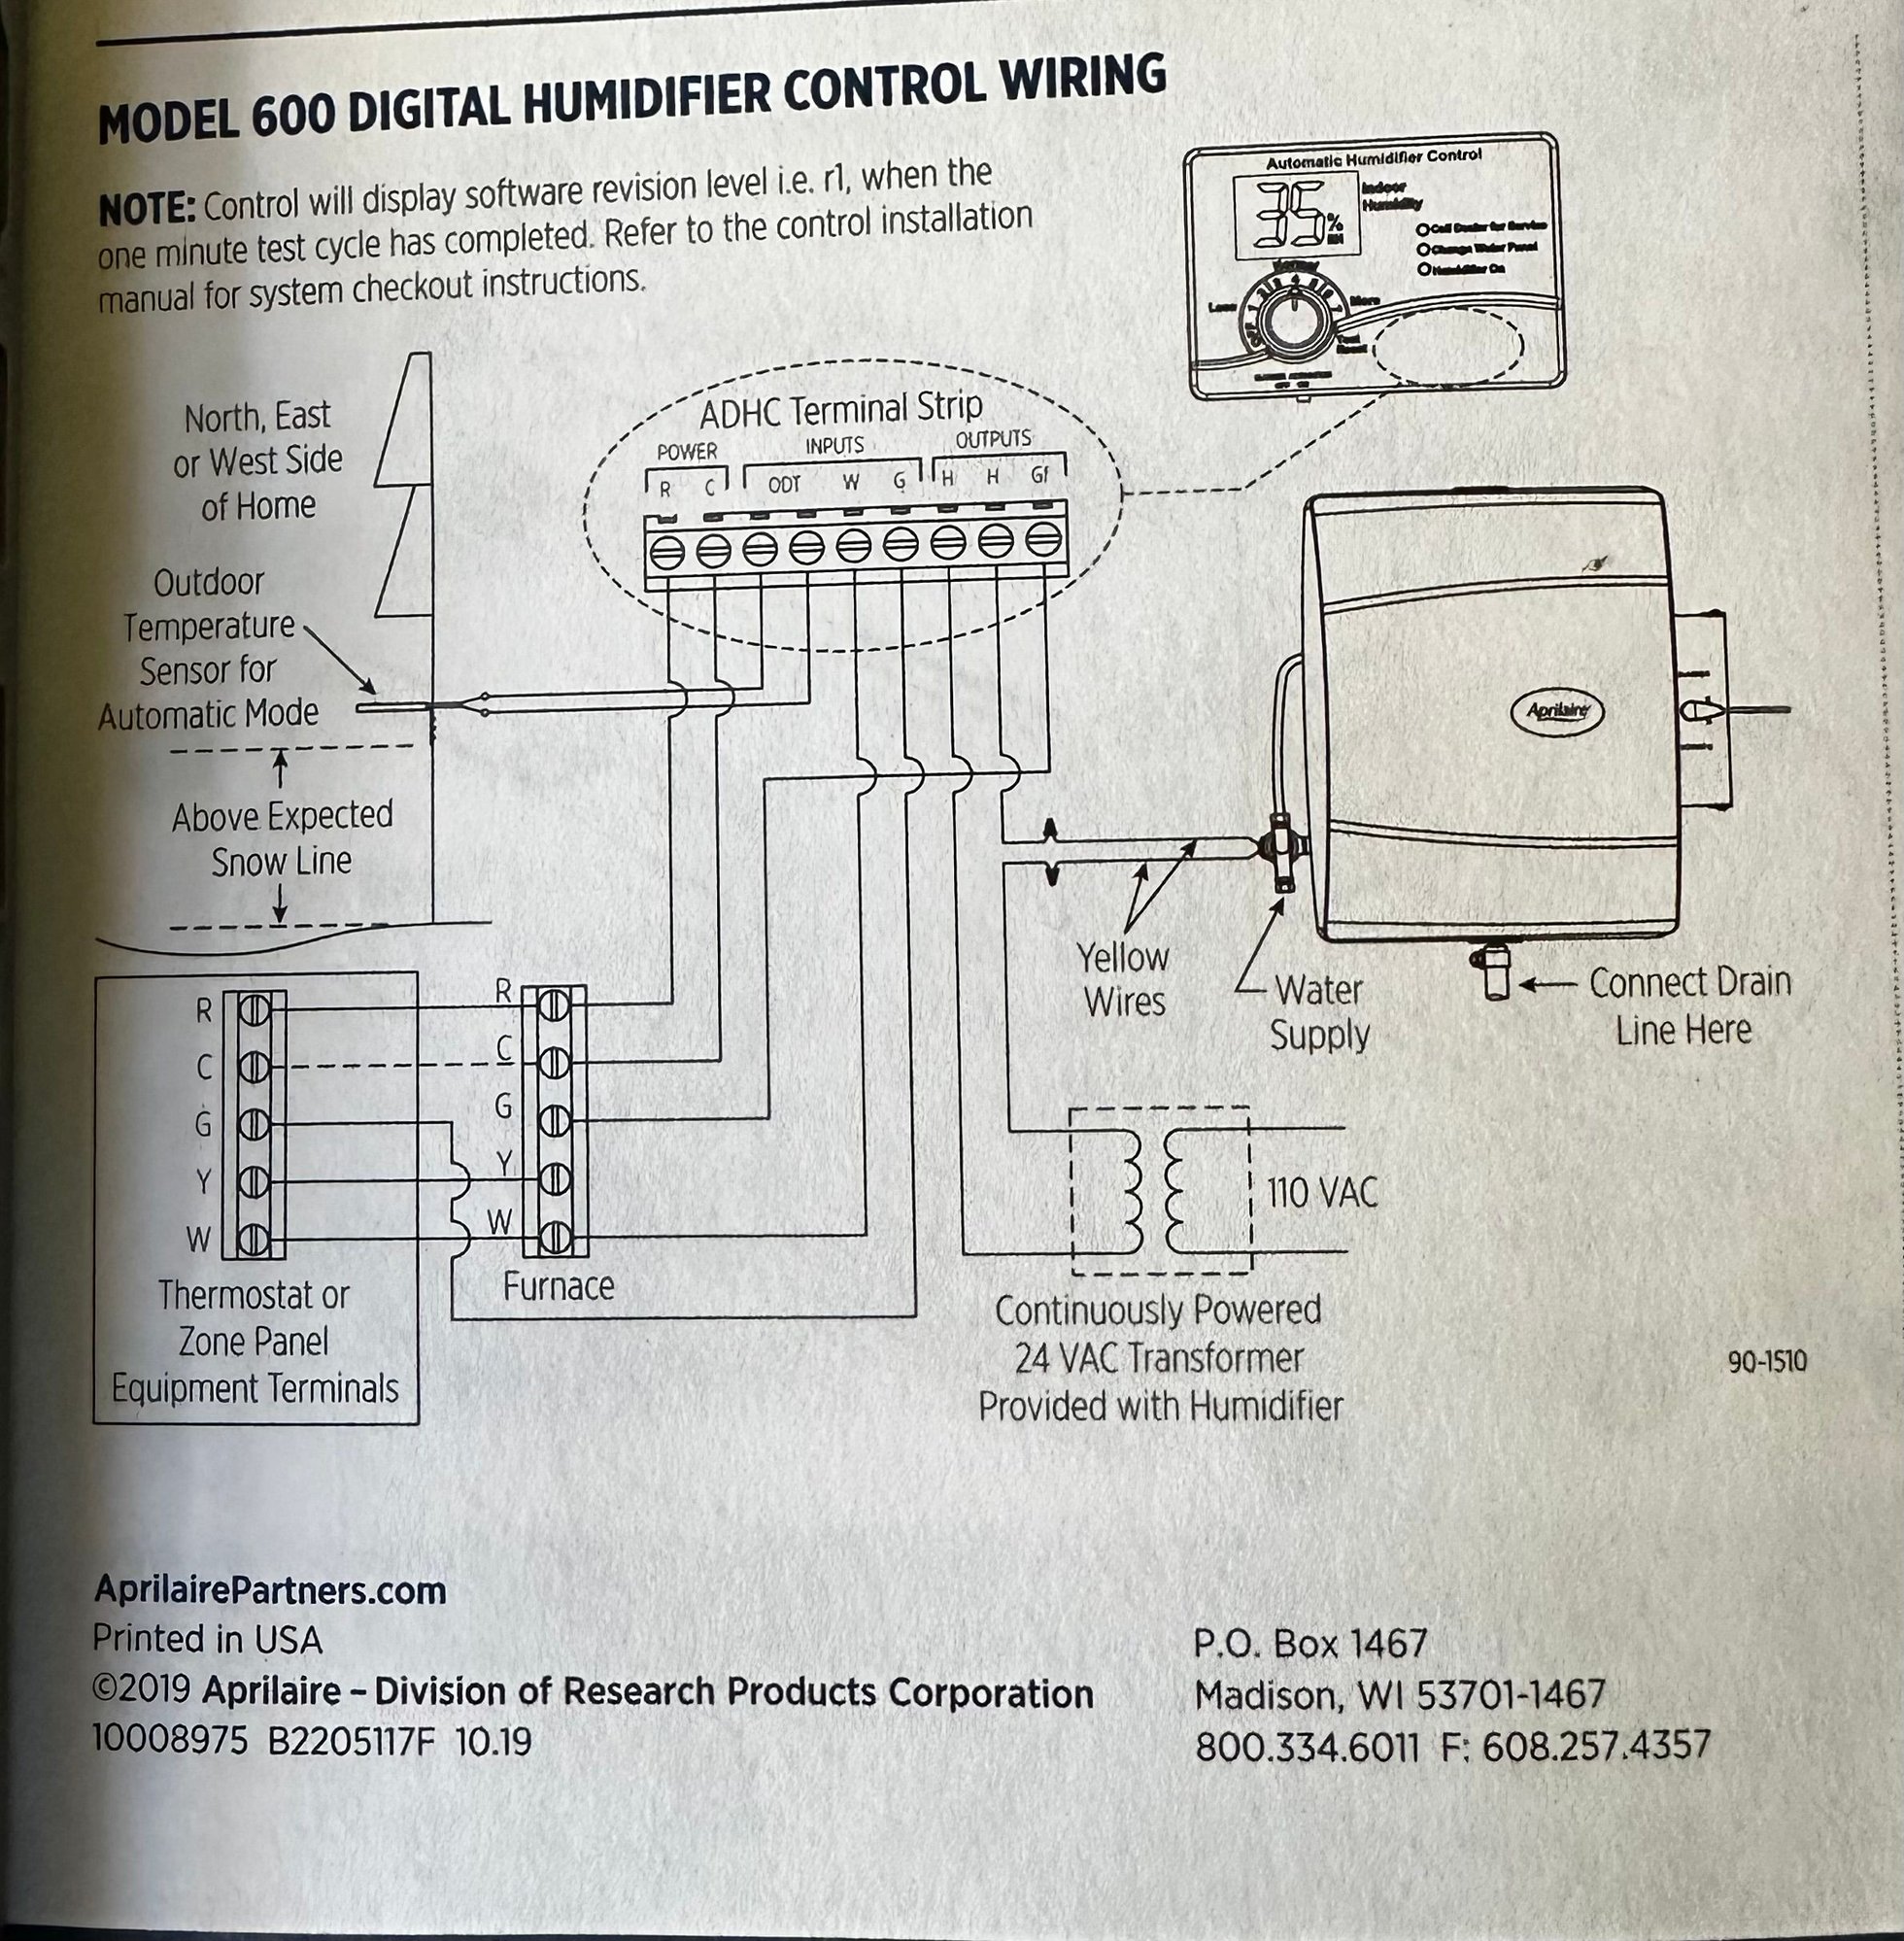
1. Locate humidistat control wires
2. With furnace running, briefly touch wires together
3. Water should flow immediately if solenoid is functional
If water flows during this wire shorting test, your humidistat has failed. For digital models, verify the display remains active even when the furnace is off—blank screens indicate power supply issues upstream.
Transformer Voltage Checks Under Real Load
Measuring voltage at the solenoid valve requires testing under actual operating load, not just open-circuit readings. Disconnecting wires gives false positives—your multimeter might show 24V with no load, but voltage collapses to zero under real conditions.
Correct testing sequence:
1. Measure 24VAC at transformer output (with humidistat calling)
2. Check voltage at humidistat output terminals
3. Verify 24VAC across solenoid terminals while connected
Zero volts at the solenoid with closed humidistat contacts indicates wiring failure or transformer issues—not solenoid problems.
Model-Specific Distribution System Fixes

Level Your Water Tray to Fix Dry Panel Spots
Bypass models (600/600M) develop “no water” symptoms when the distribution tray tilts even slightly. This causes uneven water flow across the panel—dry spots mimic complete water failure. During test mode, water must emerge from every tray orifice across the full panel width.
Tray leveling procedure:
– Loosen mounting screws while observing water flow
– Adjust until water streams evenly from all distribution holes
– Tighten screws incrementally while verifying coverage
This simple alignment fix resolves 30% of reported “no water” cases where the solenoid and supply are actually functional.
Drum Unit Float Mechanism Failure Signs
Drum-style humidifiers rely on a float to regulate water intake. If the float sticks in the “up” position, it falsely signals a full tray and blocks water entry. Physical inspection reveals:
– Debris binding the float in guide tracks
– Cracks compromising buoyancy
– Corrosion preventing free movement
Any visible damage requires immediate float replacement—attempted repairs fail within days due to constant water exposure.
Step-by-Step Repair Protocol

Phase 1: 5-Minute Rapid Diagnosis
- Check actual humidity: Use a digital hygrometer—above 45% RH means your unit correctly inhibits operation
- Listen for solenoid click: Rotate humidistat to max setting with furnace running
- Touch water panel: Should feel damp within 5 minutes of furnace startup
Phase 2: Electrical Verification (10 Minutes)
- Measure 24VAC across solenoid terminals during operation
- Critical: Test with wires connected (open-circuit readings mislead)
- If zero volts, confirm humidistat contact closure via wire shorting test
- Check transformer output under load if humidistat tests functional
Phase 3: Hydraulic Testing (15 Minutes)
- Close saddle valve and disconnect water line at humidifier
- Open saddle valve—strong steady stream confirms good supply
- Reconnect line and activate test mode—water should flow immediately
- No flow with proper voltage? Replace solenoid valve
Component Replacement Essentials
Solenoid Valve Installation Mistakes to Avoid
- Flow direction error: Arrow on valve body must point toward humidifier
- Overtightening: Hand-tight plus 1/4 turn on compression fittings only
- Electrical mismatch: Verify 24VAC coil rating matches your system
Humidistat Upgrade Tips
Duct-mounted models (884021BS) require continuous 24VAC power—not just furnace signal. New units ship preset at 35% RH; adjust based on your climate. Mount minimum 6 inches upstream of the humidifier on the return air duct for accurate readings.
Saddle Valve Replacement Benefits
Upgrading to a full-port ball valve eliminates future flow restrictions. Professional brazing creates a permanent copper connection that won’t leak like compression fittings. Most importantly, it allows complete humidifier servicing without disrupting your entire home’s water supply.
Post-Repair Verification Checklist
Don’t assume success—verify with these critical checks:
– Run furnace 30 minutes at max humidistat setting
– Track 24-hour water consumption (3-6 gallons indicates proper operation)
– Monitor indoor RH for 72 hours to confirm automatic cycling
– Confirm water panel dries completely between cycles
Avoid These Costly Misdiagnosis Traps
- “New solenoid didn’t fix it”: Usually upstream electrical failure, not valve defect
- “24V measured but no click”: Voltage must be tested under actual load
- “Only works in test mode”: Normal behavior when indoor humidity exceeds setpoint
- “Intermittent operation”: 95% saddle valve restriction—not electrical issues
Seasonal Maintenance Prevention
Monthly during heating season:
– Visually confirm water panel dampness after furnace startup
– Listen for solenoid click activation
– Verify humidistat response to dial adjustments
Fall startup routine:
– Replace water panel annually
– Test saddle valve operation
– Run full system verification before temperatures drop
Pro tip: Keep spare solenoid valve and humidistat on hand—they’re the two most common failure points. With these components stocked, you’ll fix 80% of “no water” issues in under 30 minutes when problems arise.
Quick Success Summary: Start with the 5-minute rapid diagnosis—most Aprilaire humidifier not getting water cases resolve with saddle valve replacement or humidistat repair. Solenoid valves rarely fail before 8 years of service. Document your voltage readings and symptom patterns using the diagnostic matrix above to eliminate guesswork. Within an hour, you’ll restore that essential winter moisture to your home without calling a technician.


