
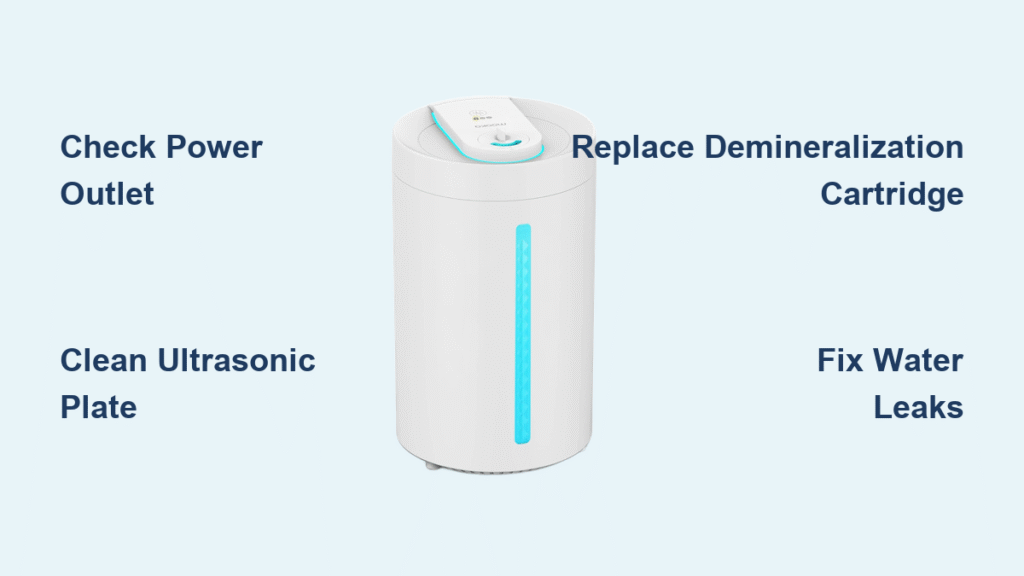
Your Mooka humidifier sits silent on the nightstand, the air remains dry, and that persistent cough won’t quit. Sound familiar? When your trusty humidifier stops working, it feels like your comfort zone just collapsed. Whether it’s refusing to turn on, producing no mist, or making concerning noises, you’re not alone—humidifier issues strike at the worst possible times. The good news? Most Mooka humidifier problems have straightforward solutions you can tackle without calling for service. This guide walks you through every common failure point, from power issues to mist problems, with step-by-step fixes that actually work. You’ll save time, money, and get back to breathing comfortably in under an hour.
Identify Your Mooka Model Symptoms Before Troubleshooting
Mooka humidifiers typically fail in predictable patterns. Recognizing your specific symptoms speeds up diagnosis significantly and prevents wasted effort on irrelevant fixes. Before you start disassembling components, take 5 minutes to document exactly what’s happening with your unit. This targeted approach saves you from cleaning parts that aren’t causing your specific issue.
Common failure patterns that pinpoint your problem:
– Complete silence – No power, no lights, no response even when plugged in
– Power without mist – Lights on, fan running, but zero moisture output after 2 minutes
– Intermittent operation – Works sometimes, randomly shuts off after 10-15 minutes
– Strange noises – Grinding, clicking, or high-pitched squeals during operation
– Water leaks – Puddles forming under the unit within 30 minutes of starting
No Power Response Issues That Block All Operation
When your Mooka shows zero signs of life, the problem usually traces back to electrical supply or internal safety switches. Most users waste time cleaning components when the issue is simply a tripped circuit breaker or faulty outlet. Start your diagnosis here before moving to more complex possibilities. Check if other devices work in the same outlet—this simple test eliminates 40% of “dead humidifier” cases immediately. If the unit worked yesterday but not today, focus on power supply issues first rather than internal components.
Mist Production Failures Despite Power
Units that power up but produce no mist often suffer from mineral buildup, clogged filters, or water level sensor problems. This is the most common Mooka humidifier issue, especially in hard water areas. When you see lights on but no mist after 2 minutes of operation, your ultrasonic plate or water sensors need attention. Don’t assume the entire unit is broken—9 times out of 10, a thorough cleaning solves this problem completely. Pay special attention to the small sensors inside the water tank cavity; these tiny components often get coated with mineral deposits that trick your humidifier into thinking the tank is empty.
Automatic Shutoff Problems That Disrupt Operation
Frequent, unexpected shutdowns typically indicate water level issues, overheating protection, or sensor malfunctions. If your Mooka runs for 10 minutes then shuts off, check the float switch mechanism first. This small plastic component rises with the water level and triggers operation. When it gets stuck or coated with minerals, your humidifier thinks the water is gone when it’s actually full. These intermittent issues are frustrating because they seem random, but they almost always trace back to one of three specific components that you can clean or adjust in under 15 minutes.
Power Supply Troubleshooting That Fixes Dead Units
Test Outlet and Adapter Like a Professional
Start with the simplest fix first—power supply issues cause 40% of “dead” humidifiers. Many users immediately assume internal failure when the problem is actually with the electrical supply. Grab your phone charger or lamp and test the same outlet—this takes 10 seconds and could save you hours of unnecessary work. If other devices work in the outlet, inspect Mooka’s power adapter for LED indicators that show it’s receiving power. Try the unit in a different room’s outlet to rule out circuit breaker issues. Finally, examine the adapter cord for any kinks or damage near the plug ends—these often develop hairline cracks that break the electrical connection.
Adapter replacement indicators you shouldn’t ignore:
– No LED light on adapter when plugged into working outlet
– Adapter feels unusually hot to the touch after 5 minutes
– Visible fraying or damage to cord near plug connections
– Intermittent power when gently wiggling the cord at connection points
Reset Internal Safety Switches Properly
Mooka humidifiers include multiple safety mechanisms that can trip during normal operation. These aren’t malfunctions—they’re designed to protect your unit from damage. When safety switches activate, your humidifier appears “dead” but just needs proper resetting. The key is following the exact sequence: unplug for 5 minutes (not 30 seconds), remove the water tank completely, and verify the float switch moves freely before reassembly. Many users skip the 5-minute wait period, which allows capacitors to fully discharge—this is why their “reset” attempts fail. When reinstalling the tank, listen for the distinct click that confirms proper alignment with the base unit.
Clean Mineral Buildup Fast to Restore Mist Production
Hard water kills humidifiers silently. That white, crusty buildup isn’t just ugly—it blocks mist production entirely by coating the ultrasonic plate and water sensors. In areas with hard water, this happens weekly if you’re using tap water. The good news? Vinegar dissolves these deposits safely and effectively without damaging components. Set a reminder to perform this cleaning weekly if you notice reduced mist output between regular cleanings.
Remove Scale from Ultrasonic Plate Without Damage
The ultrasonic plate creates mist through rapid vibration. Mineral deposits stop this cold by adding weight and creating uneven surfaces. Never use metal tools or abrasive cleaners on this delicate component—scratches will ruin its functionality. Instead, empty the tank completely and mix equal parts white vinegar and water. Fill the tank 1/4 full with solution and let it sit for exactly 30 minutes (set a timer). Then use a soft-bristled toothbrush with gentle circular motions to dislodge deposits. Rinse thoroughly with clean water 3 times to remove all vinegar residue—leftover acid can damage seals over time.
Pro tip: Keep a dedicated spray bottle with 50/50 vinegar solution under your sink. When you notice reduced mist output, spray directly onto the ultrasonic plate through the water fill opening and let sit while you finish other tasks. This targeted approach prevents full shutdowns before they happen.
Clean Water Level Sensors to Prevent False Readings
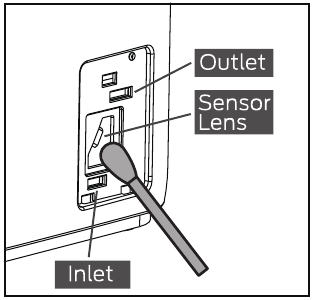
Dirty sensors cause false “empty tank” readings that shut down your humidifier prematurely. These small plastic probes inside the tank cavity develop invisible mineral coatings that block their electrical contact. Using a cotton swab dipped in vinegar, gently clean both sensor tips in circular motions for 20 seconds. For stubborn buildup, let the swab sit on the sensor for 1 minute before wiping. Rinse with clean water using a spray bottle—don’t dunk the base unit. Dry completely with a microfiber cloth before reassembly; moisture on sensors causes immediate operational issues. Test with a small amount of water first to verify proper function before leaving unattended.
Fix No Mist Output Issues When Unit Powers On
When your Mooka runs but produces zero mist, systematic testing reveals the culprit. Start with the simplest explanations first—water quality and basic blockages—before moving to component replacement. Most users jump straight to “my humidifier is broken” when the solution is often as simple as switching to distilled water or clearing a minor obstruction.
Unclog Mist Output Channel Completely
Blockages in the mist pathway stop output completely and often go unnoticed during casual inspection. Remove the mist nozzle or directional spout by twisting counter-clockwise. Run warm tap water through it for 30 seconds while gently squeezing the flexible tubing. For stubborn mineral deposits, insert a pipe cleaner and rotate slowly—never force it as this can damage internal channels. Check the internal fan blades through the mist outlet; accumulated dust here reduces airflow significantly. Reassemble and test with the unit on its highest setting for 5 minutes before declaring success.
Replace Demineralization Cartridge Before Damage Occurs
Old cartridges restrict water flow and reduce mist quality, often mistaken for major component failure. Mooka cartridges should be replaced every 60 days in hard water areas, not the 90 days some manuals suggest. When your cartridge turns dark gray or develops white crystalline deposits, replace it immediately. The white dust appearing around your unit is a dead giveaway—you’re dispersing minerals into your air instead of clean mist. Install the new cartridge by soaking it in distilled water for 5 minutes first, which activates the filtering media and prevents initial dry operation damage.
Stop Water Leaks Immediately With Permanent Fixes
Leaks typically stem from three sources: tank cracks, seal failures, or overfilling. Temporary fixes like tape might stop the drip but create bigger problems later. Address the root cause properly to prevent water damage to your floors or electrical hazards. Most leaks develop gradually, so catching them early prevents costly repairs down the line.
Seal Replacement Guide for Long-Term Solutions
Rubber seals harden and crack over time from constant water exposure and cleaning chemicals. When replacing seals, never use standard rubber washers—food-grade silicone is required for safety and longevity. Measure both inner and outer diameters with calipers for exact replacement. Apply a tiny amount of food-safe mineral oil to new seals before installation to ensure proper seating and prevent premature drying. The tank cap gasket is the most common failure point—replace this every 6 months as preventive maintenance even if no leaks are visible yet.
Prevent Overfilling Issues That Cause Hidden Damage
Overfilling causes immediate leaks and long-term damage to internal components. Many users fill to the very top of the “max” line, not realizing thermal expansion creates overflow during operation. Always leave a 1/2 inch air gap at the top—this small space prevents 95% of overflow incidents. Wipe the tank threads clean with a dry cloth before capping to ensure a proper seal. After filling, gently shake the tank over the sink for 10 seconds to check for hidden leaks at the cap seal. If you notice moisture here, tighten the cap slightly and repeat the test.
Reset and Maintenance Schedule That Prevents Future Failures
Factory Reset Process for Electronic Glitches
Complete resets solve persistent electronic glitches that regular troubleshooting can’t fix. This isn’t just “unplugging and plugging back in”—it requires a specific sequence to clear the control board’s memory. Start by unplugging the unit for exactly 5 minutes (use your phone timer). Hold the power button while plugging back in, and continue holding for 10 seconds after power connection. Release when all indicator lights flash in sequence, then reconfigure your settings. This process resets safety timers, sensor calibrations, and operational parameters to factory defaults—often solving mysterious intermittent issues.
Prevent Future Failures With Strategic Maintenance
Consistent maintenance prevents 90% of common issues and doubles your humidifier’s lifespan. Set calendar reminders for both weekly and monthly tasks—don’t rely on memory. Weekly, focus on quick actions that take under 5 minutes: empty and rinse the tank, wipe visible surfaces, and check for immediate problems. Monthly, perform deeper maintenance during a time when you don’t urgently need the humidifier—like during warmer seasons. This is when you replace filters, inspect seals, and do full descaling. Most importantly, keep a log of maintenance dates on the unit itself; this simple habit prevents “I thought I cleaned it last week” confusion that leads to buildup problems.
Your Mooka humidifier should now be back to normal operation. Remember: prevention beats cure every time. Set a monthly reminder for cleaning, use distilled water when possible, and address small issues before they become major failures. With proper care, your humidifier will provide years of comfortable, healthy air. When in doubt about any repair step, consult Mooka’s official support channels—they often have model-specific videos that clarify complex procedures. Don’t let a temporary malfunction disrupt your comfort; armed with these proven fixes, you’re now equipped to handle nearly any Mooka humidifier issue that arises.


