Running your baby’s humidifier shouldn’t feel like rocket science, yet many parents struggle with setup, safety concerns, and maintenance questions. Whether you’re fighting dry winter air or managing your little one’s stuffy nose, getting your Safety First humidifier running correctly the first time saves precious sleep for everyone. This comprehensive guide walks you through every step—from unboxing to troubleshooting—so you can create the perfect nursery environment without the guesswork. Learn exactly how to use Safety First humidifier units safely and effectively to protect your infant’s delicate respiratory system.
Unbox and Assemble Your Humidifier
Verify All Components Immediately
Open your Safety First box carefully and confirm you have every critical component before assembly. Your kit must include the main base unit, water tank with cap, mist nozzle or directional spout, power cord and adapter, and the small cleaning brush. Filtered models will contain a filter assembly, while all units come with the user manual and warranty card. Missing parts? Contact Safety First immediately—never operate with incomplete components.
Pro tip: Keep the original box for seasonal storage—it’s perfectly sized to protect your investment from dust and damage during off-seasons.
Essential Pre-Use Cleaning Protocol
Before your baby inhales the first breath of humidified air, complete these non-negotiable prep steps. Wash all removable parts (tank, nozzle, filter) with mild baby soap and warm water—never submerge the electrical base. Rinse each component until water runs crystal clear to eliminate manufacturing residues that could irritate tiny lungs. Air-dry everything on a clean towel for 30+ minutes. For filtered models, pre-soak the filter for 15 minutes in cool water per manual instructions. Finally, choose placement on a flat dresser top at least 3 feet from the crib and 6 inches from walls to prevent moisture damage.
Fill Water Tank Correctly

Water Quality Safety Rules
Your choice of water directly impacts both air quality and humidifier lifespan. Always use cool, distilled or filtered water in your Safety First unit. Tap water contains minerals that create harmful white dust—dangerous for developing lungs—and rapidly gunk up internal components. Never add hot water (damages ultrasonic plate), essential oils (clogs mechanisms), Vicks, medications, or any additives unless explicitly specified by Safety First.
Precision Filling Procedure
Follow this exact sequence to avoid leaks and ensure proper operation: Lift the tank straight up from the base—no twisting. Unscrew the bottom cap counterclockwise. Fill only to the max line visible inside (overfilling causes dangerous leaks). Hand-tighten the cap firmly but don’t over-tighten and crack the seal. Flip the tank and replace it on the base, pressing down until you hear a secure click. Wait 2-3 minutes for water to flow into the base before powering on—rushing this step causes dry operation damage.
Power On and Set Controls
Baby-Safe Operation Sequence
Getting therapeutic mist flowing takes just moments when you follow this sequence: Plug directly into a wall outlet (avoid extension cords near cribs). Press the power button—most units illuminate with a blue light when active. Cycle through settings using the same button (Low → Medium → High). Immediately rotate the nozzle to direct mist away from the crib and electronics toward the room’s center. Never leave unattended during initial operation.
Control Panel Decoding Guide
Standard single-button models use color-coded safety indicators: Red (off), Blue (low mist—8-12 hour runtime), Green (medium—6-8 hours), White (high—4-6 hours). Advanced models add critical features like variable dials for precise moisture control, humidity sensors that auto-maintain 45% levels, and timer settings for worry-free overnight operation. Consult your specific manual—never guess at control functions.
Pediatrician-Approved Settings
Newborns to 6 months: Run on low or medium to maintain 45-50% humidity—higher levels risk mold growth. 6+ months: Use medium or high for larger rooms (up to 400 sq ft), targeting 40-50% humidity. During illness: Temporarily increase one setting level for congestion relief but return to standard settings within 48 hours. Always pair with a digital hygrometer to verify actual room humidity.
Safety First Safety Features
Built-In Infant Protection Systems
Safety First humidifiers include multiple safeguards engineered specifically for nurseries: Automatic shut-off triggers when water runs out—eliminating overheating risks. Cool mist technology prevents burn hazards from hot steam. Tip-over protection instantly cuts power if knocked over. BPA-free plastics line all water-contact areas. UL safety certification guarantees continuous overnight operation without electrical hazards.
Non-Negotiable Child Safety Setup
Create an impenetrable safety zone: Secure placement on stable, elevated surfaces only—never dressers with drawers. Route cords away from crib using cord shorteners to prevent strangulation risks. Supervise operation daily during the first week to observe patterns. Empty the tank completely each morning to prevent bacterial growth. Never allow toddlers access to controls or water—these units are not toys.
Daily and Weekly Maintenance
2-Minute Daily Safety Routine
Integrate this into your morning nursery reset: Power off and unplug completely. Empty the tank into the sink—never let water sit stagnant overnight. Rinse tank and base with clean water only (no soap). Wipe exterior with a damp cloth. Air-dry components before evening refill. This prevents 95% of bacterial contamination issues.
15-Minute Weekly Deep Clean
Tank deep clean: Fill with 1 cup white vinegar plus 2 cups water. Shake gently and soak 30 minutes. Scrub interior with the included brush. Rinse until vinegar smell disappears. Air dry 24 hours before reuse. Base cleaning: Unplug and empty. Wipe interior with 50/50 vinegar solution. Clean the ultrasonic plate with a vinegar-dipped cotton swab. Rinse base (avoid electrical parts). Dry thoroughly—moisture near electronics causes permanent damage.
Fix Common Problems Fast
When Humidifier Won’t Start
Execute this diagnostic checklist: Verify power cord connections at both ends. Confirm water tank clicks into place (listen for the seal). Check minimum water level (1/4 tank required). Test the wall outlet with a phone charger. Wait 5 minutes after unplugging—some models require reset time. If unresolved, consult your model-specific manual before contacting support.
Solving Low Mist Output
Boost moisture production immediately: Turn mist level up one setting. Refill if water drops below 25%. Clean the ultrasonic plate with vinegar solution—mineral buildup is the #1 cause. Ensure room temperature stays between 65-75°F (cold air reduces mist visibility). Clear furniture blockages from the mist pathway—obstructions cut output by 50%.
Stop White Dust Formation
Eliminate harmful residue: Switch exclusively to distilled water—this solves 90% of cases. Clean the unit every 3-4 days in hard water areas. Replace demineralization cartridges (filter-free models) every 20-30 uses. Inspect for hairline tank cracks monthly. Install a water softener if tap water exceeds 180 ppm hardness.
Prevent Leaks and Drips
Stop water damage permanently: Hand-tighten tank caps only—over-tightening cracks seals. Inspect tanks monthly for hairline fractures. Ensure tanks sit flush on bases without gaps. Empty base condensation daily. Never exceed the max fill line—overfilling causes 70% of leaks.
Seasonal Usage Guide
Winter Operation Protocols
Cold months demand enhanced vigilance: Increase cleaning to every 3-4 days due to extended runtime. Monitor humidity hourly—winter furnace use creates extreme dryness. Run higher settings as needed but maintain 40-50% maximum. Check for freezing if used in unheated areas like basements—ice damage voids warranties.
Summer Storage Preparation
When humidity rises naturally: Deep clean using the weekly procedure. Dry all components for 48 hours in a ventilated area. Remove and discard filters (if equipped). Store in original packaging in a climate-controlled closet. Never use garages or storage units—extreme temperatures warp components.
Model-Specific Quick Reference
Safety First 360° Cool Mist
Ideal for: Large nurseries up to 400 sq ft
Critical specs: 1.5-gallon capacity (24-hour runtime on low), rotating nozzle, BPA-free plastics. Pro tip: Position nozzle toward room corners for even distribution in spacious rooms.
Safety First Filter-Free
Ideal for: Low-maintenance parents
Critical specs: 1.2-gallon tank (20-hour runtime), demineralization cartridge instead of filters, quieter operation. Pro tip: Replace cartridges every 20-30 uses—ignore this and white dust appears.
Safety First Smart Humidity
Ideal for: Precision-focused parents
Critical specs: 1.0-gallon tank (16-hour max), digital humidity display, auto-maintains 45% levels. Pro tip: Place hygrometer 3 feet from unit for accurate readings—wall placement gives false lows.
Professional Usage Guidelines
Pediatrician Safety Recommendations
Follow these evidence-based protocols: Maintain 45-50% humidity for newborns to 6 months. During respiratory illnesses, temporarily boost to 50-55% but revert within 48 hours. For asthma concerns, consult your pediatrician before adjusting settings—improper humidity worsens symptoms. During allergy seasons, increase cleaning frequency to every 3 days to prevent irritant buildup.
HVAC Integration Strategies
Optimize whole-home comfort: Never place units near HVAC vents—airflow interference reduces effectiveness by 60%. Disable central humidification if running nursery units to prevent over-humidification. Reduce settings by one level when home HVAC adds moisture. For persistent issues, request a professional humidity assessment—many problems stem from whole-home imbalances.
Replacement Schedule Cheat Sheet
Critical Replacement Timelines
Filtered models: Replace filters every 30-45 days. Rinse pre-filters weekly to extend life. All models: Demineralization cartridges (filter-free) every 20-30 uses. Cleaning brushes annually. Water tank caps immediately if seals crack. Never exceed these intervals—worn parts compromise safety.
Authentic Parts Sourcing
Only use Safety First OEM parts: Filters are model-specific (sold in 2-packs). Demineralization cartridges match filter-free models. Cleaning brushes and caps have unique safety designs. Avoid generics—they void warranties and cause leaks. Purchase exclusively through Safety First’s website or authorized retailers to guarantee compatibility.
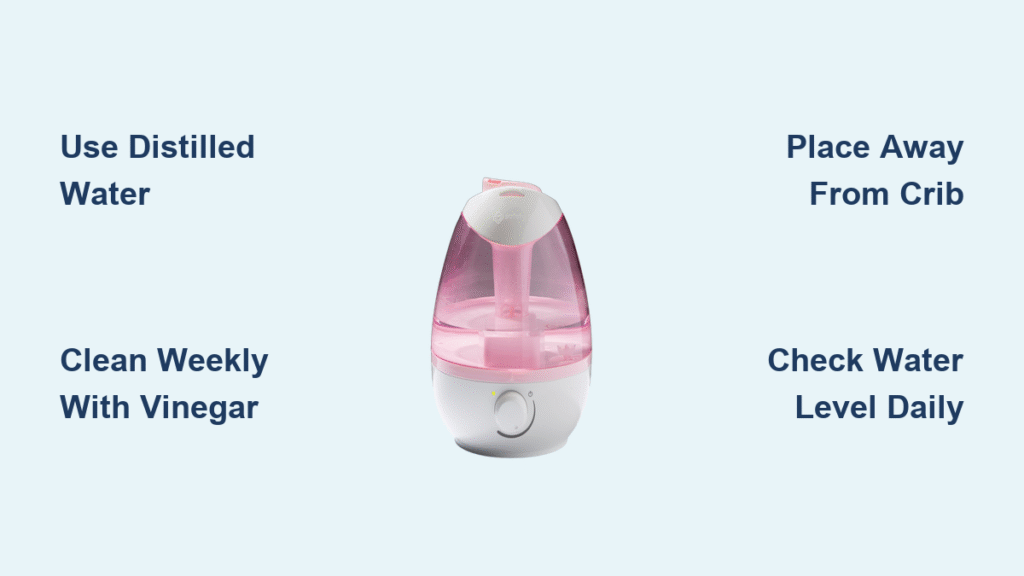
Key Takeaway: Mastering how to use Safety First humidifier units requires three non-negotiable actions—use distilled water daily, clean weekly with vinegar, and maintain strict placement safety. These pediatrician-approved devices deliver worry-free operation when you follow model-specific protocols, ensuring your baby breathes clean, optimally humidified air all night. Remember: consistent 40-50% humidity prevents dry nasal passages, reduces illness severity, and promotes deeper sleep—making proper humidifier use one of your simplest yet most powerful parenting tools. Always keep your manual accessible and contact Safety First support for model-specific questions before troubleshooting.