
Is your home feeling stuffy, or are you battling seasonal allergies? You might be considering an air purifier, but they can be expensive. Did you know you can significantly improve your air quality with something you likely already have – a box fan? This simple DIY hack transforms a standard box fan into a surprisingly effective air purifier, offering quick relief from dust, pollen, and even odors.
This guide will walk you through everything you need to know to create your own DIY air purifier. We’ll cover the materials required, step-by-step instructions, different filter options, and even how to optimize your setup for maximum effectiveness. By the end of this article, you’ll have a cost-effective solution for cleaner, fresher air in your home.
What You’ll Need for a DIY Fan Air Purifier
| Item | Quantity | Specifications |
|---|---|---|
| Box Fan | 1 | 20-inch standard box fan recommended |
| MERV 13 Filter | 1-2 | 20x20x1 inch (or sized to fit fan) |
| Bungee Cords or Duct Tape | As needed | For securing the filter to the fan |
| Optional: Pre-Filter | 1 | Washable furnace filter or cheesecloth |
| Safety Glasses | 1 | Recommended for handling filters |
| Gloves | 1 Pair | Optional, for handling filters |
Step-by-Step: Building Your DIY Air Purifier

Phase 1: Preparation
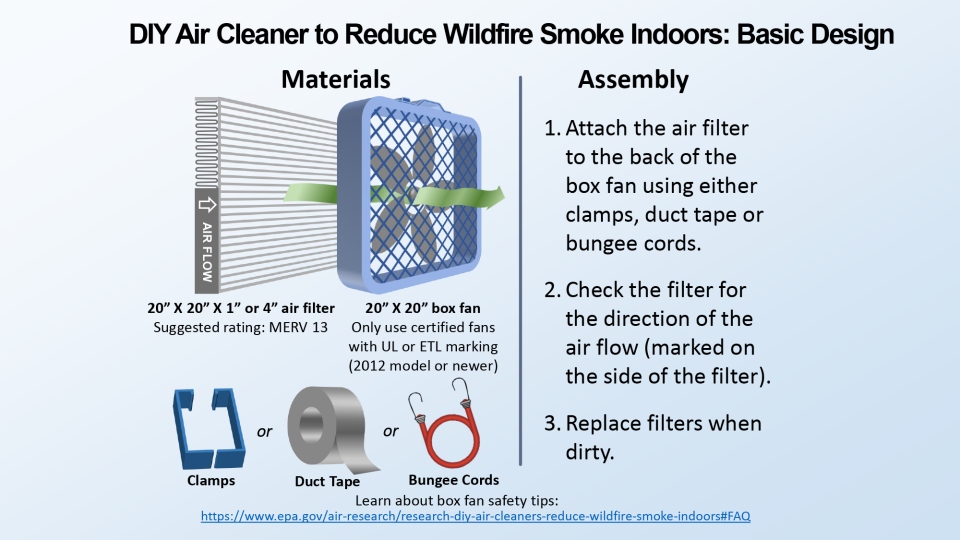
- Safety First: Before you begin, unplug the box fan from the power outlet. This is crucial to prevent electric shock. Consider wearing safety glasses and gloves, especially if you’re sensitive to dust or filter materials.
- Filter Selection: MERV 13 filters are recommended. These filters capture a high percentage of airborne particles, including dust, pollen, pet dander, mold spores, and even some viruses. Higher MERV ratings (14-16) offer even better filtration, but may reduce airflow. Avoid fiberglass filters, as they can release small particles into the air.
- Fan Inspection: Check your box fan for any damage. Ensure the grill is secure and free of obstructions.
Phase 2: Filter Attachment
- Filter Orientation: Identify the airflow direction on your filter (usually indicated by an arrow). The arrow should point towards the fan, meaning the air will pass through the filter before entering the fan.
- Secure the Filter: There are two primary methods for attaching the filter:
- Bungee Cords: Position the filter against the intake side (back) of the fan. Use bungee cords to securely fasten the filter to the fan grill. Wrap the cords around the filter and fan frame, ensuring a snug fit.
- Duct Tape: Carefully apply duct tape around the edges of the filter and the fan frame. Ensure a complete seal to prevent air from bypassing the filter. Note: Duct tape can leave residue, so use sparingly.
- Optional: Pre-Filter: For extended filter life, consider adding a pre-filter. Attach a washable furnace filter or a layer of cheesecloth to the intake side of the MERV 13 filter using tape or clips. This will capture larger particles and prolong the life of the more expensive MERV 13 filter.
Phase 3: Testing & Placement
- Plug It In: Once the filter is securely attached, plug the fan back into the power outlet.
- Power On: Turn the fan on to a medium or high setting. Avoid using the lowest setting, as it may not provide sufficient airflow through the filter.
- Airflow Check: Feel around the edges of the filter to ensure air is being drawn through the filter, not around it. If air is bypassing the filter, reinforce the seal with more bungee cords or tape.
- Placement: Position the fan air purifier in a central location in the room you want to purify. Avoid placing it directly against a wall or in a corner, as this can restrict airflow.
Common Causes of Reduced Air Purification Effectiveness
- Poor Filter Seal: Air bypassing the filter significantly reduces its effectiveness. Ensure a tight seal using bungee cords or tape.
- Low Airflow: Using a low fan setting or a filter with a very high MERV rating can restrict airflow, decreasing purification.
- Dirty Filter: A clogged filter reduces airflow and purification efficiency. Regularly inspect and replace the filter.
- Incorrect Filter Orientation: Installing the filter with the airflow arrow pointing in the wrong direction will reduce its effectiveness.
- Room Size: A single fan air purifier may not be sufficient for very large rooms.
How to Maintain Your DIY Air Purifier
- Filter Replacement: Replace the MERV 13 filter every 1-3 months, depending on air quality and usage. Check the filter regularly for visible dirt and dust buildup. A visibly dirty filter needs replacing.
- Pre-Filter Cleaning: If you’re using a pre-filter, wash it every 1-2 weeks or as needed.
- Fan Cleaning: Periodically clean the fan blades and grill to remove dust and debris. Unplug the fan before cleaning.
- Storage: When not in use, store the fan and filter in a clean, dry place.
Pro Tips for Maximizing Performance

- Multiple Units: For larger homes, consider using multiple fan air purifiers.
- Filter Upgrade: Experiment with different MERV ratings to find the best balance between filtration and airflow for your needs.
- Activated Carbon Pre-Filter: Add an activated carbon pre-filter to help remove odors and volatile organic compounds (VOCs).
- Air Circulation: Use the fan to circulate air throughout the room, ensuring even purification.
- Placement is Key: Placing the fan near a source of pollutants (e.g., a pet bed, a doorway) can be particularly effective.
- Run Continuously: For optimal air quality, run the fan air purifier continuously, even when you’re not in the room.
Professional Help Section
While a DIY air purifier is effective, it won’t match the performance of a high-end commercial unit. If you have severe allergies, asthma, or other respiratory problems, or if you’re concerned about very fine particles, consider investing in a professionally manufactured air purifier with a HEPA filter.
- Signs you need a professional unit: Persistent allergy symptoms, difficulty breathing, concerns about mold or VOCs.
- What to look for in an air purifier: HEPA filter, activated carbon filter, CADR rating (Clean Air Delivery Rate).
- Typical cost ranges: $100 – $500+ depending on features and room size.
- Warranty Considerations: Check the manufacturer’s warranty for filter replacements and unit repairs.
FAQ Section
Q: What MERV rating should I use?
A: MERV 13 is a great starting point, offering a good balance of filtration and airflow. Higher ratings (14-16) are better for capturing smaller particles but may restrict airflow.
Q: How often should I change the filter?
A: Every 1-3 months, depending on air quality and usage. Check the filter visually for dirt and dust buildup.
Q: Will this remove odors?
A: A MERV 13 filter will help reduce some odors, but an activated carbon pre-filter is more effective at removing smells and VOCs.
Q: Is this safe to use around pets and children?
A: Yes, as long as the filter is securely attached and the fan is placed in a safe location.
Q: Can I use a different type of fan?
A: While a box fan is most commonly used, you can adapt this method to other fans with a flat intake surface.
Alternative Solutions Section
If you find a fan-based air purifier doesn’t meet your needs, consider these alternatives:
| Solution | Pros | Cons | Best For |
|---|---|---|---|
| HEPA Air Purifier | Superior filtration, quiet operation | More expensive | People with severe allergies or asthma |
| Portable Air Conditioner | Cools and purifies air | Bulky and expensive | Small rooms requiring cooling and purification |
| Houseplants | Natural air purification | Limited effectiveness, requires maintenance | Adding greenery and improving air quality |
Enjoy Your Cleaner Air!
You’ve now successfully transformed a simple box fan into a powerful air purifier! By following these steps and maintaining your DIY unit, you can breathe easier and enjoy cleaner, fresher air in your home.
Remember these key takeaways:
– Use a MERV 13 filter for optimal performance.
– Ensure a tight seal between the filter and the fan.
– Replace the filter regularly for continued effectiveness.
Have you built your own fan air purifier? Share your experience and tips in the comments below!


