
If you’ve noticed your Vax air purifier isn’t performing as effectively as it used to—maybe the air feels stuffier or the unit’s indicator lights are flashing warnings—you’re not alone. A dirty filter is one of the most common culprits behind reduced efficiency in Vax air purifiers, trapping dust, allergens, and pet dander until it clogs up. The good news? Vax air purifier filter cleaning is a straightforward DIY task that can restore peak performance in under 30 minutes with a quick vacuum and gentle wipe-down, giving you fresher air without the hassle of buying replacements right away.
In this comprehensive guide, we’ll go beyond the basics to cover everything you need to know about maintaining your Vax air purifier. From understanding why cleaning is crucial and how often to do it, to a detailed step-by-step process tailored for most Vax models like the Air Total Home or Air Stretch, we’ll equip you with multiple methods for different filter types. By the end, you’ll have the confidence to keep your unit running smoothly, extend its lifespan, and enjoy cleaner indoor air year-round—no more guessing or trial-and-error.
Why Regular Filter Cleaning is Essential for Vax Air Purifiers
Air purifiers like those from Vax are designed to improve indoor air quality by capturing airborne particles, but they rely heavily on their filters to do the heavy lifting. Over time, these filters accumulate dust, pollen, pet hair, and even microscopic pollutants, which can reduce airflow and diminish the unit’s ability to purify effectively. For Vax models, which often feature multi-stage filtration systems including pre-filters and HEPA filters, neglecting cleaning can lead to up to 50% loss in efficiency, according to air quality experts at the EPA. This not only means poorer air quality but also strains the motor, potentially shortening the device’s lifespan and increasing energy costs.
Important: Regular Vax air purifier filter cleaning prevents the buildup of mold or bacteria, which is especially critical if you have allergies, asthma, or live in a high-pollution area. By maintaining your filter, you’re not just fixing a short-term issue—you’re investing in long-term health benefits and cost savings. Skipping this can trigger error codes on your Vax unit or force you into premature filter replacements, which can cost $20–$50 per filter. Think of it as routine car maintenance: a little effort now avoids bigger breakdowns later.
How Often to Clean Your Vax Air Purifier Filter
The cleaning frequency for your Vax air purifier filter depends on usage, environment, and model specifics. High-traffic homes with pets or smokers might need more frequent attention, while lighter use in a clean space can extend intervals. Vax recommends checking filters monthly, but always consult your user manual for model-specific advice—some like the Vax Air Pure 300 have washable pre-filters that tolerate more dirt.
To make it simple, here’s a recommended Vax air purifier filter cleaning schedule based on general guidelines from Vax support and air purification standards:
| Frequency | Task | Duration | Notes |
|---|---|---|---|
| Weekly | Vacuum pre-filter lightly | 5 minutes | Ideal for pet owners or dusty environments; use a soft brush attachment to avoid damage. |
| Monthly | Full clean of pre-filter and inspect HEPA filter | 15-20 minutes | Check for visible dirt; clean if airflow feels reduced. |
| Every 3-6 Months | Deep clean or replace HEPA filter | 30 minutes | HEPA filters in Vax units are often not fully washable—replace if heavily soiled to maintain 99.97% particle capture efficiency. |
| Annually | Professional inspection if in heavy-use settings | Varies | For commercial or allergy-prone homes; ensures no hidden clogs. |
Warning: Over-cleaning with water on non-washable filters can degrade performance, so stick to dry methods unless specified. Track your cleanings in a simple app or calendar to stay consistent—many Vax models have filter life indicators that flash when it’s time.
Complete Filter Cleaning Process
Cleaning your Vax air purifier filter doesn’t require fancy tools or expertise, but following the right steps ensures you don’t void your warranty or damage delicate components. Most Vax air purifiers have a removable pre-filter (washable) and a main HEPA filter (often dry-clean only), so we’ll cover both. Always unplug the unit first for safety, and work in a well-ventilated area. The entire process should take 20-30 minutes.
Step 1: Preparation and Safety
Before diving in, gather your supplies and prepare safely to avoid any mishaps. This phase sets you up for success and protects your health.
- Unplug the unit: Always disconnect from power to prevent electrical hazards. Wait 5 minutes for any residual charge to dissipate.
- Gather tools: You’ll need a soft-bristle brush, vacuum cleaner with upholstery attachment, microfiber cloth, mild dish soap (for washable filters), and lukewarm water. Avoid harsh chemicals like bleach, as they can corrode filter materials.
- Choose your workspace: Lay down newspapers or a towel outdoors or in a garage to contain dust. Wear a mask if you’re sensitive to allergens being stirred up.
- Check your model: Refer to the Vax manual (downloadable from vax.co.uk if lost). For example, the Vax Air Total Home has a snap-out filter tray, while compact models like the Air Pure might require gentle prying.
Safety Tip: If your Vax unit has been running continuously, let it cool down to avoid burns from warm components. Children and pets should stay clear during cleaning.
Step 2: Removing the Filters
Accessing the filters is straightforward on most Vax models, but handle them gently to prevent tears.
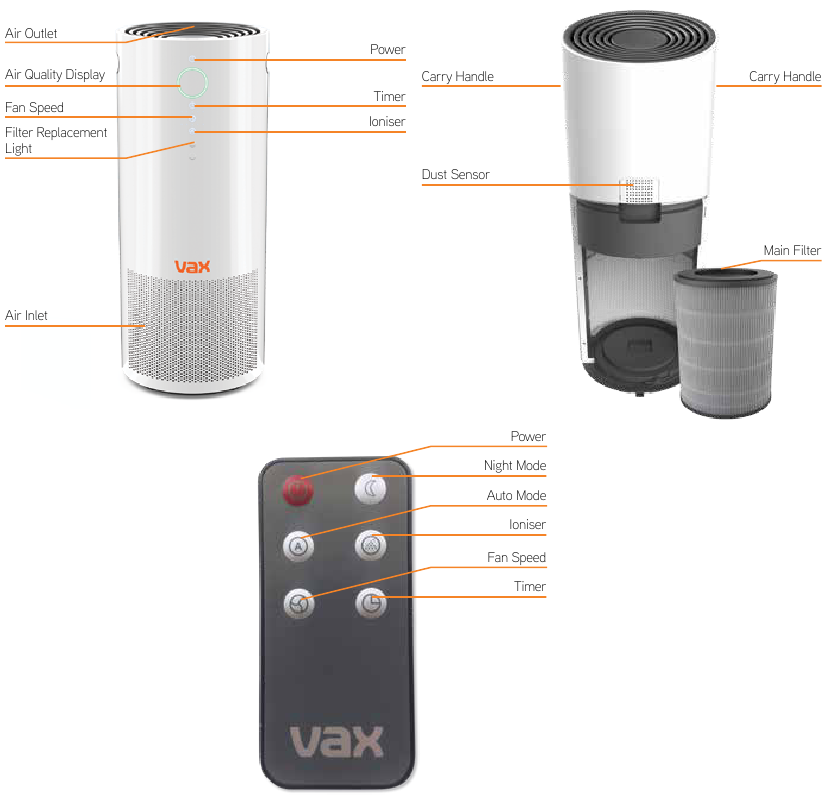
- Locate the filter compartment: On the back or bottom of your Vax air purifier, look for latches or screws. For the Air Stretch model, press the release button on the side.
- Open the panel: Gently pull or twist to remove the cover— it should come off without force. If stuck, check for hidden clips.
- Extract the filters: The pre-filter (often a foam or mesh layer) slides out first, followed by the HEPA filter. Note their order for reassembly. Tap lightly over a trash bin to dislodge loose debris.
- Inspect for damage: Look for tears, excessive discoloration, or odors. If the HEPA filter is over 80% clogged (visible by dark patches), consider replacement instead of cleaning.
This step usually takes 5 minutes. Pro Tip: Take photos of the disassembly for reference if you’re new to your model.
Step 3: Cleaning the Pre-Filter
The pre-filter catches larger particles and is typically washable, making it the easiest part of Vax air purifier filter cleaning.
- Dry method for light cleaning: Use your vacuum’s soft brush attachment to gently suck away dust. Hold the filter at a 45-degree angle and work in short strokes—avoid high suction to prevent pulling fibers.
- Wet method for deeper clean: If washable (check manual), rinse under lukewarm water with a few drops of mild soap. Gently agitate with your fingers or a soft brush, focusing on clogged areas. Never soak or use hot water, as it can shrink the material.
- Rinse and dry: Flush thoroughly until water runs clear, then shake off excess and air-dry on a rack for 24 hours. Do not use a hairdryer or sun-dry, as heat can warp the filter.
- Time estimate: 10 minutes active, plus drying time.
Warning: For non-washable pre-filters (rare in Vax models), stick to vacuuming only. Over-wetting can lead to mold growth if not dried properly.
Step 4: Cleaning the HEPA Filter

HEPA filters in Vax air purifiers are designed for high-efficiency particle capture but are usually not fully washable to preserve their pleated structure. Focus on gentle, dry cleaning.
- Vacuum exterior: Use the lowest suction setting with a crevice tool to remove surface dust from the folds. Go slowly along each pleat— this captures 70-80% of buildup without damage.
- Brush gently: If needed, use a soft paintbrush to loosen stubborn particles, then vacuum again. Avoid compressed air cans, as they can bend the pleats.
- Spot clean if applicable: For minor stains, dab with a dry microfiber cloth. If your Vax model specifies (e.g., some Air Pure variants), a very light mist of water followed by immediate vacuuming can help, but test a small area first.
- Assess replacement need: If the filter feels heavy or airflow doesn’t improve post-clean, it’s time for a new one. Vax HEPA filters last 6-12 months with proper care.
This step takes about 10 minutes. Remember, improper cleaning can reduce HEPA efficiency from 99.97% to as low as 80%, per filtration studies from the American Lung Association.
Step 5: Reassembly and Testing
Putting it all back together ensures your Vax air purifier runs optimally.
- Reinsert filters in reverse order: Secure the HEPA first, then the pre-filter, and snap the cover back on.
- Plug in and power on: Run the unit on a medium fan speed for 10-15 minutes in an empty room to test airflow. Listen for unusual noises and check if indicator lights reset.
- Monitor performance: Place a tissue near the intake—if it pulls strongly, you’re good. If not, repeat vacuuming or consult troubleshooting.
Troubleshooting if issues persist: If airflow remains weak, ensure filters are fully dry and seated correctly. For error codes (e.g., “Filter Dirty” on digital displays), reset via the manual’s instructions.
Pro Tips for Optimal Vax Air Purifier Maintenance
To get the most out of your Vax air purifier filter cleaning routine and beyond, here are expert tips from Vax technicians and air quality pros:
- Customize for your environment: In urban areas with high PM2.5 levels, clean bi-weekly. Use a particle counter app (like those from AirVisual) to monitor when dirt builds up faster.
- Combine with unit wipe-down: While filters are out, vacuum the interior vents and wipe the exterior with a damp cloth to prevent secondary clogs.
- Avoid common mistakes: Don’t use a washing machine for filters—it’ll destroy the structure. Also, never run the purifier without filters installed, as it can damage the fan.
- Optimize placement: Position your Vax unit 1-2 feet from walls for better circulation, reducing filter strain by 20-30%.
- Track filter life: Label your filters with installation dates using a marker for easy replacement reminders.
- Eco-friendly upgrades: Opt for Vax’s reusable pre-filters if available, cutting waste and costs.
- Seasonal deep clean: Before allergy season, do a full teardown clean to preempt issues.
These tweaks can extend filter life by up to 50% and keep your air purifier humming efficiently.
When to Seek Professional Help
While Vax air purifier filter cleaning is DIY-friendly, some situations call for experts to avoid warranty issues or complex repairs.
Signs you need pro help include persistent error lights after cleaning, unusual odors from the unit, or visible motor strain (e.g., loud humming). If your model has integrated smart features like app connectivity that glitch post-clean, it might indicate deeper electrical problems.
Look for certified Vax service centers via their website or authorized dealers—check reviews on Trustpilot for reliability. Expect costs of $50–$150 for a full service, depending on location and model. Vax offers a 2-year warranty on most units, so contact support first if under coverage; they’ll often cover filter assessments. Always provide your serial number for quick diagnostics.
FAQ
Q: Can I wash the HEPA filter in my Vax air purifier?
A: Most Vax HEPA filters are not fully washable to maintain their electrostatic charge and filtration efficiency. Stick to vacuuming and gentle brushing as outlined. If your manual specifies otherwise (e.g., for certain Air Total models), use only lukewarm water and air-dry completely for 24-48 hours. Washing improperly can reduce effectiveness by up to 40%, so err on the side of caution and replace if heavily soiled.
Q: How do I know if my Vax filter needs cleaning or replacing?
A: Check for reduced airflow (tissue test), flashing filter indicators, or visible dirt buildup. Vax units often have a filter reset button or app alerts. If cleaning doesn’t restore performance, replace—HEPA filters typically last 6-12 months in moderate use.
Q: What if my Vax air purifier won’t turn on after cleaning?
A: Ensure filters are dry and properly seated, as moisture can trigger safety shutoffs. Double-check connections and reset the unit by unplugging for 10 minutes. If it persists, it could be a fuse issue—contact Vax support for model-specific troubleshooting.
Q: Are there specific cleaners safe for Vax filters?
A: Use only mild, unscented dish soap diluted in water for washable pre-filters. Avoid vinegar, baking soda, or commercial cleaners, as they can leave residues that attract more dust. For dry cleaning, compressed air is okay in short bursts but not ideal for home use.
Q: How does cleaning affect my Vax warranty?
A: Proper cleaning as per the manual won’t void it, but aggressive methods (e.g., submerging non-washable parts) might. Keep receipts and photos of your maintenance to prove due care if issues arise.
Q: Can I clean the filter while the unit is running?
A: No—always unplug first to avoid injury or damage. Running without filters even briefly can suck in large particles and clog the internal fan.
Q: What’s the difference between pre-filter and HEPA filter cleaning in Vax models?
A: The pre-filter handles larger debris and is often washable for easy rinsing. The HEPA targets fine particles and requires dry vacuuming only to preserve its microscopic pores. Cleaning both ensures comprehensive air purification.
Keep Your Vax Air Purifier Running Smoothly
With this guide, you’ve got all the tools to master Vax air purifier filter cleaning and maintain top-notch performance:
- Essential reasons for regular upkeep and a tailored cleaning schedule
- A foolproof step-by-step process from prep to testing
- Pro tips, FAQs, and when to call in pros for peace of mind
Following these steps will not only revive your unit’s efficiency but also promote healthier air and save you money on replacements. Don’t wait for allergy season to hit—schedule your next clean today and breathe easier.
Have you cleaned your Vax filter before? Share your tips or challenges in the comments below to help fellow readers! If issues linger, describe your model for more tailored advice.


