
If you’ve noticed your Hunter air purifier isn’t performing as effectively as it used to—maybe the air in your home feels stuffier or the device is running louder—it’s likely time to tackle the Hunter air purifier filter cleaning. Dust, pet hair, and allergens can quickly clog the filter, reducing airflow and efficiency, which frustrates anyone relying on it for cleaner indoor air. The good news is that a quick vacuuming and gentle wipe-down can often restore its performance in under 10 minutes, giving you immediate relief without needing to buy a replacement right away.
In this comprehensive guide, we’ll go beyond that basic fix to explore everything you need to know about maintaining your Hunter air purifier. You’ll get step-by-step instructions for a thorough cleaning, tips on frequency to prevent buildup, and pro advice to extend your filter’s life. By the end, you’ll feel confident in keeping your unit running at peak efficiency, ensuring fresher air year-round and avoiding costly repairs or premature replacements.
Why Regular Filter Cleaning is Essential for Hunter Air Purifiers
Hunter air purifiers, like popular models such as the Hunter HP700 or HP750, are designed to capture airborne particles, but their filters—often a combination of pre-filters and HEPA elements—aren’t invincible. Over time, everyday pollutants like pollen, smoke, and cooking odors accumulate, leading to several issues. First, a dirty filter reduces the purifier’s ability to circulate clean air, meaning allergens and dust linger in your space longer than they should. This can exacerbate allergies or respiratory problems, especially in homes with pets or high-traffic areas.
Beyond health concerns, neglecting Hunter air purifier filter cleaning impacts the device’s longevity and energy efficiency. A clogged filter forces the fan to work harder, increasing energy consumption by up to 20-30% according to the EPA’s guidelines on indoor air quality. It can also cause unusual noises, error lights, or even complete shutdowns if the buildup is severe. Regular maintenance not only improves air quality but also saves you money—Hunter recommends cleaning every 1-3 months depending on usage, which can extend filter life from 6 months to over a year. By staying proactive, you’re investing in better performance and a healthier home environment without the hassle of frequent replacements.
How Often to Clean Your Hunter Air Purifier Filter

Determining the right cleaning schedule for your Hunter air purifier filter depends on factors like your home’s size, air quality, and how often the unit runs. Hunter’s official manual for most models suggests checking the filter monthly, but cleaning frequency can vary. In high-pollution areas or homes with smokers/pets, you’ll need to clean more often to maintain optimal airflow and filtration efficiency.
To make it simple, here’s a recommended maintenance schedule based on Hunter’s guidelines and user experiences from sources like the manufacturer’s support site and Consumer Reports. Adjust based on your model’s indicator lights—many Hunter units have a filter reset or change alert.
| Frequency | Task | Duration | Notes |
|---|---|---|---|
| Weekly | Quick vacuum of pre-filter | 5 minutes | Ideal for high-dust environments; prevents minor buildup from escalating. |
| Monthly | Full pre-filter cleaning and HEPA inspection | 15-20 minutes | Standard for average homes; use if no indicator light is present. |
| Every 3 Months | Deep clean of all accessible filters | 30 minutes | For low-usage scenarios; combine with unit wipe-down. |
| Every 6-12 Months | Professional inspection or replacement | Varies | HEPA filters aren’t fully washable; replace if cleaning doesn’t restore performance. |
Important: Always unplug the unit before any cleaning to avoid electrical hazards. If your model has a washable pre-filter (common in Hunter’s QuietFlo series), stick to dry methods only—water can damage the material. Monitoring your local air quality index via apps like AirNow can help you fine-tune this schedule for even better results.
Complete Filter Cleaning Process for Hunter Air Purifiers
Cleaning your Hunter air purifier filter is straightforward and doesn’t require special tools, but following the right steps ensures you don’t damage the components. This process applies to most Hunter models, including the HP series, but always refer to your specific user manual for variations—some filters are partially washable, while others are dry-clean only. Expect the full process to take 20-30 minutes, and do it in a well-ventilated area to avoid inhaling dust.
Step 1: Preparation and Safety Setup
Before diving in, gather your supplies and prepare safely to make the job efficient and risk-free. Start by turning off and unplugging the air purifier to prevent any accidental starts or shocks. Warning: Never clean while the unit is powered on, as this could void your warranty or cause injury.
You’ll need:
– Soft-bristle brush or vacuum with upholstery attachment
– Microfiber cloth or soft towel
– Mild dish soap (for washable pre-filters only)
– Compressed air canister (optional for tight spots)
– Trash bag for debris
Remove the unit from its usual spot and place it on a flat surface covered with a towel to catch any falling dust. If your Hunter model has a front grille, gently press the release tabs to open it—Hunter’s design makes this user-friendly, but avoid forcing it to prevent cracks.
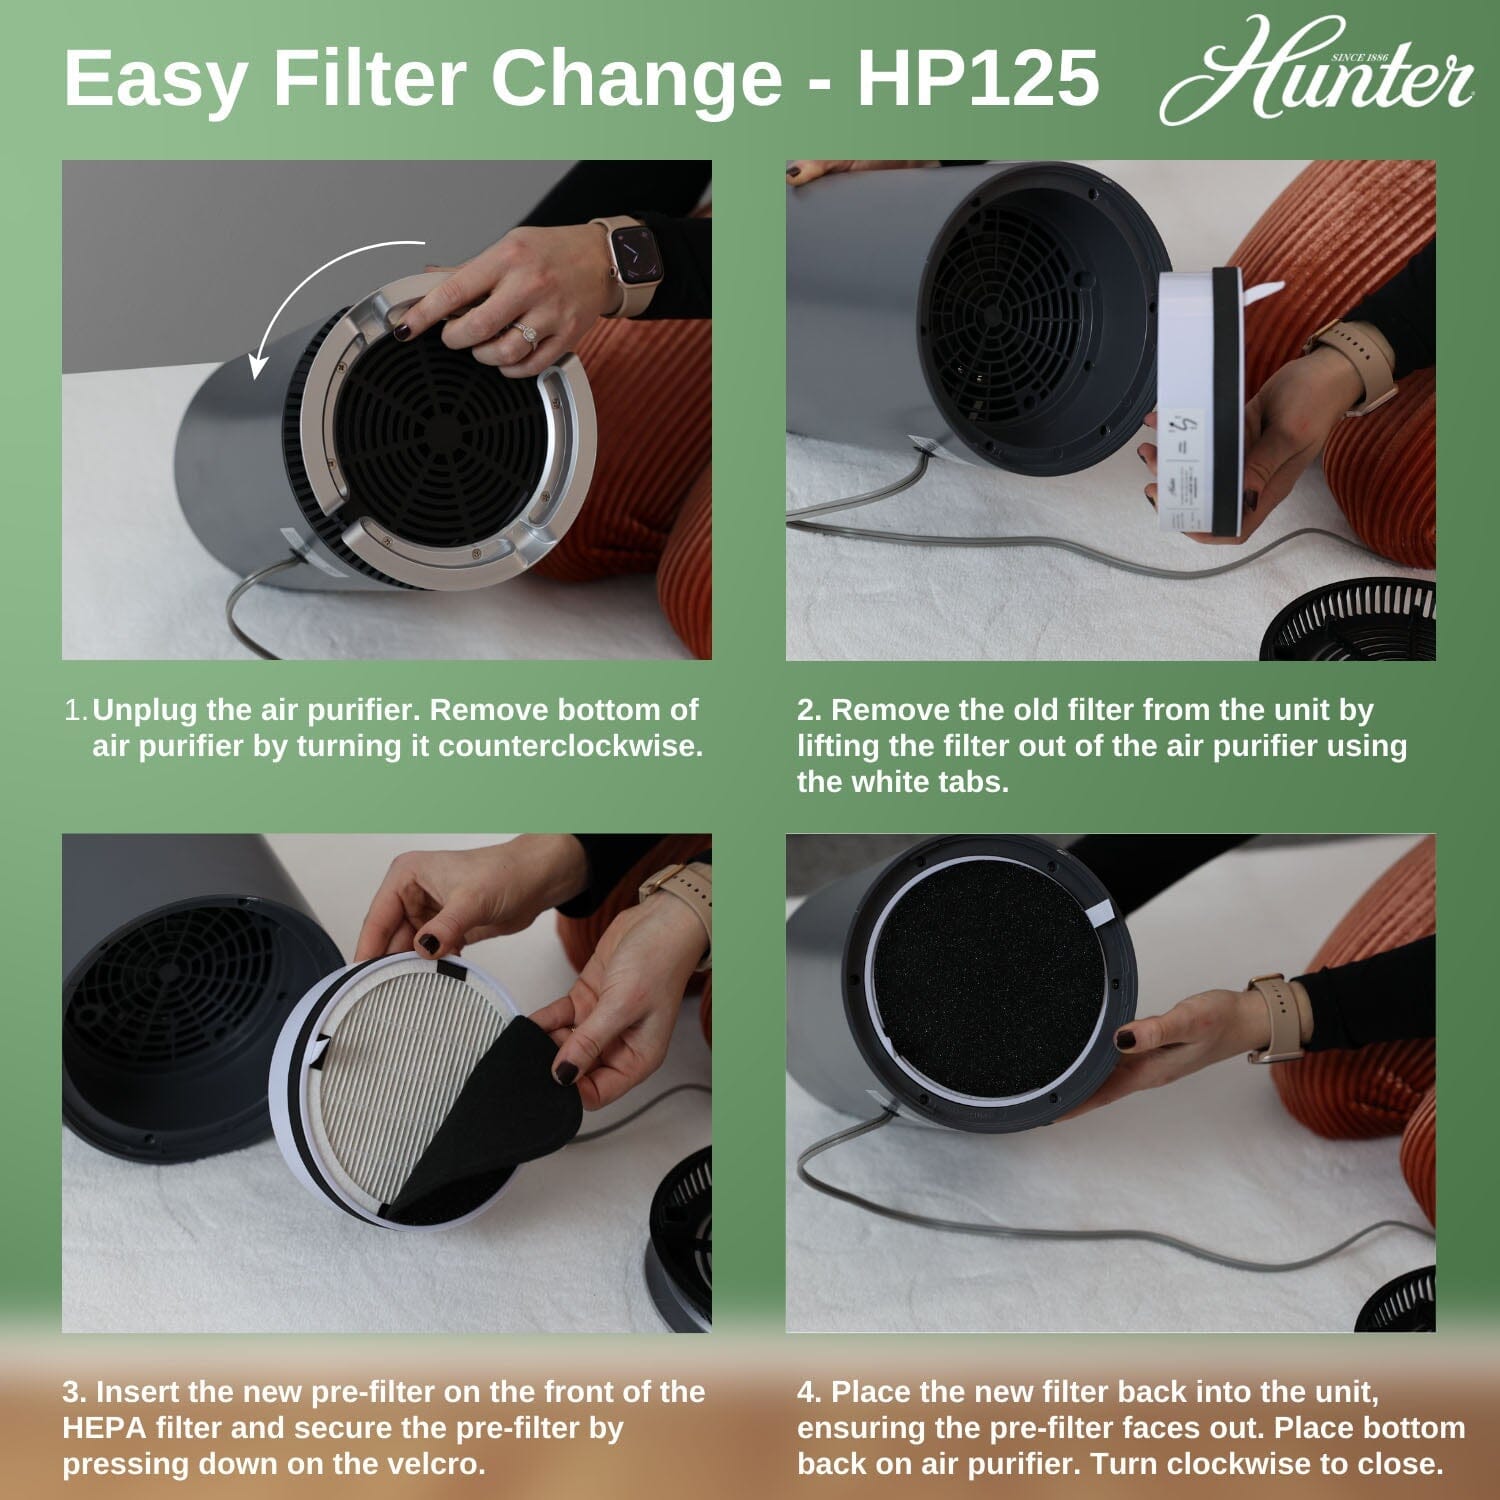
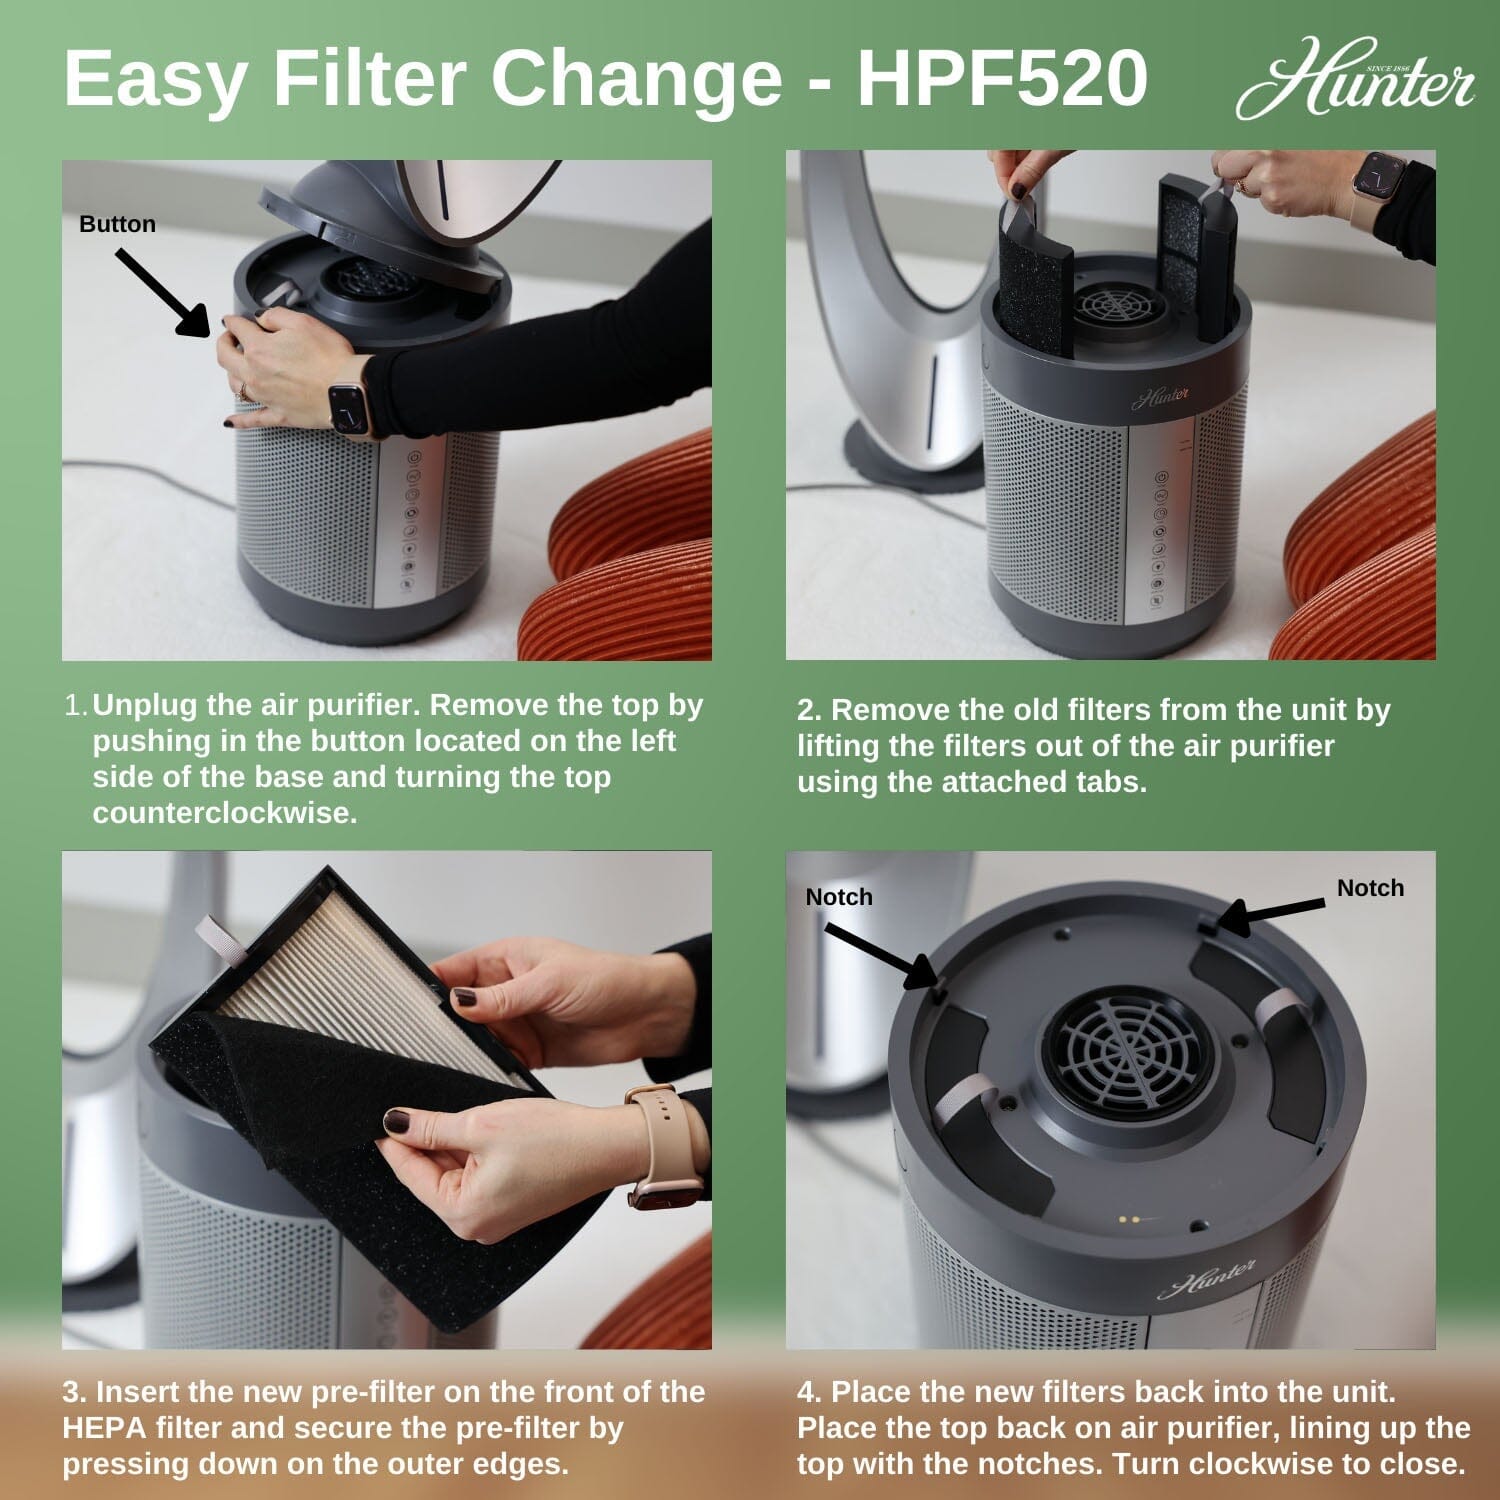
Step 2: Removing and Inspecting the Filter
Accessing the filter is the first hands-on part, and it’s designed to be simple for DIY maintenance. Locate the filter compartment, usually behind the front panel or bottom grille on Hunter units. For example, in the Hunter HP750, slide the panel down and pull out the filter tray.
Once removed:
– Hold the filter over a trash bag and shake gently to dislodge loose debris.
– Inspect for damage: Look for tears in the HEPA material or excessive clumping. If the filter is more than 50% clogged or damaged, cleaning might not suffice—consider replacement (Hunter filters cost $20-40 and are available on their site or Amazon).
– Troubleshooting Tip: If the filter won’t budge, check for hidden clips or consult the manual. For stubborn models like older HP600 series, a flathead screwdriver can help, but wrap it in cloth to avoid scratches.
This step usually takes 5 minutes and helps you gauge how dirty things are—if it’s caked with pet hair, note that for more frequent cleanings next time.
Step 3: Cleaning the Pre-Filter and Main Filter
The pre-filter catches larger particles and is often the easiest to clean, while the main HEPA filter requires gentler handling since it’s not fully washable. Separate them if your model allows (most Hunter units have a layered design).
For the pre-filter (washable in many models):
1. Use a vacuum’s soft brush attachment to suck away surface dust—go slowly to avoid pulling fibers.
2. If it’s a washable type (check your manual), mix a bowl of lukewarm water with a drop of mild soap. Submerge for 5-10 minutes, then gently agitate by hand.
3. Rinse thoroughly under running water (avoid high pressure) and pat dry with a towel—never wring it out.
4. Air-dry completely (about 24 hours) in a shaded area; using heat like a hairdryer can warp the material.
For the main HEPA filter (dry-clean only):
1. Vacuum both sides lightly with the upholstery tool, holding it 1-2 inches away to prevent embedding dirt deeper.
2. Use a soft brush to whisk away fine particles, or a burst of compressed air from 6 inches away.
3. Avoid water or soap entirely—HEPA material loses effectiveness if wet, as per Hunter’s care instructions and filtration experts at the Asthma and Allergy Foundation of America.
4. If heavily soiled, tap gently against a hard surface over the trash bag to loosen trapped particles.
Important: For models with carbon filters (like some Hunter anti-odor variants), treat them like HEPA—dry clean only. This phase should take 10-15 minutes, and if the filter still looks gray after cleaning, it’s time for a new one to maintain 99.97% particle capture efficiency.
Step 4: Reassembly and Testing
Once everything is dry (wait at least 24 hours for washed parts), reassemble in reverse order: Slide the filter back into the tray, secure the panel, and ensure no loose pieces. Plug in the unit and test it on a low setting.
- Listen for normal fan noise; unusual rattling means something’s misaligned.
- Check for indicator lights—if a filter alert persists, reset it via the model’s button sequence (e.g., hold the power button for 5 seconds on HP models).
- Run it for 30 minutes and monitor air output; it should feel stronger and fresher.
If performance doesn’t improve, repeat the vacuuming or consider environmental factors like nearby construction causing rapid re-clogging. This final step ensures your Hunter air purifier filter cleaning was successful and prevents future issues.
Pro Tips for Optimal Hunter Air Purifier Maintenance
To get the most out of your Hunter air purifier filter cleaning routine, here are some expert insights drawn from Hunter’s support resources and long-term user reviews on sites like Best Buy and Reddit’s r/AirPurifiers. These go beyond basics to help you optimize and avoid pitfalls:
- Placement Matters: Position your unit away from walls or curtains by at least 12 inches for better airflow—this reduces strain on the filter and can cut cleaning frequency by 20%.
- Combine with Room Habits: Vacuum floors and dust surfaces weekly to lessen the load on the filter; in pet-heavy homes, use a pet-specific pre-filter extension if available for Hunter models.
- Track Usage with Apps: Hunter’s app (for smart models) or third-party trackers like those from IQAir can log runtime and remind you of cleanings, ensuring you don’t miss a cycle.
- Avoid Common Mistakes: Don’t use a shop vac—its strong suction can tear delicate HEPA fibers. Also, never clean in direct sunlight, as UV rays can degrade materials over time.
- Enhance Longevity: After cleaning, store spare filters in a sealed bag to keep them dust-free. For high-humidity areas, add a dehumidifier to prevent mold growth on the filter.
- Eco-Friendly Twist: Opt for reusable cloth covers over the intake grille to pre-capture pet hair, reducing filter wear—wash them bi-weekly.
- Seasonal Adjustments: In allergy season (spring/fall), clean bi-weekly and run the purifier 24/7 for maximum benefit, as recommended by the American Lung Association.
These tips can extend your filter’s life by months, saving you $50-100 annually on replacements while keeping air quality top-notch.
When to Seek Professional Help for Your Hunter Air Purifier
While Hunter air purifier filter cleaning is DIY-friendly, some situations call for expert intervention to avoid voiding your warranty or causing more damage. Signs include persistent error codes (like a flashing red light on HP models), unusual odors post-cleaning, or if the unit overheats during operation—these could indicate deeper issues like motor problems or irreparable filter damage.
Look for certified technicians through Hunter’s authorized service network (find them on hunterfan.com/support) or platforms like Angi. They should have experience with HVAC systems and provide proof of training. Expect costs of $50-150 for a service call, depending on location and diagnosis—always ask about parts included. If your unit is under warranty (typically 2-5 years for Hunter), contact support first for free repairs. Prioritize providers with good reviews for promptness, as air quality issues shouldn’t wait.
FAQ
Q: Can I wash the HEPA filter in my Hunter air purifier?
A: No, Hunter’s HEPA filters are not washable, as water can compromise their ability to capture 99.97% of particles down to 0.3 microns. Stick to vacuuming and brushing for cleaning; if it’s too dirty, replace it every 6-12 months per the manual.
Q: How do I know if my Hunter air purifier filter needs cleaning?
A: Watch for reduced airflow, increased noise, or a filter indicator light. You can also manually check— if the filter looks discolored or dusty, it’s time. In moderate use, clean monthly to maintain efficiency.
Q: What if cleaning doesn’t improve my air purifier’s performance?
A: The filter might be worn out and need replacement, or there could be an issue like a blocked vent. Test by running it empty first, then try a new filter. If problems persist, consult Hunter support or a pro.
Q: Is it safe to clean the filter while the unit is on?
A: Absolutely not—Warning: Always unplug the device to avoid electric shock or damage. Hunter emphasizes this in all manuals for safety.
Q: How long does a cleaned Hunter filter last?
A: A properly cleaned filter can last 3-6 months longer than an uncleaned one, but replace the HEPA every 6-12 months regardless. Factors like room size (up to 500 sq ft for most models) affect this.
Q: Can I use a dishwasher for the pre-filter?
A: No, dishwashers use harsh detergents and heat that can degrade the material. Hand-wash with mild soap and air-dry instead to preserve the filter’s integrity.
Q: What’s the difference between cleaning and replacing the filter?
A: Cleaning removes surface debris to restore airflow, but replacement is needed for deep-embedded particles or wear. Hunter recommends replacement annually for best results, costing about $30.
Alternative Solutions for Hunter Air Purifier Filter Maintenance
If cleaning your Hunter air purifier filter proves challenging—say, due to a non-removable design in older models—or if you want backups, consider these options. They include filter alternatives or complementary methods when standard cleaning falls short.
| Solution | Pros | Cons | Best For |
|---|---|---|---|
| Replacement Hunter OEM Filters | Exact fit, maintains warranty; easy online ordering. | Costs $20-40 per filter; not reusable. | Long-term reliability in standard homes. |
| Third-Party Washable Filters (e.g., from Amazon) | Cheaper ($15-25), fully reusable up to 1 year; eco-friendly. | May reduce efficiency slightly; compatibility checks needed. | Budget-conscious users with washable models. |
| Electrostatic Pre-Filters (Add-Ons) | Captures more particles without frequent cleaning; lasts 3-6 months. | Adds $10-20 upfront; requires periodic charging. | Pet owners or high-dust areas. |
| Professional Cleaning Services | Thorough deep clean; extends life without DIY effort. | $50+ per visit; scheduling required. | Busy households or complex models. |
Weigh these based on your needs—OEM replacements ensure peak performance, but washable alternatives cut costs by 50% over time. Always verify compatibility with your specific Hunter model to avoid airflow issues.
Keep Your Hunter Air Purifier Running Smoothly
With this guide, you’re equipped to master Hunter air purifier filter cleaning and maintain top-notch air quality:
– Understand why regular upkeep prevents clogs and inefficiency
– Follow a tailored schedule to stay ahead of buildup
– Execute the full cleaning process safely and effectively
– Apply pro tips to optimize and avoid mistakes
– Know when to call in pros or explore alternatives
Following these steps will extend your unit’s lifespan, reduce energy bills, and keep your home’s air fresher—imagine breathing easier without the worry of a underperforming purifier. Take action today: Grab your vacuum and give your filter a quick check. You’ll notice the difference immediately.
Have you cleaned your Hunter air purifier filter before? Share your tips or challenges in the comments below to help fellow readers! If issues persist, describe your model for more tailored advice.


