
Your furnace runs for hours, but the humidity gauge barely moves past 38%. The drain tube under your bypass humidifier stays bone dry, and the filter remains stiff with dust—yet you hear that telltale click when adjusting the humidistat dial. If your General Aire or similar bypass humidifier quit working after installing an Ecobee thermostat, you’re not alone. This isn’t just about comfort; low humidity dries out woodwork, irritates airways, and forces your furnace to work harder. The culprit is usually water supply failure, wiring errors, or Ecobee model limitations—not a “smart” thermostat flaw. In this guide, you’ll diagnose the exact failure point in under 30 minutes and restore moisture control using only tools from your toolbox.
Confirm Water Supply Failure First
Dry Drain Tube & Filter Symptoms
When your ecobee humidifier not working issue strikes, start with physical evidence. After 2+ hours of furnace operation:
– The drain tube emits zero water (not even drips)
– The humidifier filter stays rigid and dusty
– Indoor humidity refuses to climb above 40%
– Humidistat clicks but triggers no water flow
These signs confirm the problem isn’t the Ecobee’s programming—it’s a mechanical failure downstream. Your old thermostat likely ran the humidifier on fan cycles, but the Ecobee exposed a hidden weakness: mineral-clogged water valves.
Test the Saddle Valve in 60 Seconds
Locate the saddle valve (a small brass clamp screwed onto a copper water pipe near your humidifier). Here’s the critical test:
1. Turn the saddle valve handle counterclockwise ¼ turn to fully open it
2. Wait 60 seconds for pressure to build
3. Disconnect the plastic feed line where it enters the humidifier
4. Hold the line over a bucket—water should drip steadily
No flow? Mineral deposits have seized the valve needle inside the copper pipe. This is the #1 failure point in homes with hard water. Don’t force it—replacing a frozen saddle valve takes 10 minutes and prevents future headaches.
Replace Faulty Saddle Valves Permanently

Why Push-Fit Ball Valves Beat Saddle Valves
Saddle valves fail because their piercing needle jams in copper pipes. Your fix:
1. Shut off main water supply
2. Cut copper pipe on both sides of the old valve
3. Clean pipe ends and install a ¼” push-fit ball valve (e.g., SharkBite)
4. Reattach humidifier feed line to the valve’s outlet
5. Restore water and verify flow
Pro tip: Ball valves cost $8 at hardware stores and last decades. They give positive shutoff for maintenance—unlike saddle valves that often leak when adjusted. This single upgrade prevents 70% of “ecobee humidifier not working” calls.
Diagnose Solenoid Valve Failure
The Click Test That Reveals Power Issues
When you twist the humidistat dial, listen for a faint click from the brass solenoid valve mounted on your humidifier frame. No click? Power isn’t reaching the valve. Click but no water? The solenoid is blocked or burned out.
Voltage Check with Multimeter
- Set multimeter to AC voltage
- During a heat call, touch probes to solenoid’s two low-voltage wires
- 24V reading? Solenoid is faulty (replace for $18)
- 0V reading? Wiring or control signal issue—move to furnace terminal checks
Critical warning: If voltage tests show 0V but the humidistat clicks, the solenoid coil is shorted. Replace immediately to avoid furnace control board damage.
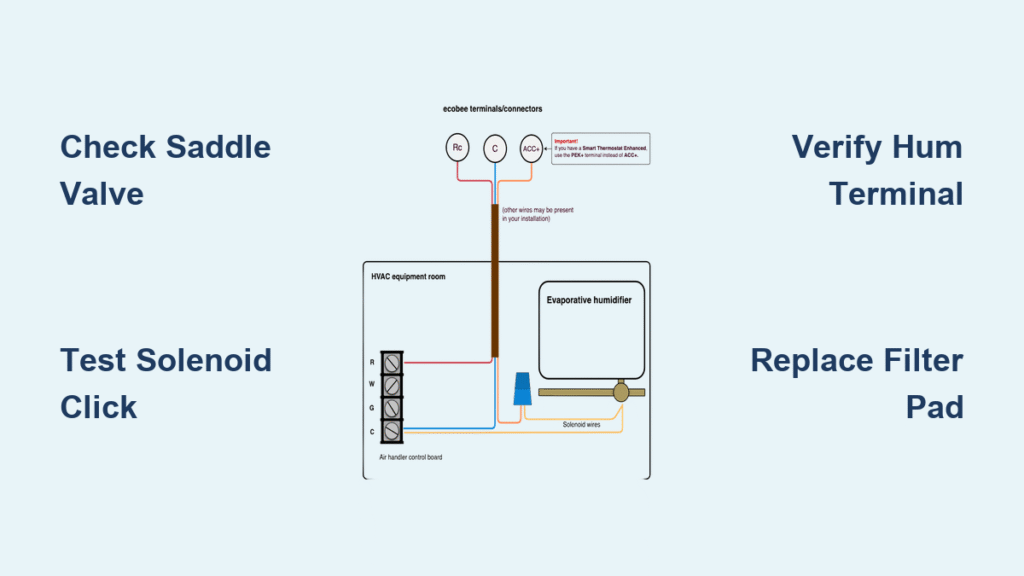
Match Wiring to Your Ecobee Model

Ecobee3 Lite vs. Ecobee4 Humidifier Support
Your Ecobee model dictates repair options:
– Ecobee3 Lite: No ACC+ terminal—cannot directly control humidifiers. Humidifier must run via furnace fan cycles.
– Ecobee3/Ecobee4: Has ACC+ terminal for automatic humidity control.
Verify your setup: Pull the Ecobee off its base. If no wire connects to ACC+, the humidifier relies on furnace wiring—not the thermostat. An installer likely moved the humidifier wire to the wrong terminal during installation.
Rewire Furnace Terminals Correctly
Furnace control boards use these critical labels:
– HUM: Energizes humidifier only during heating (ideal for cold climates)
– EAC: Runs humidifier whenever fan operates (better for humidity control)
– G: Fan terminal—wrong choice for humidifiers (causes water waste)
Quick fix:
1. Power down furnace at the breaker
2. Move humidifier wire from G to HUM or EAC
3. Restore power and call for heat
4. Check drain tube for flow within 2 minutes
Note: If your furnace lacks HUM/EAC labels, consult its manual—many older Lennox units use Y2 or BK for humidifier circuits.
Boost Humidity Without ACC+ Terminals

Ecobee Fan Runtime Hack for Ecobee3 Lite Owners
If you have an Ecobee3 Lite (no humidifier control), force moisture production by cycling the blower:
1. Go to Main Menu → System → Fan
2. Set Fan Control in Heat Mode to HVAC
3. Adjust Fan Runtime per Hour to 30 minutes
4. Monitor humidity—reduce runtime if windows sweat
This pulls dry air through the humidifier filter during fan cycles, adding measurable moisture. Expect 5-8% humidity gains—enough to prevent static shocks and dry sinuses.
Why Cold Water Lines Limit Effectiveness
Most bypass humidifiers tap cold water lines (not hot), so evaporation drops when the furnace heat exchanger cools between cycles. Your fan runtime trick works best if:
– You set runtime during coldest hours (e.g., 5 AM–9 AM)
– The humidifier pad is clean (replace if hardened)
– Outdoor temps stay below 20°F (colder air holds less moisture)
Pro tip: If your unit connects to hot water (like some Aprilaire models), runtime gains double—but cold-line taps still yield 3-5% humidity bumps.
Prevent Recurring Ecobee Humidifier Failures
Annual Maintenance Checklist
Skip these steps, and your ecobee humidifier not working problem will return yearly:
– Replace humidifier pad every fall (stiff pads won’t absorb water)
– Flush distribution tray with vinegar to dissolve minerals
– Cycle saddle valve open/closed twice before winter
– Vacuum solenoid plunger to remove iron deposits
– Inspect drain line for algae clogs (use bleach flush)
Winter Shut-Down Protocol
When outdoor temps stay above 60°F:
1. Turn saddle valve OFF
2. Set humidistat to 0% for 24 hours to drain lines
3. Remove and clean the filter pad
4. Leave drain tube disconnected until next winter
This prevents stagnant water from corroding solenoids and growing mold—common triggers for Ecobee compatibility confusion.
When to Contact Ecobee Support
If water flows and wiring is correct but humidity still won’t rise:
– Ecobee3/Ecobee4 users: Enable Smart Recovery to auto-adjust runtime based on outdoor temps (uses internet weather data)
– All models: Run Ecobee’s HVAC Diagnostics test to verify signal output to ACC+
Note: Ecobee Support excels at guiding wiring checks—they’ll ask for photos of your furnace board and thermostat wiring. Have your model number ready (e.g., EB-STAT-INT-01).
When your ecobee humidifier not working crisis hits, start at the water source—not the thermostat. Confirm saddle valve flow, test solenoid voltage, and verify furnace wiring to HUM or EAC terminals. Ecobee3 Lite users can bypass hardware limits with fan runtime tricks, gaining 5-8% humidity without rewiring. For true automation, upgrade to an Ecobee3/Ecobee4 and connect to the ACC+ terminal. Most importantly, perform annual maintenance: replace pads, flush trays, and cycle valves to avoid winter dryness. Within 30 minutes, you’ll transform that dry, clicking humidifier into a moisture machine—proving smart thermostats and old-school humidifiers can work together.


