
Dry winter air cracking your skin and making wood floors squeak like a haunted house? Adding a humidifier to your furnace solves this problem in one weekend while saving you $500+ compared to professional installation. This step-by-step guide shows exactly how to choose the right unit, cut ductwork safely, and integrate water/electrical connections for professional results. You’ll transform your home’s comfort with humidity levels between 30-45%—the sweet spot for health and home protection—without calling an HVAC technician.
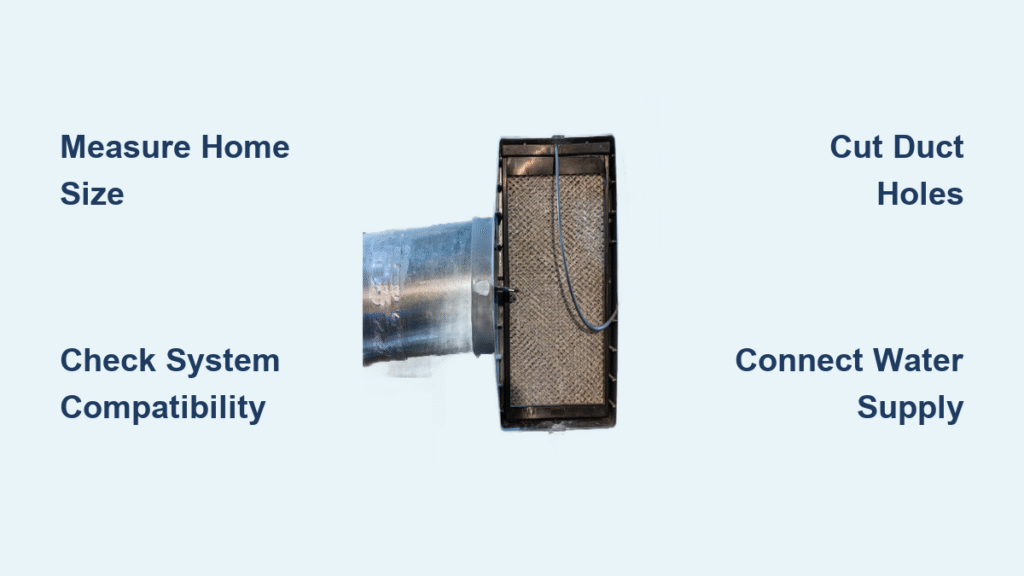
Measure Your Home First
Size Requirements by Square Footage
Match humidifier capacity to your home size for optimal performance. Houses under 2,000 sq ft work perfectly with bypass models. Between 2,000-4,000 sq ft requires fan-powered units for stronger moisture distribution. Oversized homes over 4,000 sq ft need steam humidifiers—though these typically require professional installation due to complex electrical needs. Never guess: Undersized units run constantly without reaching target humidity, while oversized models cause condensation damage in ducts.
Check Your System Compatibility
Confirm you have forced-air heating with accessible ductwork near the furnace—this is non-negotiable for furnace-mounted units. Homes without ducts need standalone humidifiers instead. Use a $10 hygrometer to measure baseline humidity; readings below 30% during winter confirm you need this upgrade. Also verify your furnace has a HUM terminal on the control board for proper electrical integration, which bypasses the need for external transformers.
Locate Key Utilities
Your installation path depends entirely on three critical elements within 6 feet of the furnace: a cold water pipe (hot water works but increases mineral buildup), a floor drain or condensate pump, and electrical access. Critical mistake to avoid: Attempting installation without confirming these first often leads to abandoned projects. Measure distances now—water supply lines over 8 feet require complex routing that increases leak risks.
Choose the Right Humidifier Type
Bypass Models: Most Common Choice
These use your furnace’s existing blower to push air through a water panel, making them the simplest DIY option. Installation takes 2-3 hours with $100-$200 units. Ideal for standard homes where duct access allows cutting matching holes on return and supply ducts. Pro tip: Choose models with self-cleaning features to minimize mineral buildup in hard water areas.
Fan-Powered Units: Limited Space Solution
Built-in fans move air independently of furnace cycles, solving installation challenges in tight spaces where bypass ducts won’t fit. Expect 3-4 hours installation time and slightly higher noise during operation. Requires more electrical connections than bypass models but delivers consistent humidity even when heating cycles stop.
Steam Models: Large Home Powerhouse
Skip these for DIY projects—they require dedicated 120V circuits, complex steam distribution, and professional calibration. While ideal for massive homes over 4,000 sq ft, improper installation risks scalding hazards and water damage. Warning: Local codes often mandate licensed technicians for steam units due to high-voltage requirements.
Essential Tools and Materials
Required Tools:
– Aviation snips (left/right cut for clean edges)
– Cordless drill with 1/4″ bit
– Non-contact electrical tester
– Adjustable wrench and screwdrivers
Materials Needed:
– Humidifier unit ($100-$300)
– 1/4″ copper tubing or supply line
– Saddle valve or tee fitting
– Drain hose or 3/4″ PVC pipe
– Sheet metal screws and foam gaskets
Safety Steps Before You Begin
Power Down Completely
Turn off the furnace breaker at your main electrical panel—never just the thermostat. Test wires with a non-contact tester to confirm zero voltage. Water and electricity create immediate electrocution risks during plumbing work.
Water Supply Shutoff
Close the main water valve and open a nearby faucet to relieve pressure. Skipping this step risks sudden water surges when piercing pipes, potentially flooding your basement.
Metal Protection
Wear cut-resistant gloves when cutting ductwork. Sheet metal edges are razor-sharp and cause severe lacerations. Keep a shop vac nearby to capture metal shavings that could damage furnace components.
Cut Installation Holes Precisely

Mark Your Template
Hold the manufacturer’s template against the return air duct 6-12 inches above the furnace. Trace outlines with a Sharpie, then drill 1/4″ pilot holes at each corner. Never freehand cut—this causes misaligned fittings that leak air and moisture.
Cut Clean Openings
Start cuts at pilot holes using aviation snips, following traced lines precisely. File all metal burrs smooth—rough edges tear gaskets and create air leaks. Test-fit mounting plates before final installation; they should slide in snugly without gaps.
Humidistat Location
Install the humidistat sensor 12 inches above the humidifier body on the return duct. This placement ensures accurate air readings without direct moisture exposure. Cutting follows the same template process as the main unit.
Connect Water Supply Safely
Choose Your Connection Method
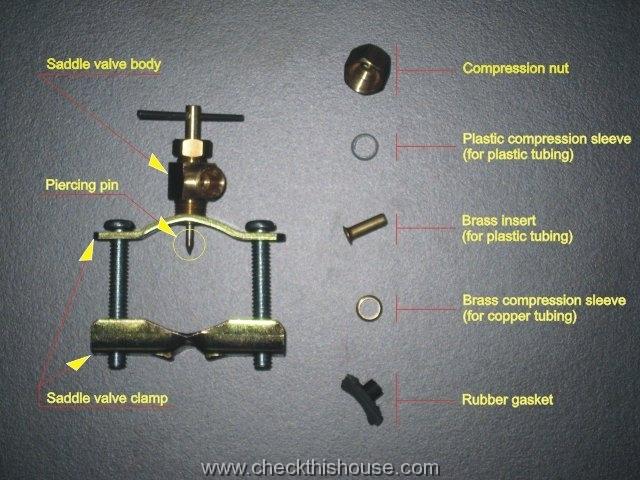
Saddle Valve Method: Position on cold water pipe, tighten clamp bolts evenly, then pierce pipe by turning handle clockwise. Connect 1/4″ tubing using compression fittings. Only use if local codes permit—many municipalities ban saddle valves due to leak risks.
Tee Fitting Method: Required where saddle valves are prohibited. Shut off main water, cut pipe with tubing cutter, and install tee fitting with compression nuts. Connect supply line to the tee’s outlet port for reliable, code-compliant operation.
Install Drain System
Route drain hose or 3/4″ PVC pipe to the nearest floor drain with consistent downward slope—water won’t flow uphill. Share your furnace’s existing drain line using a tee fitting to simplify installation. Critical check: Verify no kinks or upward bends that cause standing water and mold.
Wire Control System Correctly
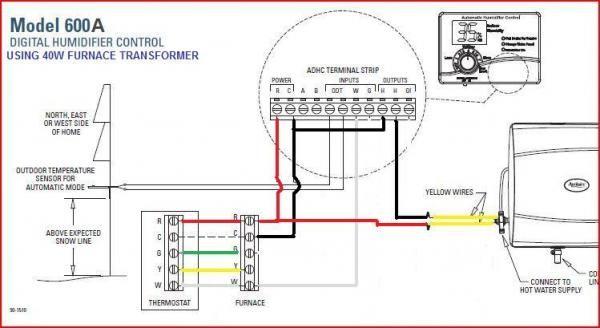
Simple 24V Connection Method
Connect humidistat yellow wire to the humidifier’s solenoid. Link a second yellow wire from humidifier to furnace HUM terminal. Complete the circuit by connecting humidistat black wire to furnace C (common) terminal. This setup ensures the humidifier activates ONLY during heating cycles—saving water and preventing summer condensation.
Test Every Connection
Restore furnace power and set humidistat to max. Listen for the solenoid’s distinct “click” indicating water flow. No click? Turn power off and check wire nuts against the manufacturer diagram—90% of electrical issues trace to loose connections at the HUM terminal.
System Testing Sequence
Initial Water Test
Open water supply slowly. Watch all connections for 5 minutes; even slow drips require tightening compression fittings 1/4 turn. Immediate action: If leaks persist, disassemble and check for debris in fittings—mineral particles often cause persistent drips.
Electrical Verification
Run a full heating cycle while monitoring operation. The humidifier should activate within 2 minutes of furnace startup and shut off immediately when heating stops. Use a separate hygrometer to confirm humidity rises steadily toward your target (35% is ideal for most homes).
First-Week Monitoring
Adjust settings in 5% increments every 48 hours. Stop at 35-45% humidity—exceeding this causes window condensation and wall dampness. Warning sign: Water pooling under the unit indicates drain clogs requiring immediate cleaning.
Maintenance Schedule That Works
Monthly Tasks
Check drain line flow with a shop vac, verify water activation during heating cycles, and wipe mineral deposits from the water panel. Hard water areas need bi-weekly checks to prevent clogs.
Annual Replacement
Change the water panel before each heating season. Clean housing with vinegar solution to dissolve mineral buildup. Test humidistat accuracy against a standalone hygrometer—replace if readings differ by more than 5%.
Spring Shutdown
Turn off water supply, drain the unit completely, and remove the water panel for drying. Store in a sealed bag to prevent dust accumulation. Skipping this invites mold growth during summer dormancy.
Professional vs DIY Decision
DIY Success Factors
Only attempt installation if you have: basic plumbing skills (comfort with copper fittings), ductwork cutting experience, and verified access to all utilities. The $250 average savings makes DIY worthwhile when these conditions are met.
Call a Pro When
Seek professionals if your furnace lacks a HUM terminal (requiring transformer installation), local codes mandate licensed work, or you need steam humidifier integration. Critical red flag: If initial testing reveals persistent leaks or electrical faults—stop immediately to prevent water damage.
Expected Results After Installation
Immediate Benefits
Static shocks vanish within 24 hours as humidity rises. Wood furniture stops cracking, skin feels noticeably softer, and your home feels 3-5°F warmer at the same thermostat setting—slashing heating bills immediately.
Long-Term Advantages
Maintain 35-45% humidity to protect hardwood floors from seasonal gaps, reduce respiratory issues by 30%, and lower heating costs by 2-4% per degree you reduce the thermostat. With proper maintenance, your humidifier pays for itself in energy savings within two winters.
Final Note: Your furnace humidifier transforms winter comfort for less than the cost of professional installation. Monitor humidity weekly during your first season using a $15 hygrometer, and you’ll quickly master the balance between dry-air discomfort and excess moisture risks. This upgrade isn’t just about comfort—it’s essential home maintenance that protects your largest investment.


