Frustrated with a dusty, less-than-fresh smelling home? A clogged filter in your Clorox air purifier could be the culprit. Replacing your filter is a simple process that significantly improves air quality and purifier performance, and often, a quick filter change is all you need to breathe easier.
This comprehensive guide will walk you through everything you need to know about changing the filter in your Clorox air purifier. We’ll cover identifying the correct filter for your model, a step-by-step replacement process, troubleshooting common issues, and essential maintenance tips to keep your air purifier running at its best. By the end of this article, you’ll be confidently maintaining clean air in your home.
Identifying Your Clorox Air Purifier Filter

Before you begin, it’s crucial to identify the correct filter for your specific Clorox air purifier model. Clorox uses a few different filter types depending on the model.
- True HEPA Filter: Removes 99.97% of airborne particles like dust, pollen, smoke, and pet dander. Most common in larger units.
- Carbon Filter: Absorbs odors, gases, and VOCs (volatile organic compounds). Often paired with a HEPA filter.
- Pre-Filter: Captures larger particles to extend the life of the HEPA and carbon filters. Typically washable.
To determine your filter type:
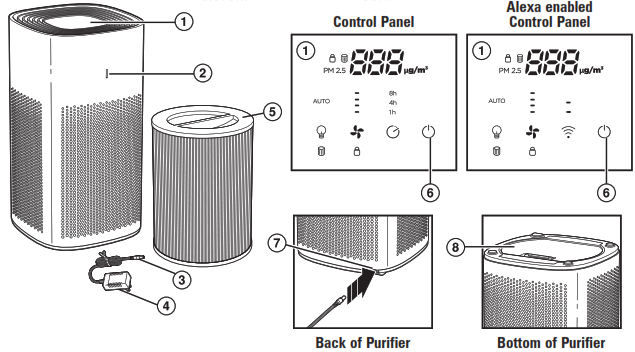
- Check the Model Number: Located on the bottom or back of your air purifier.
- Consult the User Manual: Your manual will specify the correct filter replacement part number.
- Visit the Clorox Website: Use the model number to find compatible filters on the official Clorox website.
How to Change Your Clorox Air Purifier Filter: A Step-by-Step Guide
The general process for changing a Clorox air purifier filter is similar across most models, but slight variations may exist. These instructions cover the most common procedures.
Step 1: Preparation & Safety
- Unplug the Air Purifier: Important: Always disconnect the power supply before performing any maintenance.
- Locate the Filter Compartment: This is usually on the side, back, or bottom of the unit. Consult your manual if needed.
- Gather Supplies: New filter(s), a clean cloth (optional).
Step 2: Accessing the Filter(s)
The method for accessing the filter varies based on the model:
- Side Panel Access: Some models have a side panel that slides or hinges open.
- Back Panel Access: Others require removing a back panel secured by screws or clips.
- Bottom Access: Some purifiers have a bottom panel that lifts off.
Refer to your user manual for specific instructions on opening the filter compartment for your model.
Step 3: Removing the Old Filter(s)
- Pre-Filter (if applicable): Remove the pre-filter first. Many pre-filters are washable – see the “Maintenance & Cleaning” section.
- HEPA & Carbon Filters: Carefully remove the HEPA and carbon filters. Note the orientation of the filters for proper re-installation. Some filters may be tightly fitted. Gently shake off any loose dust or debris.
- Disposal: Dispose of the used filters responsibly. Check local regulations for proper disposal methods.
Step 4: Installing the New Filter(s)
- Pre-Filter: If your model has a pre-filter, install the new or cleaned pre-filter first. Ensure it’s properly seated.
- HEPA & Carbon Filters: Install the new HEPA and carbon filters, matching the orientation of the old filters. Ensure they fit snugly and securely within the compartment.
- Double-Check: Confirm all filters are correctly positioned and the compartment is fully closed.
Step 5: Testing and Resetting
- Plug in the Air Purifier: Reconnect the power supply.
- Power On: Turn on the air purifier.
- Filter Reset (if applicable): Some Clorox air purifiers have a filter replacement indicator light. You may need to reset this light according to your user manual. This usually involves pressing and holding a button for a few seconds.
- Verify Operation: Ensure the air purifier is running smoothly and at the desired fan speed.
Maintenance & Cleaning

Regular maintenance extends the life of your Clorox air purifier and ensures optimal performance.
| Frequency | Task | Duration |
|---|---|---|
| Weekly | Vacuum exterior of unit | 2-5 minutes |
| Monthly | Wash/replace pre-filter | 5-10 minutes |
| Every 3-6 Months | Replace HEPA & Carbon Filters | 10-15 minutes |
- Pre-Filter Cleaning: Most pre-filters are washable. Gently vacuum to remove loose debris then hand wash with mild soap and water. Allow to air dry completely before reinstalling.
- Exterior Cleaning: Vacuum the exterior of the air purifier regularly to remove dust buildup.
- Sensor Maintenance: Some models have sensors that may need occasional cleaning. Consult your manual for details.
Pro Tips for Clorox Air Purifier Owners

- Filter Life Varies: Filter life depends on usage and air quality. Check filters monthly, even if the indicator light hasn’t illuminated.
- Air Quality Matters: If you live in an area with high pollution or have pets, you may need to replace filters more frequently.
- Genuine Filters: Always use genuine Clorox replacement filters to ensure optimal performance and avoid damaging your unit.
- Don’t Overwash: Overwashing the pre-filter can damage it and reduce its effectiveness.
- Consider Air Quality Monitoring: Use an air quality monitor to track particle levels and determine when filter changes are needed.
When to Call a Professional
While filter replacement is a DIY task, consider professional help if:
- You’re uncomfortable disassembling the unit.
- The air purifier is still not functioning properly after filter replacement.
- You suspect a mechanical issue with the purifier itself.
A qualified appliance repair technician can diagnose and address more complex problems.
FAQ
Q: How often should I replace the filters in my Clorox air purifier?
A: Generally, HEPA and carbon filters should be replaced every 3-6 months. Pre-filters should be cleaned monthly and replaced as needed (typically every 3-6 months as well). However, this depends on usage and air quality.
Q: What happens if I don’t change the filters?
A: A clogged filter reduces airflow, decreasing the purifier’s effectiveness. It can also strain the motor, potentially shortening the life of the unit.
Q: Can I wash the HEPA filter?
A: No. HEPA filters are not washable. Washing can damage the delicate fibers and reduce their filtration efficiency.
Q: Where can I buy replacement Clorox air purifier filters?
A: You can purchase genuine filters from the Clorox website, major retailers like Amazon, Walmart, and Best Buy, and some home improvement stores.
Q: My air purifier smells bad after changing the filter. Why?
A: This could be due to residual odors trapped in the unit. Run the purifier on high for a few hours to help eliminate the smell.
Get Your Clorox Air Purifier Working Again
By following this guide, you’ve learned how to easily change the filters in your Clorox air purifier, ensuring clean and healthy air in your home. Remember to check your model number, use genuine filters, and maintain a regular cleaning schedule.
Did this guide help you? Share your experience in the comments below, or let us know if you have any other questions!


