
If you’ve noticed your Honeywell air purifier isn’t pulling in as much air as it used to, or if that little filter indicator light is blinking like it’s trying to send you a Morse code message, you’re not alone. Many users face the frustration of reduced performance due to a clogged or dirty filter, which can lead to poor air quality in your home. The good news is that checking the filter on your Honeywell air purifier is a straightforward process that can restore its efficiency quickly—often in just 5-10 minutes with basic tools. This simple maintenance step ensures cleaner air and extends the life of your device.
In this comprehensive guide, we’ll go beyond the basics to cover everything you need to know about filter checks for Honeywell air purifiers. You’ll learn the most common signs of filter issues, step-by-step instructions tailored to popular models like the HPA300 or InSight series, recommended maintenance schedules, and pro tips to prevent future problems. By the end, you’ll have the confidence to maintain your purifier like a pro, ensuring optimal performance and healthier indoor air year-round.
Why Regular Filter Checks Are Essential for Honeywell Air Purifiers
Maintaining your Honeywell air purifier starts with understanding the role of the filter—it’s the heart of the machine, capturing dust, allergens, pet dander, and even viruses from the air. Without regular checks, a dirty filter can reduce airflow by up to 50%, forcing the fan to work harder and potentially shortening the unit’s lifespan. According to Honeywell’s official guidelines, neglecting filter maintenance can lead to decreased air purification efficiency, higher energy consumption, and even the release of trapped pollutants back into your space.
For allergy sufferers or those in high-pollution areas, checking the filter on your Honeywell air purifier isn’t just maintenance—it’s a health priority. A clogged filter can harbor mold or bacteria, exacerbating respiratory issues. Regular inspections help you catch problems early, saving money on premature replacements (filters typically cost $20-50 each). Plus, many models feature smart indicators that make the process user-friendly, but manual checks ensure nothing slips through the cracks.
Recommended Frequency and Timing for Filter Checks
Honeywell recommends checking your air purifier’s filter based on usage, air quality, and model specifics. For most household models, a quick visual inspection every 1-3 months is ideal, while full replacements vary from 3-12 months. Factors like pet ownership, smoking, or dusty environments accelerate dirt buildup, so adjust accordingly.
Here’s a handy maintenance schedule table to keep you on track:
| Frequency | Task | Duration | Notes |
|---|---|---|---|
| Weekly | Check indicator light or app notifications (for smart models) | 1 minute | Look for alerts on models like the HPA5300B; reset if needed. |
| Monthly | Visual filter inspection | 5-10 minutes | Open the unit and check for visible dirt; ideal for light users. |
| Every 3 Months | Deep clean or replace True HEPA filter | 15-20 minutes | Recommended for average homes; use for HPA300 series. |
| Every 6-12 Months | Full filter replacement | 10-15 minutes | Based on usage; pre-filters may need more frequent changes in polluted areas. |
By following this schedule, you’ll maximize your Honeywell air purifier’s efficiency and avoid surprises like sudden performance drops.
Complete Process to Check the Filter on Your Honeywell Air Purifier
Checking the filter on your Honeywell air purifier is simple and model-specific, but the core steps are similar across series like the Insight, Enviracaire, or HPA lines. Always unplug the unit first for safety. We’ll break it down into major steps, with variations noted for popular models. This process typically takes 5-15 minutes and requires no special tools beyond a soft brush or vacuum with a hose attachment.
Step 1: Preparation and Safety Check
Before diving in, ensure you’re set up for success. Warning: Always unplug your Honeywell air purifier from the power outlet to avoid electrical hazards. Place the unit on a stable, flat surface in a well-ventilated area, like a kitchen counter or garage floor, to contain any dust.
- Gather basic supplies: A soft cloth, compressed air canister (optional), and gloves if you’re sensitive to dust.
- Consult your model’s manual—download it from Honeywell’s website if needed (search for your model number, e.g., HPA100). For instance, the HPA300 has a front grille that’s easy to remove, while slimmer models like the HPA100 require side access.
- Note the filter type: Most use a True HEPA filter (H13-rated for 99.97% particle capture) with a pre-filter layer. If your model has a carbon pre-filter, check it separately.
This prep phase takes about 2 minutes and prevents common mishaps like static shocks or scattered debris.
Safety Precautions
- Avoid using water on filters unless specified—most are not washable.
- Work in a dust-free zone to prevent re-contaminating your space.
- If you have severe allergies, wear a mask during inspection.
Step 2: Accessing the Filter Compartment
Now, locate and open the filter housing. Honeywell designs make this intuitive, but steps vary slightly by model.
For most grille-style models (e.g., HPA300 or HPA5300):
1. Press the release tabs or latches on the front or rear grille—gently pull to remove it.
2. Slide out the filter tray or pull the filter directly; it should come out with minimal force.
For compact or tower models (e.g., HPA100 or InSight series):
1. Tilt or lift the top cover if applicable, or press side buttons to open the bottom panel.
2. Grip the filter handle (often labeled) and pull straight out—avoid twisting to prevent damage.
If the filter feels stuck, check for hidden clips. This step usually takes 3-5 minutes. Important: Handle filters by the edges to avoid compacting the pleats, which can reduce airflow.
Diagnosing Filter Condition
Once removed, hold the filter up to a light source:
– Clean filter: Minimal dust; light passes through easily.
– Dirty filter: Visible grayish buildup, reduced light penetration, or musty odor—replace immediately.
– Clogged filter: Heavy debris blocking most of the surface; this can cut efficiency by 70%.
For smart models, sync with the Honeywell app to view digital filter life percentage—anything below 20% signals a check.
Step 3: Inspecting and Cleaning the Filter
With the filter out, perform a thorough check. Tap gently over a trash bin to dislodge loose particles, but don’t force it.
- Examine the pre-filter (if separate): Vacuum it with a soft brush attachment for 1-2 minutes to remove surface dust.
- For the main HEPA filter: Shine a flashlight through it. If you see clumping or tears, it’s time for replacement. Honeywell filters aren’t typically washable, but some pre-filters can be rinsed with cool water and air-dried for 24 hours.
- Check for unusual issues: Mold spots (white/green fuzz) indicate high humidity—address room conditions first.
Reinsert the filter securely, ensuring arrows on the frame align with airflow direction (usually marked “Air In”). Close the compartment and plug in the unit. Test by running it on high for 5 minutes—listen for normal fan hum without straining.
Testing Post-Check
Power on and monitor the indicator light. Reset the filter timer via the control panel (hold the filter button for 3 seconds on most models). Run a cycle and check air output; if airflow improves, you’re good. If not, proceed to troubleshooting in the pro tips section.
This full process ensures your Honeywell air purifier operates at peak performance, capturing up to 300 cubic feet of air per minute in larger models.
Warning Signs That Your Honeywell Air Purifier Filter Needs Immediate Attention
:strip_icc()/clean-dirty-air-filter-side-by-side-29436c4309ce48ae808d02848dcbbfce.jpg)
Don’t wait for the scheduled check—watch for these red flags that scream “filter issue”:
– Indicator light flashing: Most models have a dedicated filter reset or warning light; ignore it, and efficiency drops.
– Reduced airflow: The unit sounds louder or blows weaker air—test by holding a tissue near the outlet; it should stick firmly.
– Unusual odors: Musty or burnt smells suggest trapped particles overheating the motor.
– Increased allergies: If symptoms worsen despite use, the filter may be saturated with allergens.
– Error codes: On digital displays (e.g., “F1” on HPA series), this often means filter replacement time.
– Higher energy bills: A clogged filter makes the fan work overtime, spiking usage by 20-30%.
Addressing these promptly prevents long-term damage, like motor burnout, which can cost $100+ to repair.
Pro Tips for Optimal Honeywell Air Purifier Maintenance

To get the most out of your device, go beyond basic checks with these expert strategies:
– Track usage digitally: Use the Honeywell app for real-time filter life monitoring on compatible models—set reminders to avoid forgetting.
– Pair with room monitoring: Place a hygrometer nearby; filters last longer in 40-60% humidity levels.
– Avoid common mistakes: Never run the purifier without a filter installed—this can damage internal components or void warranties.
– Optimize placement: Keep it 1-2 feet from walls for better airflow, and elevate on a stand in carpeted rooms to reduce floor dust intake.
– Seasonal swaps: In pollen-heavy spring, check filters bi-weekly; stock up on genuine Honeywell replacements for authenticity (third-party filters may underperform).
– Eco-friendly cleaning: Use a HEPA vacuum for pre-filters to minimize waste— this extends life by 20-30%.
– Firmware updates: For smart models, update via app to improve filter life predictions based on air quality sensors.
These tips can boost efficiency by 25% and save you from frequent replacements.
When to Call Professional Help for Your Honeywell Air Purifier
While DIY checks handle most issues, some signs warrant expert intervention:
– Persistent error codes or unusual noises after filter replacement—could indicate motor or sensor problems.
– Visible damage like cracks in the housing or burnt smells, suggesting electrical faults.
– If your model is under warranty (typically 5 years for Honeywell), contact support first to avoid voiding it.
Look for certified technicians via Honeywell’s authorized service network (find via their website). Expect costs of $50-150 for diagnostics and repairs, depending on location. Always verify provider credentials and ask about parts sourcing—genuine Honeywell techs use OEM components. If buying extended warranty, note it covers filter-related defects but not neglect.
FAQ
Q: How do I know if my Honeywell air purifier filter is dirty without removing it?
A: Check the built-in indicator light or digital display on models like the HPA300—it lights up or shows a percentage when replacement is due (usually at 80-90% saturation). For non-smart units, listen for fan strain or feel reduced suction at the intake grille. This quick test takes seconds and alerts you early.
Q: Can I wash the HEPA filter on my Honeywell air purifier?
A: No, most True HEPA filters in Honeywell models are not washable, as water can damage the fibers and reduce trapping efficiency by up to 50%. Only pre-filters on select models (check your manual) can be rinsed with cool water and fully air-dried. Always use dry methods like vacuuming for the main filter.
Q: What if the filter light keeps blinking after I replace the filter?
A: This usually means the timer wasn’t reset. Press and hold the filter reset button (often labeled “Filter” or a clock icon) for 3-5 seconds until the light stops. If it persists, ensure the new filter is genuine and properly seated—misalignment can trigger false alerts. Consult the manual for model-specific resets.
Q: How often should I replace the filter in a high-dust environment?
A: In dusty homes (e.g., near construction or with pets), replace every 1-3 months instead of 6-12. Monitor via the indicator and visual checks; Honeywell’s carbon pre-filters may need monthly swaps to maintain odor control.
Q: Are there different filters for various Honeywell models?
A: Yes, filters are model-specific—e.g., the HPA300 uses HRF-R1 (HEPA + pre-filter), while the HPA100 needs a slimmer HRF-A100. Always match the part number from your manual or Honeywell’s site to ensure compatibility and avoid airflow issues.
Q: Does checking the filter void my warranty?
A: No, routine maintenance like filter checks is encouraged and won’t void your warranty. However, using non-genuine parts or improper disassembly might. Stick to official guidelines for peace of mind.
Q: Can a dirty filter cause my air purifier to overheat?
A: Absolutely—clogged filters restrict airflow, causing the motor to overwork and potentially overheat. Signs include hot exterior or auto-shutoff. Clean or replace immediately to prevent costly repairs.
Alternative Solutions for Honeywell Air Purifier Filter Maintenance
If checking or replacing filters feels too frequent, consider these alternatives, though they may not match Honeywell’s performance:
| Solution | Pros | Cons | Best For |
|---|---|---|---|
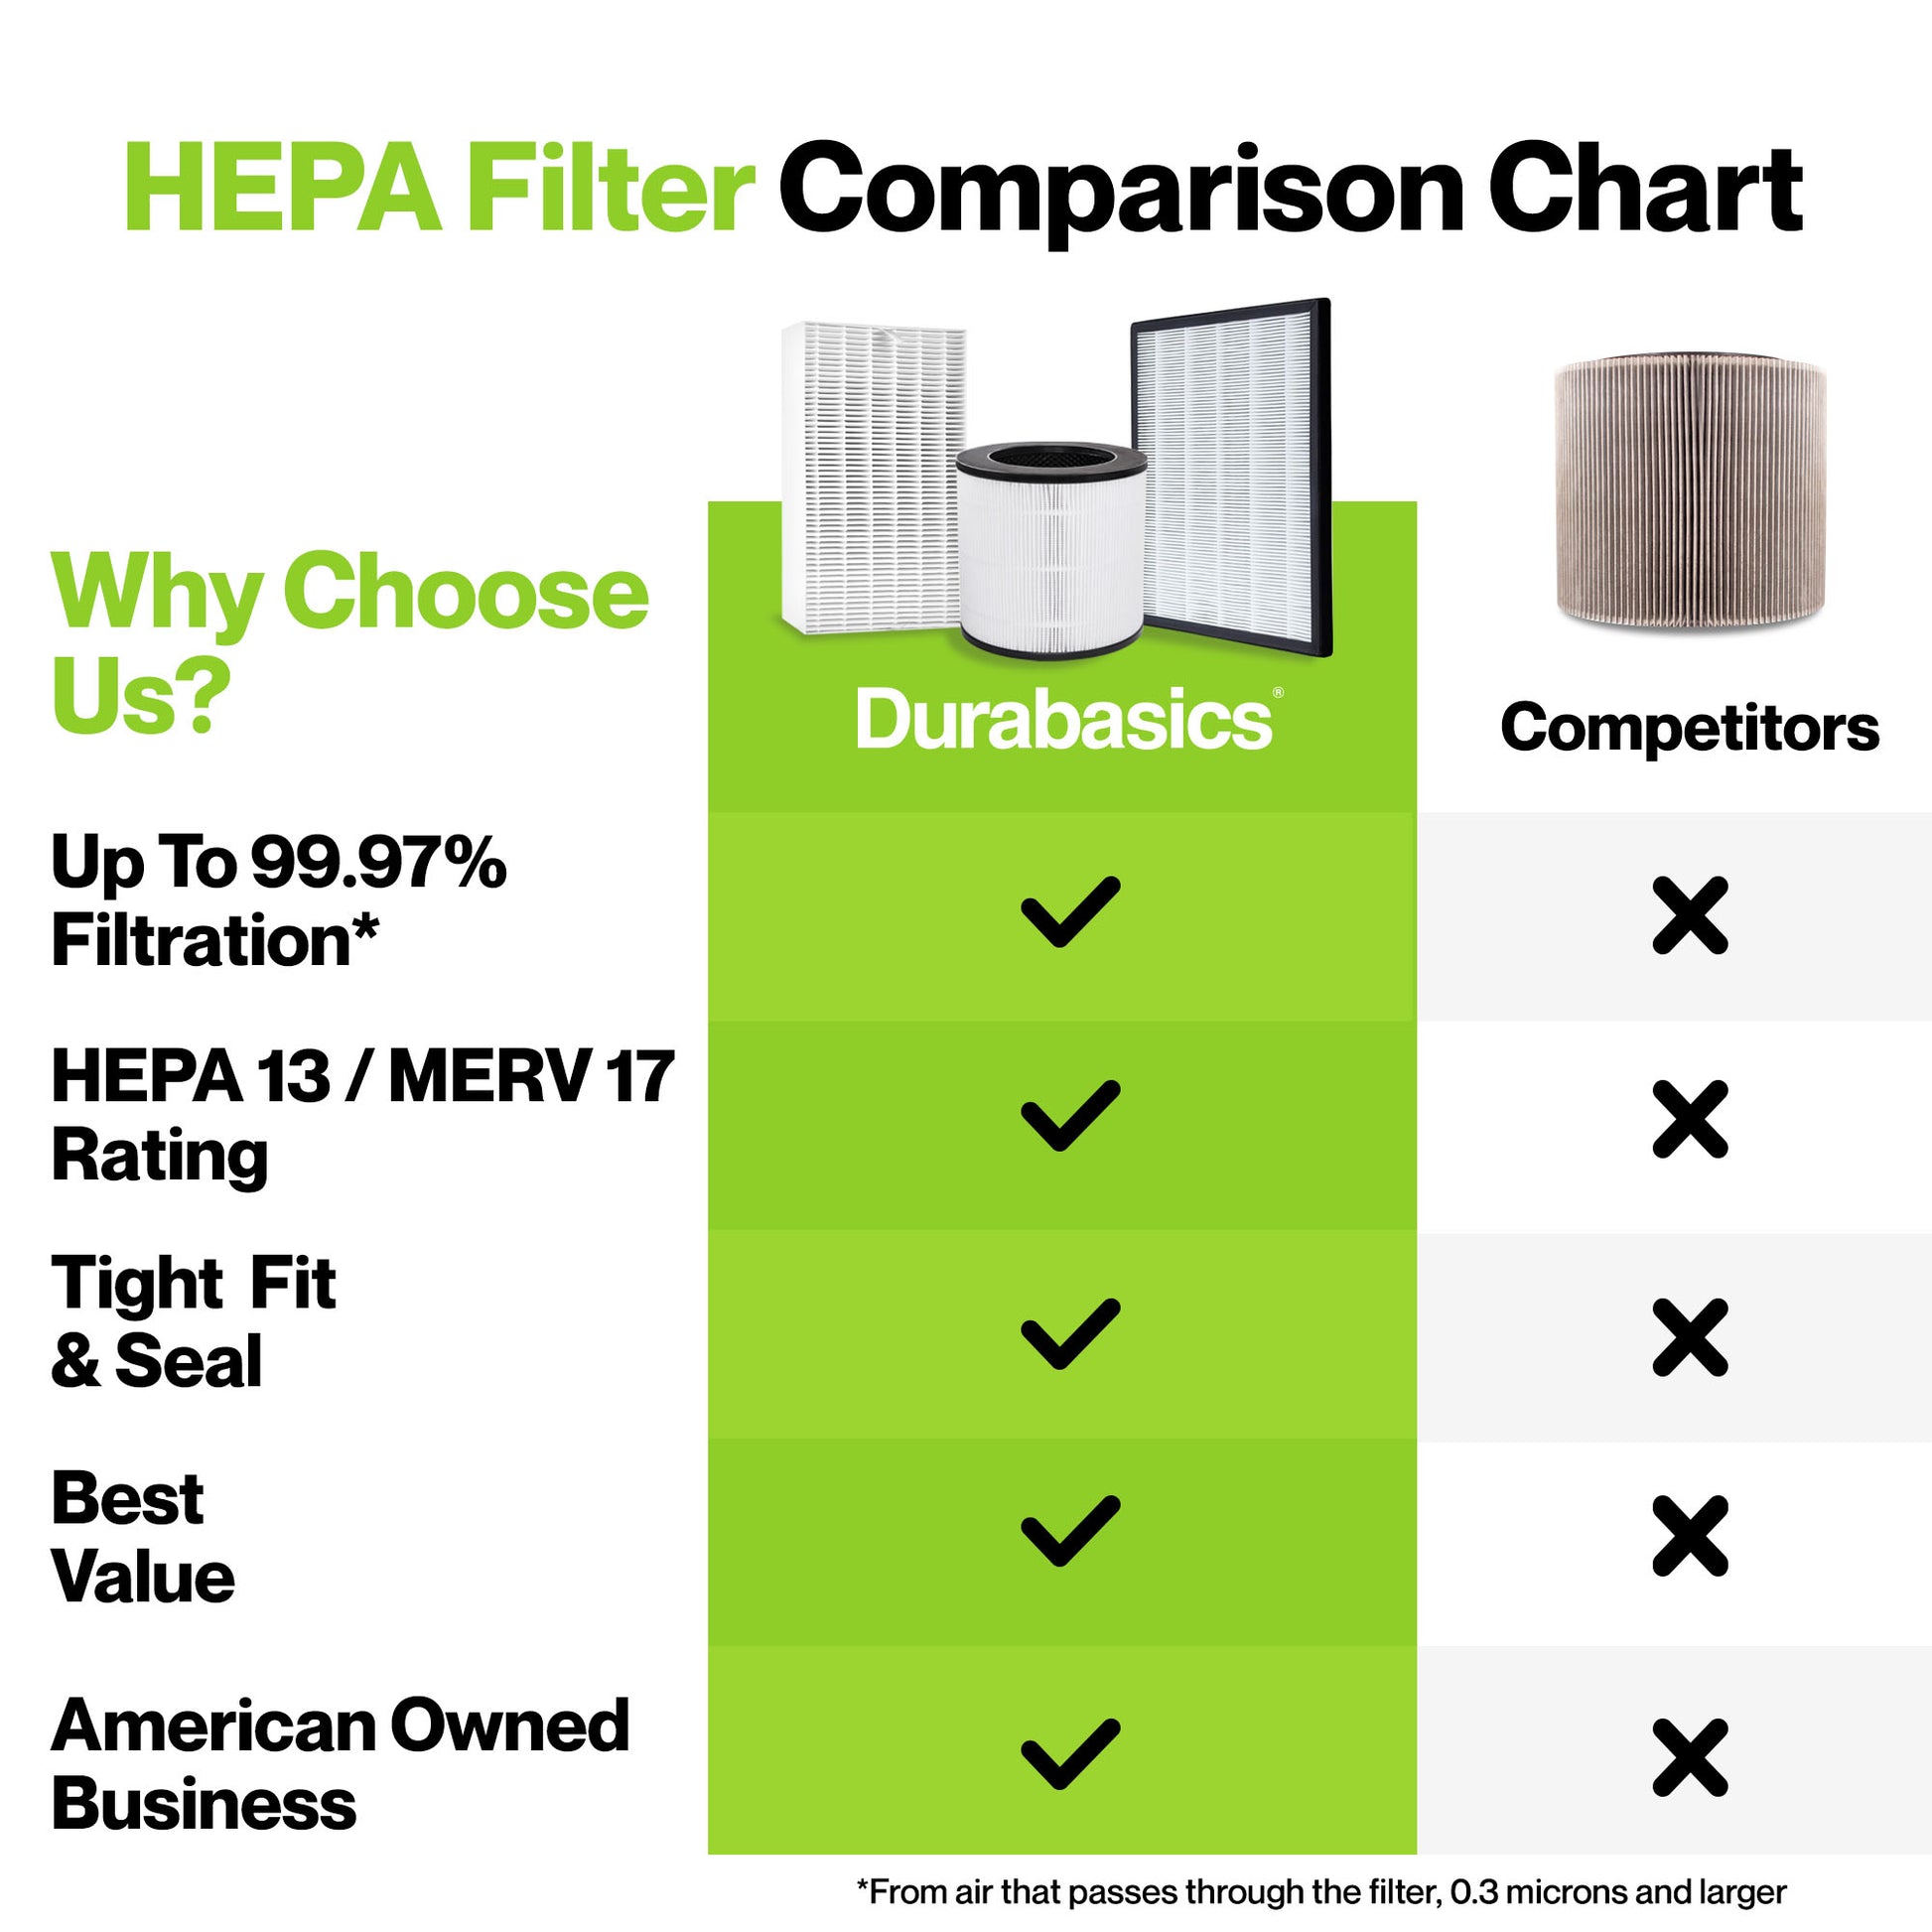
| Third-Party Filters (e.g., from Amazon) | Cheaper ($10-20 vs. $30+ official); similar HEPA rating | May fit poorly or trap fewer particles (95% vs. 99.97%); shorter lifespan | Budget-conscious users with low-pollution homes |
| Washable Electrostatic Filters (compatible add-ons) | Reusable for 6-12 months; eco-friendly | Lower efficiency for fine particles; requires monthly washing | Allergen-focused setups in moderate dust areas |
| Upgrading to a Filterless Ionizer (e.g., alternative purifiers like Sharp) | No filters to check; lower long-term costs | Produces ozone (potential health risk); less effective on odors | Small spaces where maintenance is a hassle |
| Professional Filter Subscription Service | Auto-delivered replacements; expert advice | Higher upfront cost ($50/year); less DIY control | Busy households with multiple units |
For most, sticking with official Honeywell filters provides the best air quality, but test alternatives if compatibility is confirmed.
Keep Your Honeywell Air Purifier Running Smoothly
By following this guide, you’re equipped to maintain peak performance for your Honeywell air purifier:
– Regular checks using the outlined steps and schedule
– Quick identification of warning signs like indicator lights or reduced airflow
– Pro tips and alternatives to extend filter life and efficiency
Investing time in these maintenance habits ensures cleaner, healthier air without unexpected breakdowns. Your lungs (and wallet) will thank you—start with a filter check today for immediate improvements.
Have you checked your Honeywell air purifier filter recently? Share your experience or model-specific tips in the comments below to help fellow readers! If issues persist, describe them for personalized advice.


