
If you’ve noticed your Rainbow air purifier isn’t pulling in as much air as it used to or it’s starting to emit a musty odor, you’re not alone—many owners face this frustrating issue after regular use. Rainbow air purifier cleaning is essential to maintain its performance, but skipping it can lead to reduced efficiency and even health risks from trapped allergens. The good news? A quick fix like emptying the water basin and wiping down the exterior can restore fresh air flow in just 5-10 minutes, giving you immediate relief while you tackle a deeper clean.
In this comprehensive guide, we’ll go beyond the basics to cover everything you need to know about Rainbow air purifier cleaning, from understanding why it’s crucial to a step-by-step process tailored for different models like the SRX or SE models. Whether you’re dealing with daily dust buildup or seasonal pollen overload, we’ll provide multiple methods, safety tips, and prevention strategies. By the end, you’ll have the confidence to keep your unit running at peak efficiency, ensuring cleaner indoor air for your home year-round.
Why Regular Maintenance is Essential for Your Rainbow Air Purifier
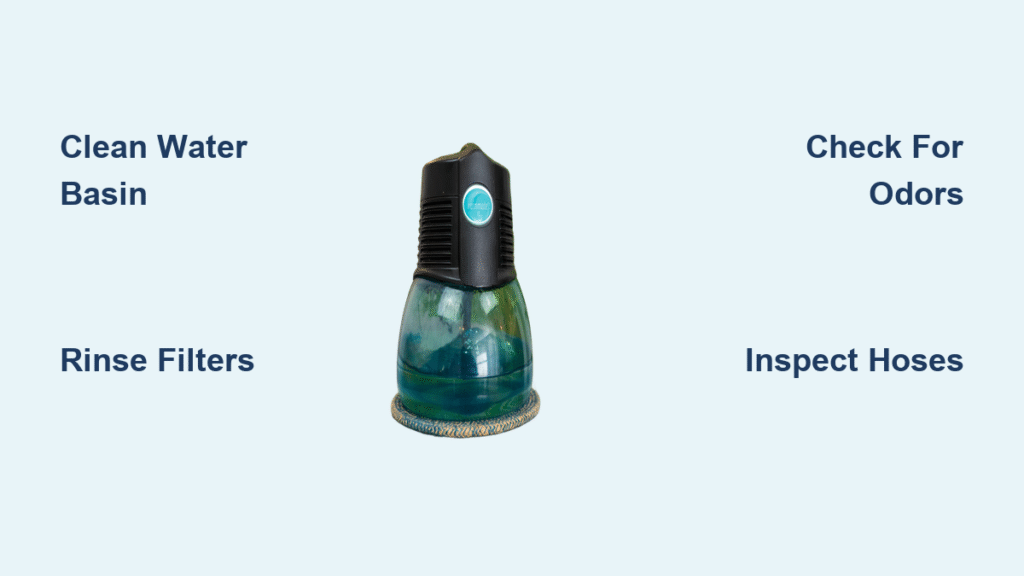
The Rainbow air purifier, often integrated with the brand’s vacuum system, uses a unique water-based filtration method to trap dust, allergens, and pollutants. Unlike traditional HEPA filters that clog over time, the Rainbow relies on a water basin to capture particles, but this also means residue and bacteria can build up if not addressed. Neglecting Rainbow air purifier cleaning can lead to several problems: reduced suction power, as the basin fills with sludge; unpleasant odors from mold growth in stagnant water; and decreased air quality, potentially aggravating allergies or asthma.
Regular cleaning not only extends the lifespan of your unit—many Rainbow models last 10-15 years with proper care—but also optimizes its performance. According to the manufacturer’s guidelines and user reports from sites like the Rainbow Consumer Relations page, a well-maintained purifier can remove up to 99.9% of airborne particles as small as 0.3 microns. Plus, it saves you money by preventing costly repairs, like replacing the motor due to overuse from clogs. In short, investing time in maintenance ensures your home stays a healthier, fresher space without the hassle of frequent replacements.
How Often to Clean Your Rainbow Air Purifier
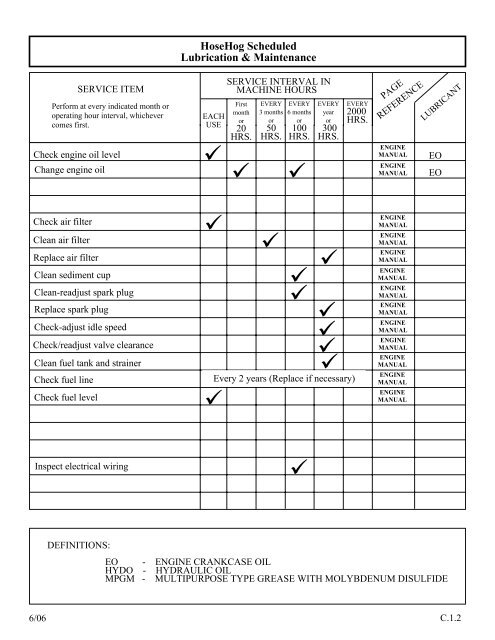
Establishing a cleaning schedule is key to preventing buildup and maintaining efficiency. The frequency depends on usage—daily operation in a high-dust environment like a home with pets requires more attention than occasional use. Rainbow recommends emptying the water basin after every use, but deeper cleans vary. Over-cleaning can wear out components, while under-cleaning leads to performance dips.
Use this maintenance schedule table as a starting point, adapted from official Rainbow manuals and expert advice from air quality specialists. Adjust based on your household’s needs, such as pet hair volume or proximity to construction sites.
| Frequency | Task | Duration | Notes |
|---|---|---|---|
| After Every Use (Daily if in Constant Use) | Empty water basin and rinse | 5-10 minutes | Prevents bacterial growth; essential for odor control |
| Weekly | Wipe exterior, clean pre-motor filter, and inspect hoses | 15-20 minutes | Ideal for moderate use; check for visible dust |
| Monthly | Deep clean basin, wash fan chamber, and replace water separator if needed | 30-45 minutes | For homes with allergies; use mild soap solution |
| Every 3-6 Months | Full disassembly, clean motor housing, and check seals | 45-60 minutes | Professional-level clean; inspect for wear |
| Annually | Replace HEPA filter (if equipped) and service by technician | Varies | Follow warranty guidelines; cost around $50-100 for parts |
By sticking to this routine, you’ll notice improved airflow and longevity. For instance, users on forums like Reddit’s r/VacuumCleaners report that weekly rinses alone cut down on deep clean needs by 50%.
Complete Cleaning Process for Rainbow Air Purifier

Cleaning your Rainbow air purifier doesn’t have to be overwhelming—it’s designed for user-friendly maintenance. This process applies to most models, including the popular Rainbow SRX and SE series, but always consult your user manual for model-specific variations. We’ll break it into major steps, with safety precautions noted. Total time for a full clean: about 45 minutes. Gather supplies first: mild dish soap, white vinegar, soft cloths, a soft-bristle brush, gloves, and distilled water for refilling.
Important: Unplug the unit before starting any cleaning to avoid electrical hazards. Work in a well-ventilated area, and wear gloves if you’re sensitive to cleaning solutions.
Step 1: Preparation and Initial Rinse
Before diving in, prepare your workspace to make the process efficient and safe.
Safety Setup
- Unplug the power cord and let the unit cool if it was recently used (wait 10-15 minutes).
- Place the purifier on a towel-covered surface near a sink or bathtub to catch drips.
- Gather tools: Ensure you have a bucket for dirty water and paper towels for quick wipes.
Emptying the Water Basin
- Remove the top lid by pressing the release button and lifting it off.
- Carefully pour out the dirty water from the basin into a sink or drain—tilt slowly to avoid spills.
- Rinse the basin under warm running water, using a soft sponge to remove loose debris. For stubborn residue, mix 1 part vinegar to 3 parts water and soak for 5 minutes.
- Dry the basin thoroughly with a clean cloth to prevent mold.
This step alone can resolve minor clogs and is the quickest way to refresh your purifier.
Step 2: Cleaning the Filters and Internal Components
The Rainbow’s pre-motor filter and optional HEPA elements trap fine particles, but they need regular attention to avoid restricting airflow.
Removing and Cleaning the Pre-Motor Filter
- Locate the filter at the base of the intake hose—it’s usually a foam or mesh piece.
- Gently pull it out (no tools needed for most models).
- Rinse under lukewarm water, gently squeezing to remove dust. Avoid twisting to prevent damage.
- For deeper clean, soak in a vinegar solution for 10 minutes, then rinse and air-dry for 24 hours before reinstalling.
– Tip: If the filter is discolored or torn, replace it—costs about $10-15 from Rainbow authorized dealers.
Cleaning the Fan Chamber and Hoses
- Detach the hose from the unit by twisting the connector counterclockwise.
- Use a soft brush to remove dust from the hose interior—blow compressed air through it if available.
- Access the fan chamber by removing the back panel (refer to manual for screws).
- Wipe with a damp cloth dipped in soapy water; avoid submerging electrical parts.
- Rinse and dry all parts completely before reassembly.
Warning: Never use harsh chemicals like bleach, as they can damage seals and void your warranty.
Step 3: Exterior and Final Assembly
A spotless exterior ensures the unit looks great and prevents secondary dust buildup.
Wiping Down the Exterior
- Mix a solution of warm water and mild soap.
- Dampen a microfiber cloth and wipe the housing, buttons, and cord—avoid getting water into vents.
- For fingerprints or grime, use a vinegar-dampened cloth.
- Dry immediately with a clean towel.
Reassembly and Testing
- Reinstall all components in reverse order: filters, hoses, basin, and lid.
- Plug in the unit and run it empty for 5 minutes to check for unusual noises or leaks.
- Fill the basin with fresh, cold water (add a splash of vinegar for purification if desired) and test with the lid on.
If suction feels weak post-clean, double-check seals or repeat the filter rinse. This full process should restore 90-100% of original performance.
Warning Signs That Your Rainbow Air Purifier Needs Immediate Cleaning

Don’t wait for your schedule—watch for these red flags indicating urgent Rainbow air purifier cleaning:
- Reduced Airflow or Suction: If the unit struggles to draw in air, the basin or filters are likely clogged.
- Odors During Operation: A musty or chemical smell points to bacterial buildup in the water.
- Visible Dust or Residue: Check the basin for sludge or the exterior for caked-on dirt.
- Increased Noise Levels: Rattling or humming suggests debris in the fan.
- Allergy Flare-Ups: If indoor air quality worsens despite use, maintenance is overdue.
- Water Overflow or Leaks: Indicates blockages in the separator.
Addressing these promptly prevents bigger issues, like motor strain, which could cost $200+ to repair.
Pro Tips for Maintaining Your Rainbow Air Purifier
To elevate your cleaning routine and avoid common pitfalls, here are 5-7 expert tips from Rainbow technicians and long-time users:
- Use Distilled Water: Tap water minerals can cause buildup—switch to distilled for longer intervals between cleans.
- Incorporate Vinegar Weekly: A natural antimicrobial, it kills 99% of bacteria without residue; dilute 1:1 with water for basin rinses.
- Avoid Overfilling the Basin: Fill only to the marked line to prevent spills and ensure optimal filtration.
- Store Upright and Dry: After cleaning, let it air-dry fully before storage to ward off mold.
- Monitor Usage in High-Pollution Seasons: Increase frequency during pollen peaks—clean bi-weekly instead of monthly.
- Common Mistake to Avoid: Don’t run the unit without water, as it can damage the separator and void warranty.
- Optimize Performance: Place the purifier in a central room for better circulation, and pair with regular home dusting for 20-30% improved air quality.
These tweaks can extend your unit’s life by years and reduce energy use by up to 15%.
When to Seek Professional Help
While DIY Rainbow air purifier cleaning handles most issues, some signs warrant a pro:
- Persistent leaks or motor failures after cleaning.
- Damage to internal wiring or seals from improper handling.
- If your model is under warranty (typically 5-7 years), avoid DIY deep cleans to prevent voiding it.
Look for certified Rainbow service providers via the official website—check reviews on sites like BBB.org for reliability. Expect costs of $75-150 for a tune-up, including parts. Always ask about warranty coverage upfront.
FAQ
Q: How do I know if my Rainbow air purifier’s HEPA filter needs replacing?
A: The optional HEPA filter (in models like the SRX) should be replaced every 6-12 months or when it appears gray and clogged. Signs include reduced particle capture—test by holding a tissue near the exhaust; if it doesn’t stick firmly, replace it. Costs $20-40; genuine parts from Rainbow ensure compatibility.
Q: Can I use bleach to clean the water basin?
A: No, bleach can corrode plastic components and leave harmful residues. Stick to vinegar or mild soap for safe, effective cleaning. If mold is severe, a pro clean might be needed.
Q: Why is my purifier making a gurgling sound after cleaning?
A: This usually means air bubbles in the water line or incomplete drying. Empty and refill the basin, ensuring no trapped air. If it persists, check hoses for kinks—run empty for 2-3 minutes to clear.
Q: Is cleaning the same for all Rainbow models?
A: Mostly yes, but older models like the D3 may require extra steps for the separator. Always reference your manual; variations include filter access points.
Q: How long does a full clean take for a beginner?
A: About 45-60 minutes initially, but with practice, it’s down to 30. Break it into sessions if needed—rinse daily to keep it manageable.
Q: Does cleaning improve energy efficiency?
A: Absolutely—clogged units use 10-20% more power. Regular maintenance keeps runtime costs low, around $0.05-0.10 per hour.
Q: What if water smells bad even after cleaning?
A: This indicates biofilm buildup; soak in a stronger vinegar solution (1:2) overnight, then scrub. If unresolved, inspect for cracks in the basin.
Keep Your Rainbow Air Purifier Running Smoothly
With this guide, you’ve got all the tools for effective Rainbow air purifier cleaning and maintenance:
- A clear schedule to prevent buildup
- Step-by-step processes for safe, thorough cleans
- Pro tips and warning signs for proactive care
Following these steps not only restores your purifier’s efficiency but also ensures cleaner, healthier air in your home for years to come. Don’t wait for problems to arise—schedule your next clean today and breathe easier.
Have you cleaned your Rainbow air purifier using these steps? Share your tips or challenges in the comments below to help fellow owners!


