
Are you noticing reduced airflow or a musty smell coming from your Honeywell air purifier? A dirty air purifier can significantly impact its performance and even release pollutants back into the air. Often, a simple cleaning can restore your unit to peak efficiency. This guide will walk you through a comprehensive cleaning process, starting with a quick fix to get your purifier working optimally right away.
This isn’t just about surface cleaning. We’ll cover everything from filter replacement schedules and pre-filter maintenance to deep cleaning the interior components, ensuring your Honeywell air purifier continues to deliver clean, fresh air for years to come. By the end of this guide, you’ll be equipped with the knowledge to maintain your purifier and breathe easier.
Common Causes of a Dirty Honeywell Air Purifier
Several factors contribute to a dirty Honeywell air purifier. Understanding these causes helps you target the cleaning process effectively.
Dust and Particle Buildup
The primary culprit! Air purifiers are designed to trap dust, pollen, pet dander, and other airborne particles. Over time, these accumulate on the filters and within the unit.
Pet Hair and Dander
If you have pets, their hair and dander can quickly clog filters and build up inside the purifier, hindering airflow.
Smoke and Odor Absorption
During events like wildfires or cooking, air purifiers absorb smoke and odors, which can leave residue and contribute to a stale smell.
Mold and Bacteria Growth
In humid environments, moisture can collect inside the purifier, creating a breeding ground for mold and bacteria if not properly maintained.
How to Clean Your Honeywell Air Purifier: A Step-by-Step Guide
This section details a comprehensive cleaning process, from simple pre-filter maintenance to more in-depth internal cleaning.
Method 1: Quick Pre-Filter Clean (Weekly)
This is your first line of defense and should be done weekly for optimal performance.
Diagnosing the Issue
Visually inspect the pre-filter. If it’s visibly dusty or clogged, it needs cleaning.
Fix Steps
- Unplug the Purifier: Always disconnect the power before any maintenance.
- Remove the Pre-Filter: Locate the pre-filter (usually behind the intake grill) and remove it. Refer to your model’s manual for specific instructions.
- Vacuum the Pre-Filter: Use a brush attachment to gently vacuum both sides of the pre-filter.
- Wash (if applicable): Some pre-filters are washable. Check your manual. If washable, hand wash with mild detergent and cool water, then allow to air dry completely before reinstalling.
- Reinstall the Pre-Filter: Once dry, reinsert the pre-filter into its designated slot.
Testing
Turn on the purifier and observe the airflow. You should notice an immediate improvement if the pre-filter was clogged.
Method 2: Filter Replacement (Every 3-6 Months)
Filters have a limited lifespan and need to be replaced regularly.
Diagnosing the Issue
Check the filter replacement indicator light (if your model has one). If the light is on, or if you notice reduced airflow even after cleaning the pre-filter, it’s time to replace the filter.
Fix Steps
- Unplug the Purifier: Safety first!
- Remove the Old Filter: Access the filter compartment and remove the old filter.
- Install the New Filter: Insert the new Honeywell-approved filter, ensuring it’s properly seated.
- Reset the Filter Indicator: If your model has a filter replacement indicator light, reset it according to the manual’s instructions.
Testing
Turn on the purifier. The airflow should be significantly improved.
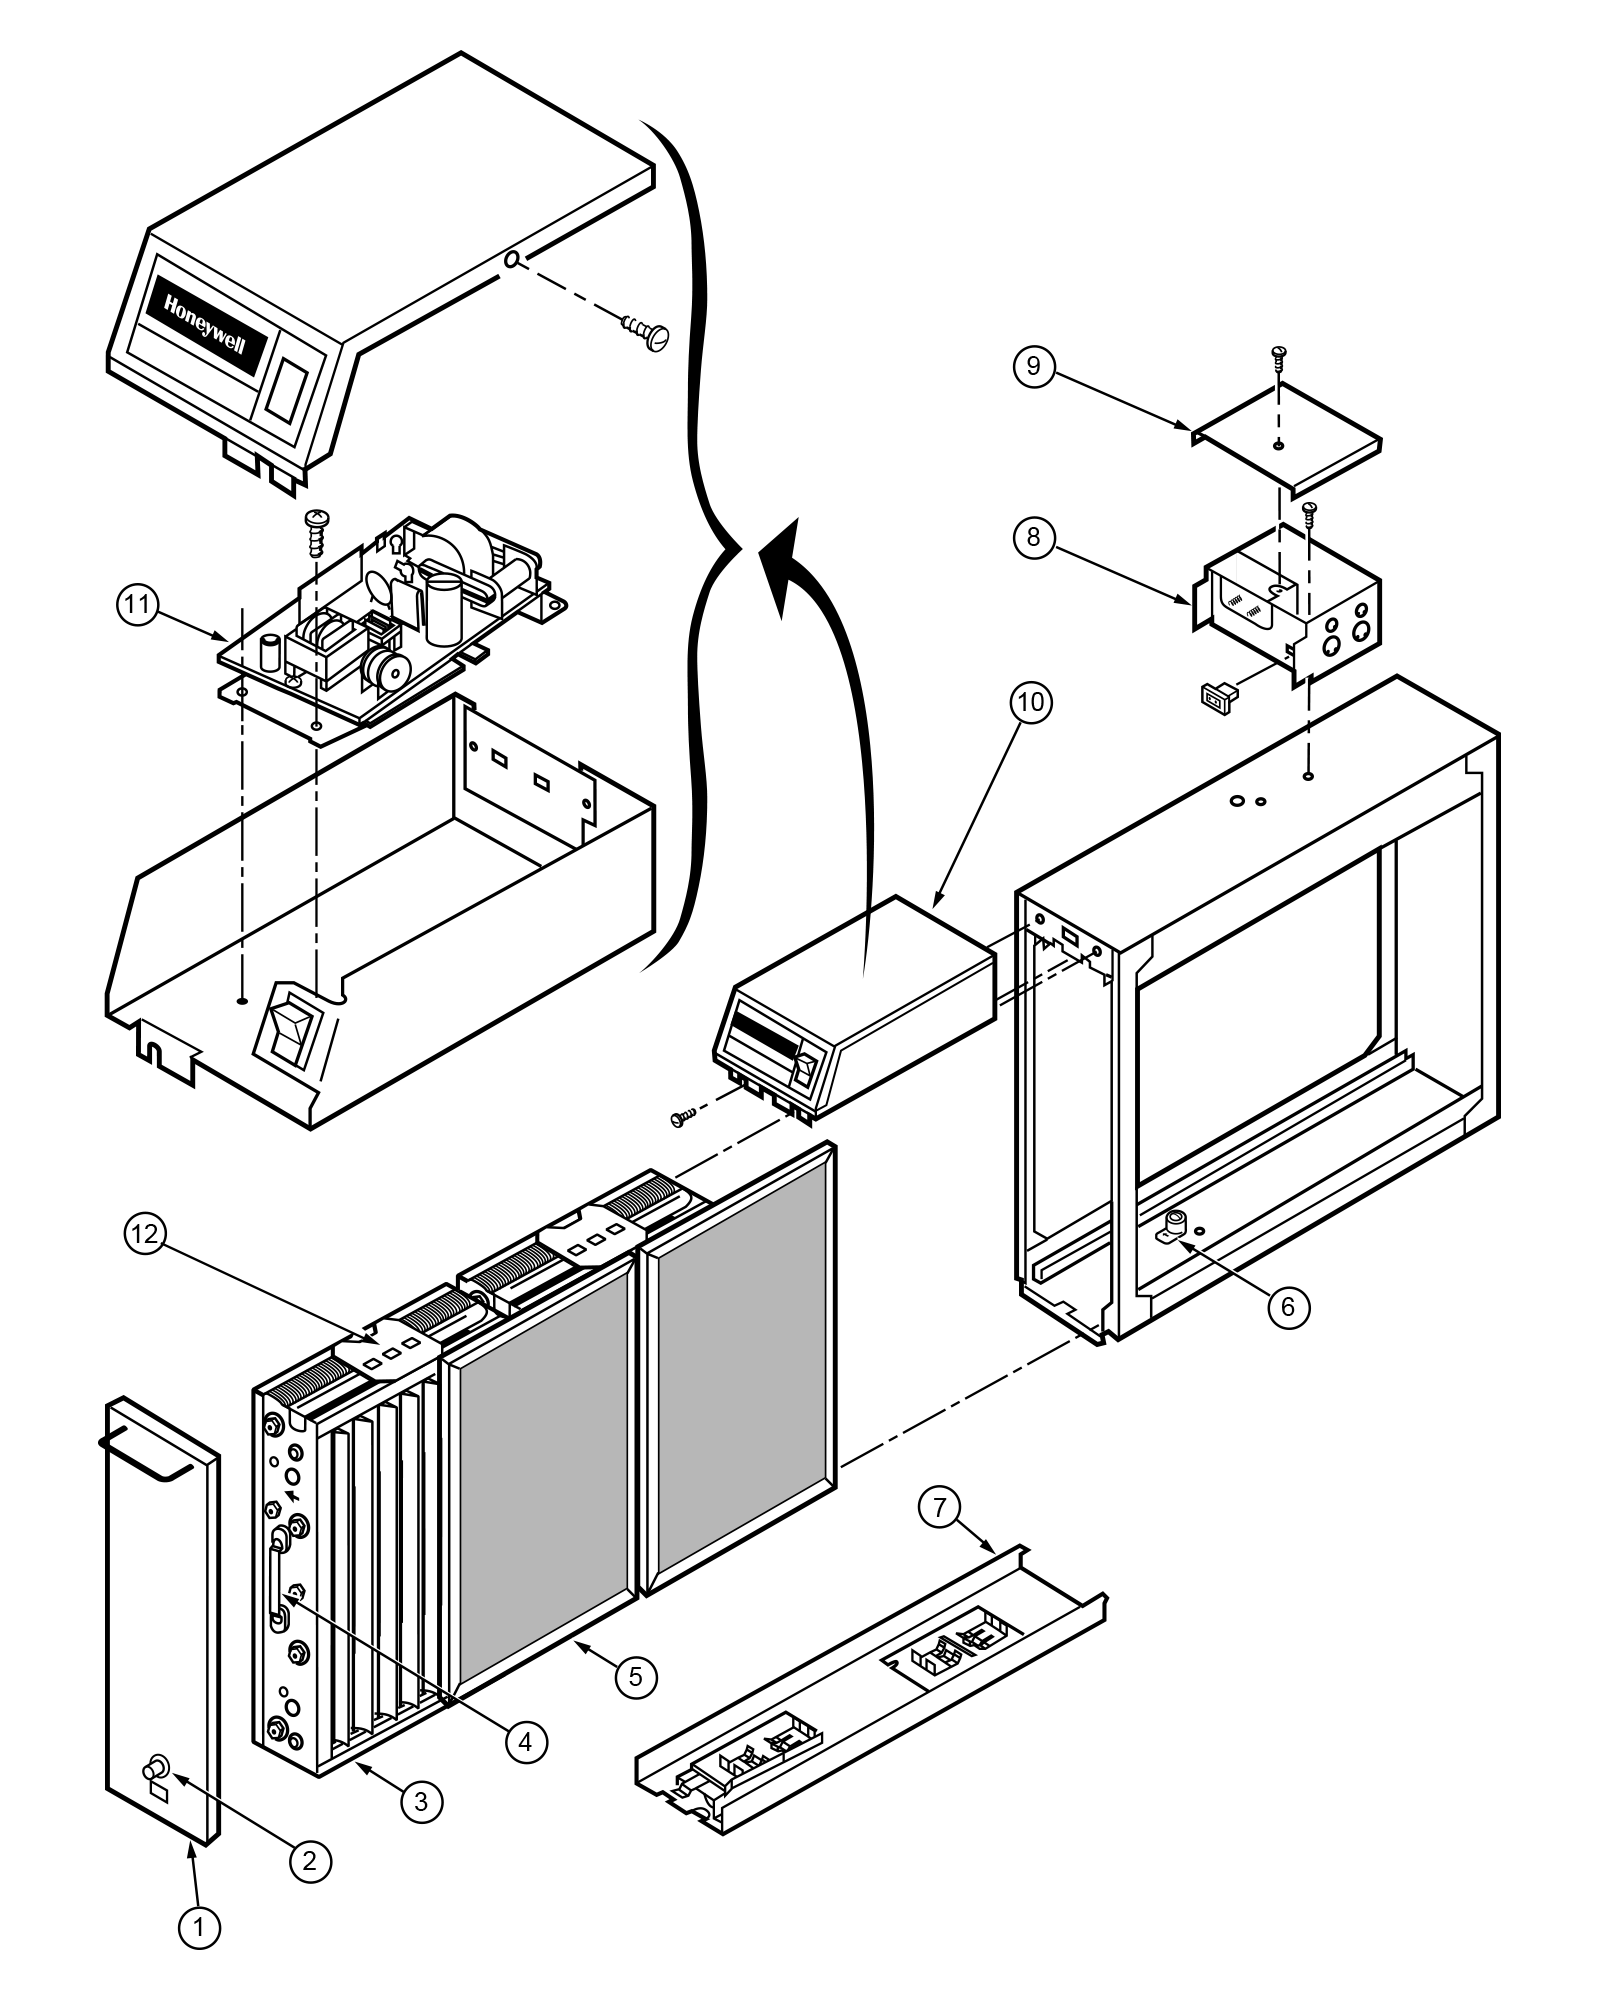
Method 3: Deep Interior Cleaning (Every 6-12 Months)
This involves cleaning the internal components to remove accumulated dust and debris.
Diagnosing the Issue
If you notice a persistent odor or significant dust buildup inside the purifier even after filter maintenance, a deep clean is necessary.
Fix Steps
- Unplug the Purifier: Absolutely essential.
- Disassemble the Unit: Carefully disassemble the purifier according to your model’s manual. This may involve removing the outer casing and fan. Important: Take photos during disassembly to help with reassembly.
- Vacuum Internal Components: Use a brush attachment to thoroughly vacuum all internal surfaces, including the fan blades, housing, and sensors.
- Wipe Down Surfaces: Dampen a microfiber cloth with mild detergent and water (ensure it’s not dripping wet) and wipe down all internal surfaces. Avoid getting water into electrical components.
- Clean the Fan: Carefully clean the fan blades with a damp cloth.
- Reassemble the Unit: Carefully reassemble the purifier, referring to your photos if needed.
- Allow to Dry Completely: Before plugging in, ensure all components are completely dry.
Testing
Plug in the purifier and run it on a high setting for a few minutes to ensure everything is functioning correctly.
How Often to Clean Your Honeywell Air Purifier
| Frequency | Task |
|---|---|
| Weekly | Pre-filter cleaning (vacuum or wash) |
| 3-6 Months | Filter Replacement |
| 6-12 Months | Deep Interior Cleaning |
| As Needed | Wipe down exterior casing |
Pro Tips for Honeywell Air Purifier Maintenance
- Use Genuine Honeywell Filters: Aftermarket filters may not provide the same level of filtration.
- Location Matters: Avoid placing your air purifier in areas with high humidity or direct sunlight.
- Don’t Use Harsh Chemicals: Avoid using abrasive cleaners or solvents, as they can damage the purifier.
- Consider a Second Pre-Filter: For homes with pets or heavy dust, using two pre-filters can extend the life of your main filter.
- Check for Blocked Vents: Ensure the intake and exhaust vents are not obstructed by furniture or other objects.
- Run Continuously: For optimal air quality, run your air purifier 24/7 on a low setting.
- Regularly Dust the Area: Reducing dust in the environment will lessen the burden on your air purifier.
When to Call a Professional
- Persistent Odor: If you’ve cleaned the purifier thoroughly and a foul odor persists, there may be a hidden mold or bacteria issue.
- Electrical Issues: If you notice sparks, burning smells, or other electrical problems, immediately unplug the purifier and contact a qualified technician.
- Complex Disassembly: If you’re uncomfortable disassembling the unit, it’s best to leave it to a professional.
FAQ
Q: Can I wash the Honeywell filter?
A: No, most Honeywell filters are not washable. Washing them can damage the filter media and reduce their effectiveness.
Q: How do I know which filter to buy?
A: Refer to your air purifier’s model number and consult the Honeywell website or owner’s manual to determine the correct filter replacement.
Q: My air purifier is making a loud noise. What could be the problem?
A: A loud noise could indicate a clogged filter, a loose component, or a failing fan. Try cleaning or replacing the filter first. If the noise persists, contact a professional.
Q: How long do Honeywell air purifier filters last?
A: Filter lifespan varies depending on usage and air quality. Generally, filters should be replaced every 3-6 months.
Get Your Honeywell Air Purifier Working Again
By following these cleaning and maintenance steps, you can ensure your Honeywell air purifier continues to deliver clean, fresh air for years to come. Remember to prioritize regular pre-filter cleaning, timely filter replacement, and occasional deep cleaning to keep your unit running efficiently.
Have you successfully cleaned your Honeywell air purifier? Share your experience or any helpful tips in the comments below!


