
Are you noticing reduced airflow or a musty smell coming from your LivePure air purifier? A dirty filter is often the culprit, and cleaning or replacing it is crucial for optimal performance. Luckily, cleaning your LivePure filter is a simple process that can significantly improve your air quality – and we’ll show you how to do it quickly.
This comprehensive guide will walk you through everything you need to know about cleaning your LivePure air purifier filter, from identifying the filter type to step-by-step cleaning instructions, maintenance tips, and knowing when it’s time for a replacement. By the end of this article, you’ll be able to keep your LivePure running efficiently and breathing cleaner air.
Understanding Your LivePure Filter

LivePure air purifiers utilize several filter types, each requiring slightly different care. Knowing your filter type is the first step in proper maintenance.
- Pre-Filter: This is the first line of defense, capturing large particles like dust, pet hair, and pollen. It’s washable and should be cleaned frequently.
- HEPA Filter: The High-Efficiency Particulate Air (HEPA) filter captures 99.97% of particles as small as 0.3 microns, including dust mites, mold spores, and bacteria. HEPA filters are not washable and require replacement.
- Carbon Filter: This filter absorbs odors, gases, and volatile organic compounds (VOCs). Like HEPA filters, carbon filters are generally not washable and require replacement.
- Specialty Filters (Optional): Some LivePure models have additional filters for specific needs, like a UV-C light filter for sanitization. These typically don’t require cleaning but may have replacement schedules.
How to Clean Your LivePure Air Purifier Pre-Filter
The pre-filter is the most frequently cleaned component. Regular cleaning extends the life of your HEPA and carbon filters.
Method 1: Vacuuming the Pre-Filter
This is a quick and easy method for light dust accumulation.
- Diagnosing the Issue: Check the pre-filter for visible dust and debris. If it’s lightly coated, vacuuming is sufficient.
- Fix Steps:
- Turn off and unplug your LivePure air purifier.
- Locate and remove the pre-filter (refer to your model’s manual).
- Use a brush attachment on your vacuum cleaner to gently vacuum both sides of the filter.
- Reinstall the pre-filter.
- Testing: Turn on the air purifier and check for improved airflow.
Method 2: Washing the Pre-Filter
For more stubborn dirt and grime, washing is required.
- Diagnosing the Issue: If vacuuming doesn’t remove all the debris, or the filter feels greasy, washing is the next step.
- Fix Steps:
- Turn off and unplug your LivePure air purifier.
- Remove the pre-filter.
- Gently wash the filter with lukewarm water and mild dish soap. Avoid harsh chemicals or abrasive cleaners.
- Rinse thoroughly until all soap residue is gone.
- Allow the filter to air dry completely (at least 24 hours) before reinstalling. Do not use a hairdryer or other heat source.
- Testing: Once dry, reinstall the pre-filter and turn on the air purifier to verify improved airflow.
Replacing HEPA and Carbon Filters
HEPA and carbon filters cannot be cleaned and must be replaced when they become saturated.
Determining Replacement Time
- HEPA Filter: Replace every 6-12 months, depending on usage and air quality. Reduced airflow or a noticeable odor indicates it’s time for a replacement.
- Carbon Filter: Replace every 3-6 months, as it loses its ability to absorb odors and gases over time.
- Filter Replacement Indicator: Many LivePure models have a filter replacement indicator light. Refer to your manual for specific instructions.
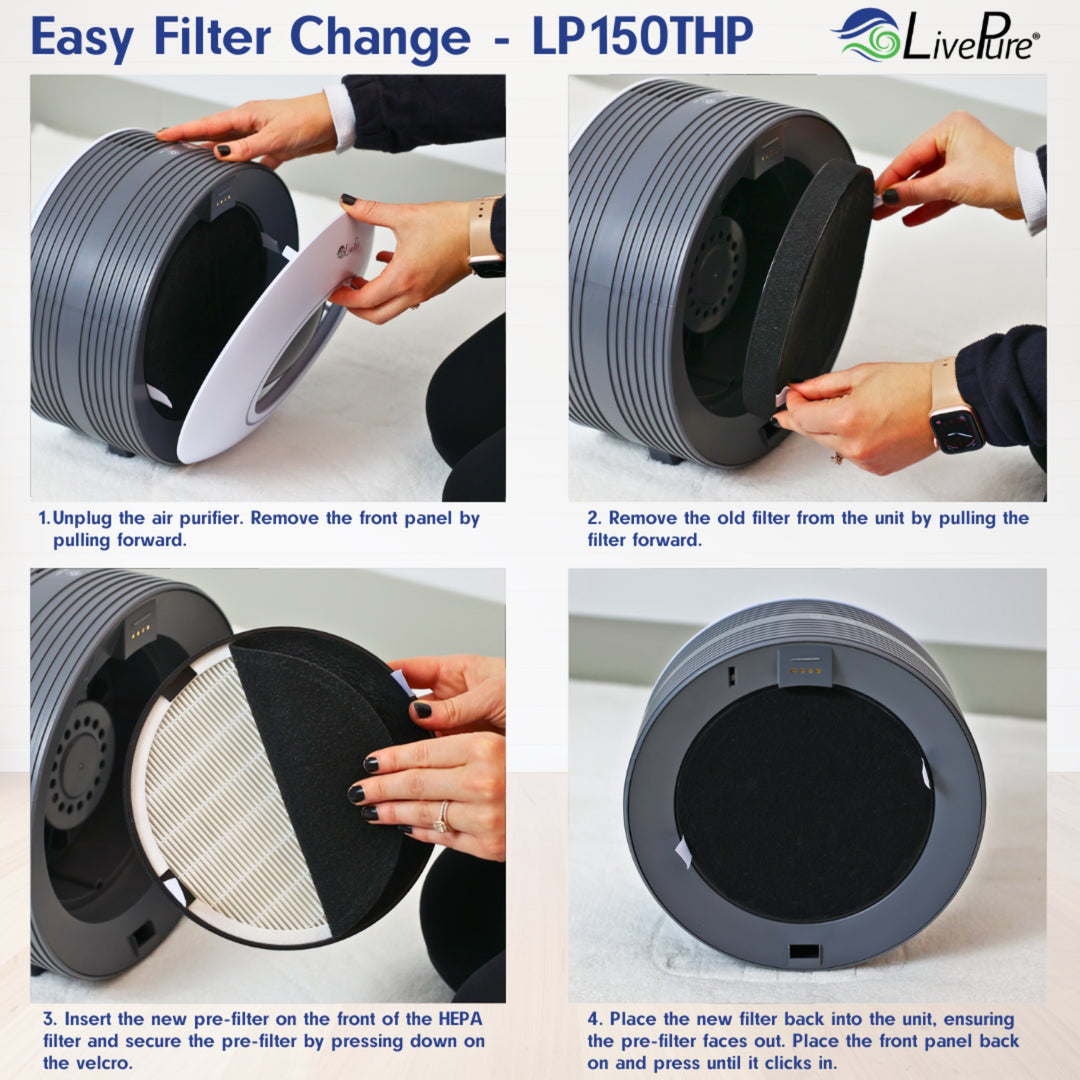
Replacement Process
- Turn off and unplug the air purifier.
- Locate and remove the old HEPA and carbon filters (refer to your manual).
- Install the new filters, ensuring they are properly seated.
- Reset the filter replacement indicator (if applicable).
- Plug in and turn on the air purifier.
Prevention Tips and Maintenance Advice

- Regular Vacuuming: Vacuum the pre-filter every 2-4 weeks, depending on dust levels.
- Air Purifier Placement: Position your LivePure away from direct sunlight and high-traffic areas.
- Monitor Air Quality: Pay attention to changes in air quality that might indicate a filter needs cleaning or replacing.
- Filter Subscription: Consider signing up for a filter subscription service to ensure you always have replacements on hand.
- Clean Around the Unit: Regularly dust the exterior of the air purifier to prevent dust buildup.
Pro Tips
- Extend Filter Life: Running the air purifier on a lower fan speed can extend the life of the filters.
- Avoid Water Damage: Ensure the pre-filter is completely dry before reinstalling to prevent mold growth.
- Filter Compatibility: Always use genuine LivePure replacement filters to ensure optimal performance and avoid damaging the unit.
- Odor Control: If you notice lingering odors even after replacing the carbon filter, check for other sources of odor in the room.
- Airflow Check: After cleaning or replacing filters, feel the airflow coming from the unit to confirm improved performance.
- Document Replacement Dates: Keep a record of when you replace your filters for future reference.
Professional Help
- Signs You Need Professional Help: If your air purifier is making unusual noises, not turning on, or consistently displaying error messages, it may require professional repair.
- Finding a Service Provider: Contact LivePure customer support for authorized service centers in your area.
- Cost Ranges: Repair costs vary depending on the issue, but typically range from $50 to $200.
FAQ
Q: How often should I clean the pre-filter?
A: We recommend cleaning the pre-filter every 2-4 weeks, but adjust based on your environment and dust levels.
Q: Can I wash the HEPA filter?
A: No, HEPA filters are not washable. Washing will damage the filter and reduce its effectiveness. They must be replaced.
Q: How do I know when to replace the carbon filter?
A: Replace the carbon filter when you notice odors returning or the filter replacement indicator light illuminates.
Q: Where can I buy replacement LivePure filters?
A: You can purchase replacement filters directly from the LivePure website, authorized retailers, or through a filter subscription service.
Q: What happens if I don’t clean or replace the filters?
A: Neglecting filter maintenance can reduce airflow, decrease air quality, and potentially damage the air purifier motor.
Get Your LivePure Working Again
By following this guide, you’ve learned how to effectively clean your LivePure air purifier’s pre-filter and when to replace the HEPA and carbon filters. Regular maintenance ensures optimal performance and cleaner, healthier air for you and your family.
Remember these key takeaways:
* Vacuum the pre-filter every 2-4 weeks.
* Wash the pre-filter as needed.
* Replace HEPA and carbon filters according to the manufacturer’s recommendations.
Have you found this guide helpful? Share your LivePure cleaning tips and experiences in the comments below!


