
Are you noticing reduced airflow or a musty smell coming from your Toppin air purifier? A dirty filter is often the culprit, significantly impacting performance and air quality. Fortunately, cleaning or replacing your Toppin air purifier filter is a simple process that can restore your unit to optimal functionality. This quick fix can make a huge difference in the air you breathe.
This comprehensive guide will walk you through everything you need to know about maintaining your Toppin air purifier’s filter, from identifying the filter type to detailed cleaning instructions and replacement schedules. We’ll cover both washable and non-washable filters, preventative measures, and what to do if you’re still experiencing issues. By the end of this article, you’ll be equipped to keep your Toppin air purifier running efficiently and ensuring clean, fresh air for years to come.
Understanding Your Toppin Air Purifier Filter
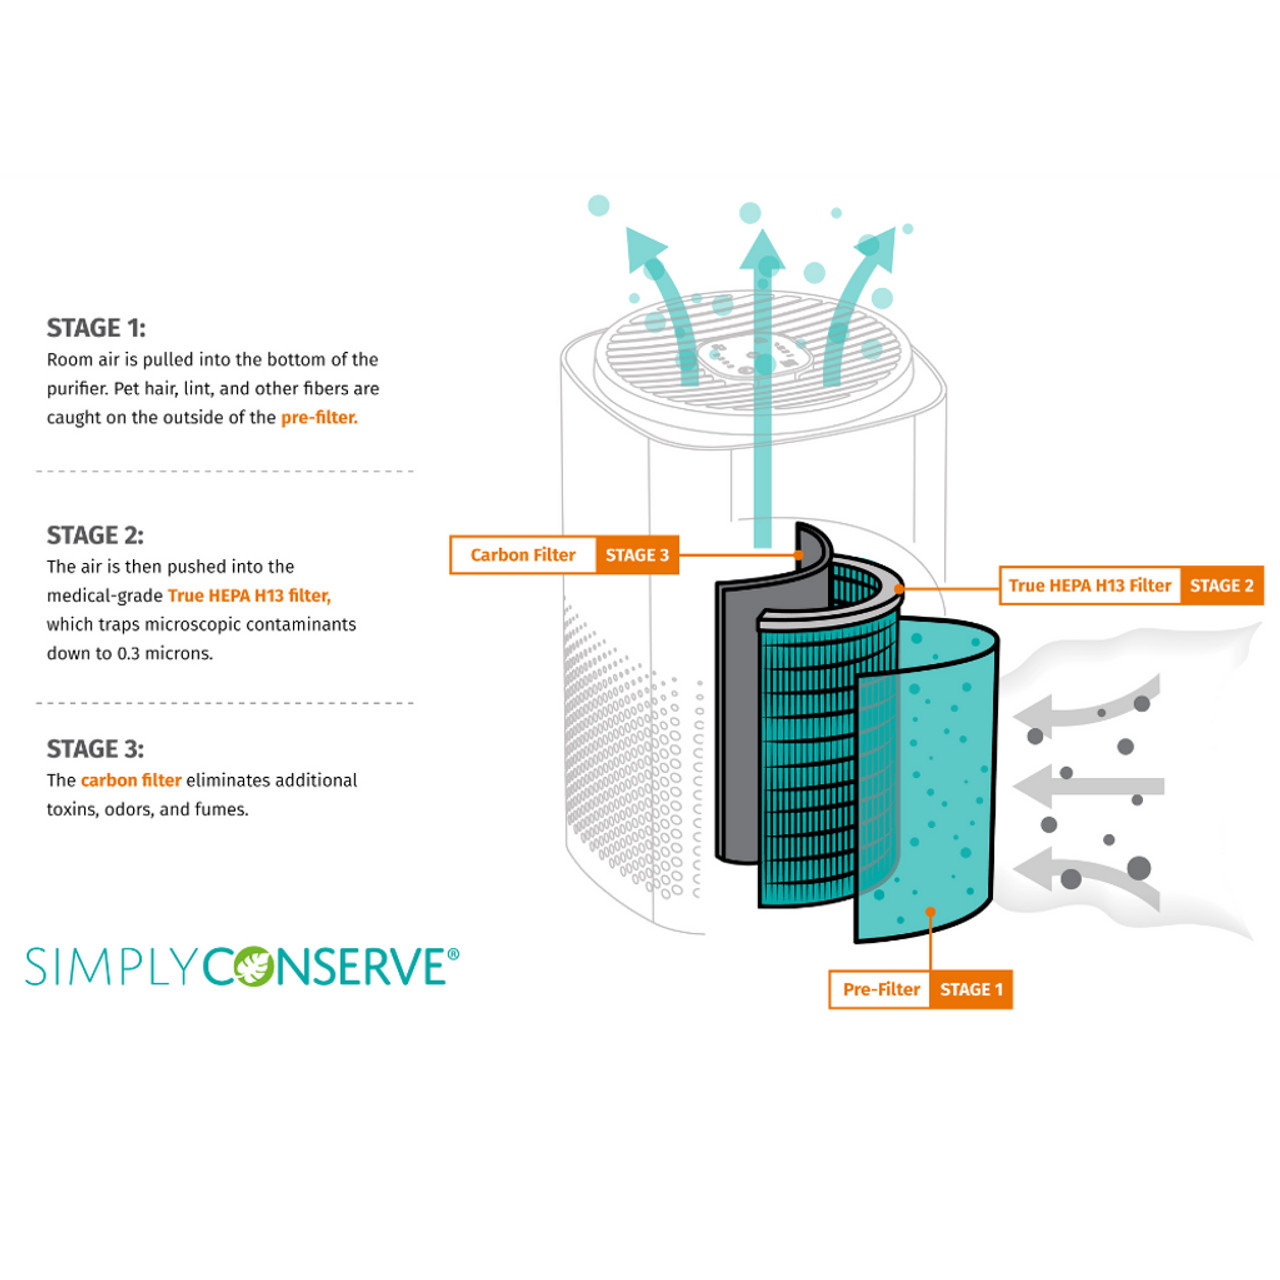
Before diving into cleaning, it’s essential to understand the type of filter your Toppin model uses. Toppin air purifiers utilize several filter layers, but the primary one requiring regular attention is the pre-filter and the HEPA filter.
Pre-Filter vs. HEPA Filter
- Pre-Filter: This is the first line of defense, capturing larger particles like dust, pet hair, and pollen. It’s typically washable and extends the life of the HEPA filter.
- HEPA Filter: The High-Efficiency Particulate Air (HEPA) filter captures 99.97% of particles 0.3 microns in size, including allergens, mold spores, and bacteria. Most HEPA filters are not washable and require replacement.
- Activated Carbon Filter: Some Toppin models include an activated carbon filter to remove odors, gases, and VOCs. These are generally not washable and need replacing.
Identifying Your Filter Type
Check your Toppin air purifier’s model number and refer to the user manual to confirm the specific filter types used. This information is crucial for proper maintenance. Toppin’s website also provides detailed filter specifications for each model.
Cleaning Your Toppin Air Purifier Filters
The cleaning process varies depending on whether you have a washable pre-filter or a non-washable HEPA or carbon filter.
Method 1: Cleaning the Washable Pre-Filter
This is the most frequent maintenance task for Toppin air purifiers.
Diagnosing the Issue
A dusty or visibly dirty pre-filter is a clear indication it needs cleaning. Reduced airflow is another sign.
Fix Steps
- Power Off & Unplug: Always disconnect the air purifier from the power source before any maintenance.
- Access the Pre-Filter: Open the air purifier’s filter compartment (refer to your user manual for specific instructions).
- Remove the Pre-Filter: Carefully remove the pre-filter.
- Vacuum: Use a brush attachment on your vacuum cleaner to remove loose dust and debris.
- Wash: Gently wash the pre-filter with lukewarm water and mild soap. Avoid harsh detergents or abrasive cleaners.
- Rinse Thoroughly: Ensure all soap residue is removed.
- Dry Completely: Allow the pre-filter to air dry completely before reinstalling. This is crucial to prevent mold growth. This can take 12-24 hours.
- Reinstall: Once dry, reinsert the pre-filter into the air purifier.
Testing
Turn on the air purifier and check for improved airflow.
Method 2: Replacing the HEPA and Carbon Filters
HEPA and carbon filters are generally not washable and need to be replaced when they become clogged.
Diagnosing the Issue
Reduced airflow, lingering odors, or a notification from your air purifier (if equipped with a filter replacement indicator) signal the need for replacement.
Fix Steps
- Power Off & Unplug: Disconnect the air purifier from the power source.
- Access the Filters: Open the filter compartment.
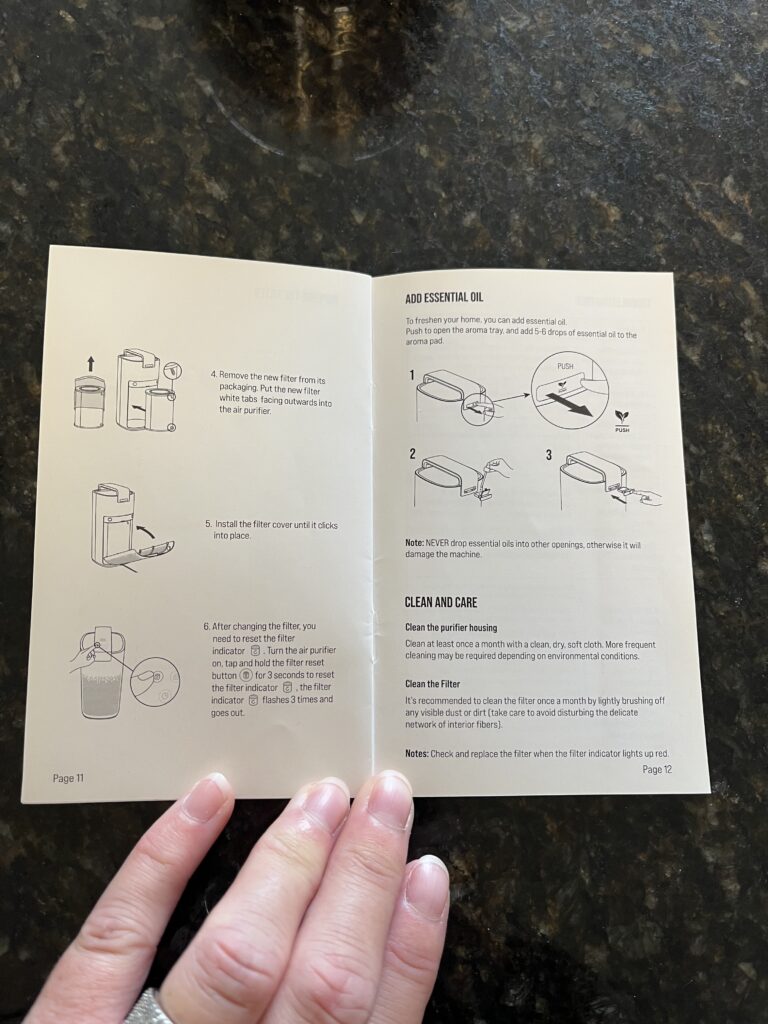
- Remove Old Filters: Remove both the HEPA and carbon filters (if applicable).
- Install New Filters: Insert the new filters, ensuring they are properly seated. Refer to your user manual for correct orientation.
- Reset Filter Indicator: If your Toppin air purifier has a filter replacement indicator, reset it according to the user manual.
Testing
Turn on the air purifier and confirm normal operation.
Filter Replacement Schedule & Prevention
Regular maintenance is key to maximizing your Toppin air purifier’s lifespan and performance.
Recommended Frequency
| Filter Type | Frequency |
|---|---|
| Pre-Filter | Every 2-4 weeks (depending on usage) |
| HEPA Filter | Every 6-12 months |
| Activated Carbon Filter | Every 3-6 months |
These are general guidelines. Adjust the frequency based on your environment and usage.
Prevention Tips
- Regular Vacuuming: Vacuum your home frequently to reduce the amount of dust and debris entering the air purifier.
- Air Purifier Placement: Position the air purifier in a central location with good airflow.
- Avoid Blocking Airflow: Don’t place objects in front of the air purifier’s vents.
- Monitor Filter Condition: Regularly check the filters for dirt and debris.
Pro Tips for Toppin Air Purifier Maintenance
- Filter Subscription Services: Consider signing up for a filter subscription service to ensure you always have replacements on hand.
- Gentle Cleaning: When washing the pre-filter, avoid scrubbing vigorously, as this can damage the material.
- Filter Storage: Store new filters in a clean, dry place until ready to use.
- Check for Leaks: After cleaning the pre-filter, inspect the filter compartment for any leaks or damage.
- Model-Specific Instructions: Always prioritize the instructions provided in your Toppin air purifier’s user manual.
- Air Quality Monitoring: Use an air quality monitor to track the effectiveness of your air purifier and determine the optimal filter replacement schedule.
- Consider a Second Pre-Filter: In particularly dusty environments, layering a second pre-filter can extend the life of both the pre-filter and the HEPA filter.
When to Call a Professional
While most maintenance tasks are DIY-friendly, consider professional help if:
- You suspect internal damage to the air purifier.
- You’re unable to locate replacement filters for your model.
- The air purifier is making unusual noises.
FAQ
Q: Can I use a different brand of filter for my Toppin air purifier?
A: While some universal filters may fit, it’s best to use Toppin-approved filters to ensure optimal performance and maintain your warranty.
Q: How do I know when it’s time to replace the HEPA filter?
A: Reduced airflow, lingering odors, or a filter replacement indicator are all signs you need a new HEPA filter.
Q: Is it okay to run my air purifier with a wet pre-filter?
A: No! Always ensure the pre-filter is completely dry before reinstalling it to prevent mold growth.
Q: Where can I purchase replacement Toppin filters?
A: You can purchase replacement filters directly from the Toppin website, Amazon, or other authorized retailers.
Alternative Solutions
If you’re experiencing persistent air quality issues despite regular filter maintenance, consider:
| Solution | Pros | Cons | Best For |
|---|---|---|---|
| Additional Air Purifier | Increased coverage, better air quality | Higher cost, more space required | Larger homes or areas with severe air pollution |
| Air Sealing | Reduces drafts and pollutant entry | Can be expensive and time-consuming | Homes with significant air leaks |
| Regular Cleaning | Reduces dust and allergens | Requires consistent effort | All homes |
Keep Your Toppin Air Purifier Running Smoothly
By following this guide, you’re well-equipped to maintain your Toppin air purifier and enjoy clean, fresh air. Remember to regularly clean or replace the filters, monitor your air quality, and address any issues promptly. Don’t let a dirty filter compromise your indoor air quality – take action today!
Have you successfully cleaned or replaced your Toppin air purifier filter? Share your experience in the comments below to help other readers!


