
Are you noticing reduced airflow or a musty smell coming from your Winix air purifier? A dirty air purifier can significantly diminish its effectiveness, and the frustration of breathing in less-than-clean air is understandable. Often, a simple cleaning can restore your Winix to peak performance. This quick fix often resolves the issue immediately.
This comprehensive guide will walk you through everything you need to know to thoroughly clean your Winix air purifier, covering routine maintenance, troubleshooting common issues, and preventative measures to keep your air clean for years to come. We’ll cover cleaning the pre-filter, carbon filter, and plasmawave technology, ensuring you get the most out of your investment and breathe easy. By the end of this guide, you’ll be equipped to handle all aspects of Winix air purifier maintenance.
Common Causes of Reduced Air Purifier Performance
Several factors can contribute to a decline in your Winix air purifier’s performance. Understanding these causes helps you address the root of the problem:
Dust and Particle Buildup
The most common culprit. Air purifiers are designed to trap dust, pollen, pet dander, and other airborne particles. Over time, these accumulate on the filters, reducing airflow and efficiency.
Carbon Filter Saturation
Carbon filters absorb odors, gases, and VOCs. Once saturated, they can no longer effectively remove these pollutants and may even release them back into the air.
Plasmawave Component Accumulation
The Plasmawave technology generates ions to neutralize pollutants. Build-up on this component decreases its efficacy.
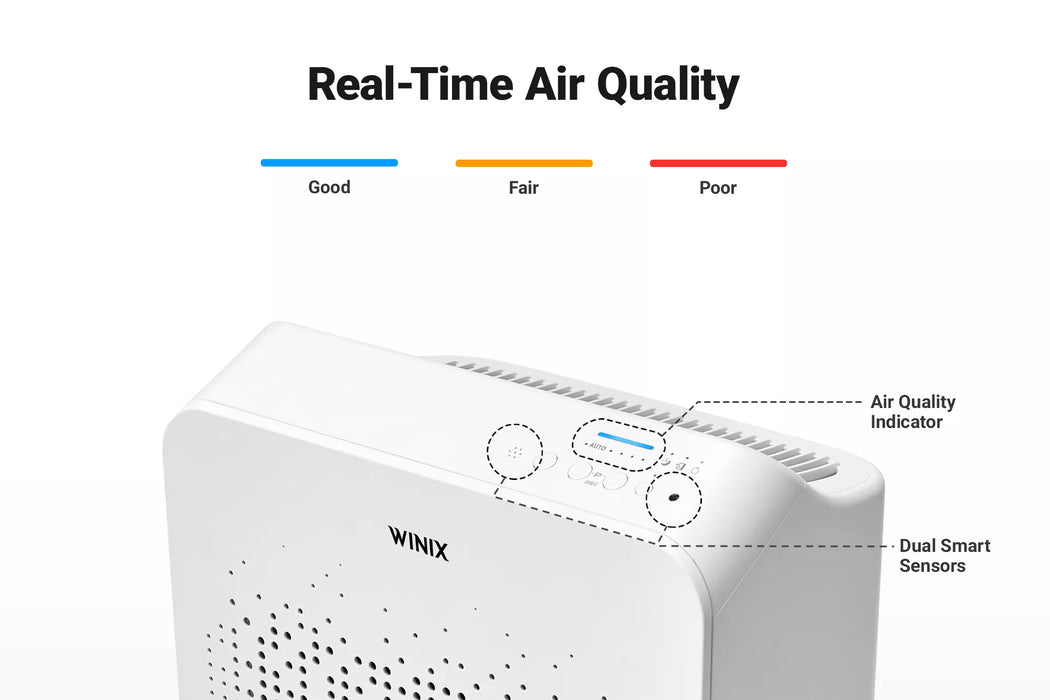
Sensor Blockage
Dust accumulation on the sensors can cause inaccurate readings, leading to suboptimal performance or malfunction.
How to Clean Your Winix Air Purifier: A Step-by-Step Guide

This section details a comprehensive cleaning process for your Winix air purifier, broken down into manageable steps.
Method 1: Routine Maintenance (Weekly/Monthly)
This method focuses on regular upkeep to prevent significant buildup.
Diagnosing the Issue
Check the filter indicator lights on your purifier. Red lights indicate it’s time for filter maintenance. Visually inspect the pre-filter for dust accumulation.
Fix Steps
- Unplug the Air Purifier: Safety first! Always disconnect the power before cleaning.
- Remove the Front Panel: Gently pull the front panel away from the unit.
- Clean the Pre-Filter: Vacuum the pre-filter using a brush attachment. For heavier buildup, gently rinse with lukewarm water, ensuring it’s completely dry before reinstalling.
- Vacuum Interior: Use a brush attachment on your vacuum to remove dust from the interior of the purifier.
- Reassemble: Reattach the front panel.
Testing
Turn on the purifier and observe the airflow. If the airflow is improved, you’ve successfully completed the routine maintenance.
Method 2: Deep Cleaning (Every 3-6 Months)
This method involves a more thorough cleaning of all components.
Step 1: Filter Removal
- Remove Front Panel: As in Method 1.
- Remove Filters: Carefully remove the pre-filter, carbon filter, and True HEPA filter (if applicable).
Step 2: Pre-Filter Cleaning
- Vacuum: Thoroughly vacuum the pre-filter.
- Wash (If Necessary): If heavily soiled, hand wash with mild detergent and lukewarm water. Rinse thoroughly and allow to air dry completely before reinstalling.
Step 3: Carbon Filter Refresh
- Sun Exposure: Place the carbon filter in direct sunlight for 2-3 hours to help reactivate the carbon. Do not wash the carbon filter.
- Vacuum: Gently vacuum the surface of the carbon filter to remove loose dust.
Step 4: True HEPA Filter (If Applicable)
- Vacuum: Gently vacuum the True HEPA filter. Do not wash the True HEPA filter.
Step 5: Plasmawave Component Cleaning
- Locate: Identify the Plasmawave component (typically a small metal grid).
- Gentle Wipe: Using a dry, soft cloth, gently wipe the Plasmawave component to remove any dust accumulation. Do not use water or cleaning solutions.
Step 6: Reassembly
- Reinstall Filters: Install the filters in the correct order (pre-filter, carbon filter, True HEPA filter).
- Reattach Front Panel: Securely reattach the front panel.
Step 7: Testing
Turn on the purifier and observe the airflow. Check the filter indicator lights.
Method 3: Sensor Cleaning (As Needed)
Dust buildup on the sensors can affect the purifier’s performance.
Diagnosing the Issue
If the purifier is running constantly on high speed or not responding to auto mode, the sensors may be dirty.
Fix Steps
- Locate Sensors: Identify the sensor openings (typically near the air intake).
- Gentle Cleaning: Use a cotton swab lightly dampened with isopropyl alcohol to gently clean the sensor openings. Do not insert anything into the sensor openings.
Testing
Turn on the purifier in auto mode and observe if the fan speed adjusts appropriately to the air quality.
How Often to Clean Your Winix Air Purifier
| Frequency | Task |
|---|---|
| Weekly | Vacuum Pre-Filter |
| Monthly | Full Routine Maintenance (Method 1) |
| 3-6 Months | Deep Cleaning (Method 2) |
| As Needed | Sensor Cleaning (Method 3) |
Pro Tips for Winix Air Purifier Maintenance

- Filter Replacement: Replace filters according to the manufacturer’s recommendations (typically every 3-6 months for the carbon filter and 6-12 months for the True HEPA filter).
- Pre-Filter Washing: Avoid over-washing the pre-filter, as it can damage the material.
- Avoid Harsh Chemicals: Never use harsh chemicals or abrasive cleaners on any part of the air purifier.
- Placement: Place your air purifier in an open area away from obstructions for optimal airflow.
- Regular Vacuuming: Vacuum around the air purifier regularly to minimize dust intake.
- Reset Filter Indicator: After replacing the filters, remember to reset the filter indicator light according to the Winix manual.
- Consider Air Quality: If you live in an area with high pollution or have pets, you may need to clean and replace filters more frequently.
Professional Help
If you’ve followed these steps and your Winix air purifier is still not functioning correctly, it might be time to seek professional help.
- Signs to Seek Help: Unusual noises, burning smells, or continued malfunction after cleaning.
- Finding a Technician: Contact Winix customer support or a qualified appliance repair technician.
- Cost Range: Repair costs can vary depending on the issue, but typically range from $50-$150.
- Warranty: Check your warranty status before seeking repair services.
FAQ
Q: Can I wash the True HEPA filter?
A: No, washing the True HEPA filter can damage the delicate fibers and reduce its effectiveness. Only vacuum it gently.
Q: How do I know when to replace the carbon filter?
A: When you notice odors returning or the filter indicator light illuminates, it’s time to replace the carbon filter.
Q: What does the Plasmawave technology do?
A: Plasmawave technology generates ions that neutralize odors, allergens, and pollutants at a molecular level.
Q: My purifier is making a loud noise after cleaning. What could be the problem?
A: Ensure all filters are properly seated and the front panel is securely attached. If the noise persists, contact customer support.
Alternative Solutions
If you’re still encountering issues, consider these alternatives:
| Solution | Pros | Cons | Best For |
|---|---|---|---|
| Filter Replacement | Guarantees optimal performance | Can be costly | Severe buildup or persistent issues |
| Different Air Purifier Model | May offer improved features or performance | Requires a new purchase | Significant performance needs |
Get Your Winix Air Purifier Working Again
By following this guide, you’ve learned how to effectively clean and maintain your Winix air purifier, ensuring clean and healthy air for your home. Remember to prioritize routine maintenance, address issues promptly, and replace filters as needed.
Have you successfully cleaned your Winix air purifier? Share your experience or any tips you’ve discovered in the comments below!


