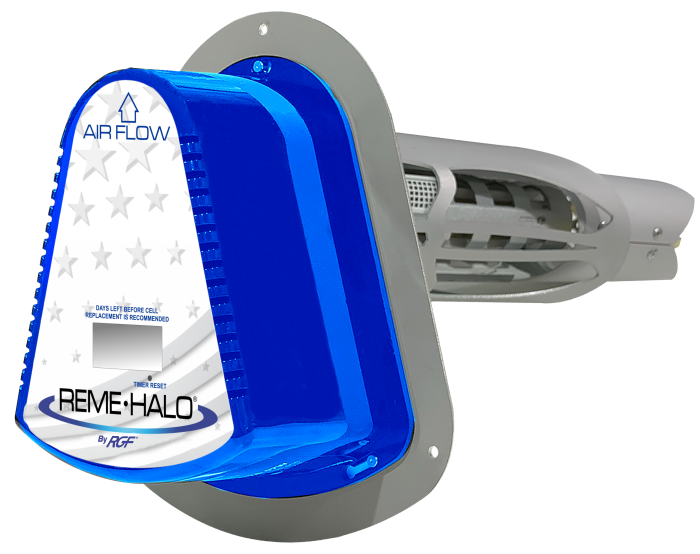
Are you looking to improve the air quality in your home or business? The Reme Halo air purifier is a popular choice, known for its advanced purification technology. But many people find the installation process daunting. Don’t worry – a successful installation is achievable, and this guide will walk you through every step. We’ll start with a quick check to ensure compatibility, and then proceed to a detailed, step-by-step installation process.
This comprehensive guide goes beyond basic instructions. We’ll cover everything from the necessary tools and materials to detailed wiring diagrams, post-installation testing, and troubleshooting common issues. By the end of this article, you’ll be confident in your ability to install your Reme Halo and breathe cleaner, healthier air.
What You’ll Need for Reme Halo Installation
| Item | Quantity | Specifications |
|---|---|---|
| Reme Halo Unit | 1 | Includes purifier, mounting bracket, and wiring harness |
| HVAC System | 1 | Compatible with most standard HVAC systems |
| Screwdriver Set | 1 | Phillips head and flathead |
| Wire Strippers/Cutters | 1 | For preparing electrical connections |
| Electrical Tape | 1 Roll | For insulating connections |
| Voltage Tester | 1 | To verify power is off |
| Drill (Optional) | 1 | May be needed for mounting bracket |
| Mounting Screws (Optional) | 4 | If not included with unit or for specific surfaces |
| Wire Connectors (Wire Nuts) | 5-10 | Appropriate size for HVAC wiring |
| Safety Glasses | 1 | Recommended for eye protection |
| Work Gloves | 1 Pair | Recommended for hand protection |
Preparing Your HVAC System for Installation
Before you begin, safety is paramount. Always turn off power to your HVAC system at the breaker box. Verify the power is off using a voltage tester before touching any wires.
- System Compatibility Check: Ensure your HVAC system is compatible. Reme Halo units are designed for systems with existing 24V control boards. Systems with millivolt controls are not compatible.
- Access the Control Board: Locate the control board within your HVAC unit. This is typically behind a panel on the side or bottom of the furnace or air handler. Consult your HVAC system’s manual if needed.
- System Shutdown: Double-check that the power is completely off. Remove the access panel to the control board and take a photograph of the existing wiring. This will be helpful if you need to revert to the original configuration.
Step-by-Step Installation Process
Phase 1: Mounting the Reme Halo Unit
- Bracket Placement: Determine the best location for the Reme Halo unit on your ductwork. It should be placed within the return air duct, as close to the furnace/air handler as possible. Ensure sufficient space around the unit for maintenance.
- Bracket Attachment: Using the provided mounting bracket, secure the unit to the ductwork. Drill pilot holes if necessary, using appropriate screws for your ductwork material. Ensure the bracket is firmly attached.
- Unit Installation: Slide the Reme Halo unit onto the mounted bracket. It should click or secure firmly into place.
Phase 2: Wiring the Reme Halo Unit
- Identify Wiring Points: Locate the necessary wiring connections on the Reme Halo unit and your HVAC control board. You’ll typically connect to:
- 24V Common (C): The common wire provides power.
- 24V Hot (R): The hot wire activates the unit.
- Fan: Connects to the fan relay to activate the purifier when the fan is running.
- Wiring Connections: Carefully connect the wires from the Reme Halo unit to the corresponding wires on the HVAC control board using wire connectors (wire nuts).
- Reme Halo Black Wire: Connect to the 24V Hot (R) wire.
- Reme Halo White Wire: Connect to the 24V Common (C) wire.
- Reme Halo Yellow Wire: Connect to the Fan wire.
- Secure Connections: Ensure all wire connections are secure and insulated with electrical tape. Avoid loose connections which can cause malfunctions.
- Grounding: Connect the green ground wire from the Reme Halo unit to the chassis ground of the HVAC system.
Phase 3: Final Checks and Power-Up
- Wiring Review: Double-check all wiring connections against your photograph of the original wiring and the Reme Halo wiring diagram.
- Panel Reinstallation: Reinstall the access panel to the HVAC control board.
- Power Restoration: Restore power to your HVAC system at the breaker box.
- System Test: Turn on your HVAC system and verify that the Reme Halo unit is powered on. The LED indicator on the unit should illuminate. Test both fan-only mode and heating/cooling mode.
How to Prevent Future Issues & Maintenance

Regular maintenance ensures optimal performance and prolongs the life of your Reme Halo unit.
| Frequency | Task | Duration |
|---|---|---|
| Monthly | Visual Inspection | 5 minutes |
| 6 Months | Clean/Replace Pre-Filter | 15 minutes |
| 1-2 Years | Replace RGF Quick Change Cartridge | 30 minutes |
- Pre-Filter Cleaning: Regularly clean or replace the pre-filter to prevent dust buildup.
- RGF Cartridge Replacement: Replace the RGF Quick Change Cartridge every 1-2 years, depending on usage and air quality.
- Visual Inspection: Periodically inspect the unit and wiring for any signs of damage or loose connections.
Pro Tips
- Wiring Diagrams: Download the specific wiring diagram for your Reme Halo model from the RGF website.
- Wire Labels: Use wire labels to clearly identify each wire for easier troubleshooting.
- Professional Assistance: If you are uncomfortable working with electrical wiring, hire a qualified HVAC technician.
- Airflow Direction: Always ensure the Reme Halo is installed with the correct airflow direction, as indicated in the manual.
- Smart Home Integration: Some Reme Halo models offer smart home integration. Explore these features for remote control and monitoring.
Professional Help

If you encounter any of the following, professional assistance is recommended:
- Unit fails to power on after installation.
- Error codes are displayed on the unit.
- You are unsure about any aspect of the installation process.
- You suspect a problem with your HVAC system.
A qualified HVAC technician can diagnose and resolve any issues quickly and safely. Typical repair costs range from $75 – $200 per hour, depending on location and complexity.
FAQ
Q: Will the Reme Halo reduce my HVAC system’s efficiency?
A: No, the Reme Halo is designed to have minimal impact on airflow and HVAC system efficiency.
Q: Can I install the Reme Halo myself if I’m not an electrician?
A: While many homeowners can install the Reme Halo, it involves working with electrical wiring. If you are uncomfortable, it’s best to hire a professional.
Q: How often do I need to replace the RGF Quick Change Cartridge?
A: The RGF Quick Change Cartridge should be replaced every 1-2 years, depending on usage and air quality.
Q: What does the LED indicator on the Reme Halo mean?
A: Refer to your Reme Halo user manual for a detailed explanation of the LED indicator codes.
Get Your Reme Halo Working Again
You’ve now learned the complete process of installing your Reme Halo air purifier. Remember these key steps:
– Thoroughly prepare your HVAC system.
– Follow the wiring diagram precisely.
– Prioritize safety by disconnecting power.
– Perform regular maintenance to ensure optimal performance.
Don’t let poor air quality affect your health and comfort. Take the first step towards cleaner air by installing your Reme Halo today!
Have you successfully installed your Reme Halo? Share your experience and any helpful tips in the comments below!


