
If you’ve invested in an air purifier to keep your home’s air clean and fresh, you know how frustrating it can be when it starts underperforming or emitting odd noises. Air purifier maintenance is essential to ensure it continues filtering out allergens, dust, and pollutants effectively, but many people neglect it until problems arise. The good news is that a simple quick fix—like wiping down the exterior and checking the filters monthly—can often restore optimal performance and prevent costly breakdowns right away.
In this comprehensive guide, we’ll go beyond the basics to cover everything you need to know about air purifier maintenance. From understanding why regular upkeep matters to detailed step-by-step cleaning processes and preventive tips, you’ll find multiple actionable solutions tailored to common models like Honeywell, Levoit, or Coway. By the end, you’ll feel confident in maintaining your unit for years of reliable use, saving you time, money, and ensuring cleaner air for your family.
Why Regular Maintenance is Essential for Your Air Purifier
Air purifiers work tirelessly to capture airborne particles, but without proper care, they can become less efficient or even harbor the very contaminants they’re meant to remove. Dust buildup on fans and filters reduces airflow, strains the motor, and diminishes the unit’s ability to purify the air—potentially leading to higher energy bills and poorer indoor air quality. According to the EPA, well-maintained air purifiers can remove up to 99.97% of particles as small as 0.3 microns, but neglected ones drop to as low as 50% effectiveness over time.
Regular air purifier maintenance also extends the lifespan of your device, often from 5-10 years to over a decade, depending on usage and environment. In homes with pets, high pollen seasons, or smoky areas, buildup happens faster, so proactive care prevents issues like mold growth in humid climates or static electricity attracting more dust. Ultimately, investing a little time in maintenance ensures your purifier delivers consistent benefits, from reducing allergy symptoms to improving overall respiratory health.
Recommended Frequency and Timing for Air Purifier Maintenance
To keep your air purifier running at peak performance, follow a structured schedule based on manufacturer guidelines and environmental factors. Over-maintenance can wear out components, while under-maintenance leads to inefficiency. Use the table below as a starting point—adjust for heavy use (e.g., in allergy-prone homes) by increasing frequency by 25-50%.
| Frequency | Task | Duration | Notes |
|---|---|---|---|
| Weekly | Wipe exterior and check pre-filter | 5-10 minutes | Ideal for visible dust accumulation; do this more often in dusty rooms. |
| Monthly | Vacuum or rinse pre-filter; inspect main filter | 15-20 minutes | Essential for most models; replace if odors persist. |
| Every 3-6 Months | Deep clean internal components and replace HEPA filter | 30-45 minutes | Check your model’s manual—HEPA filters typically last 6-12 months in moderate use. |
| Annually | Full disassembly and professional tune-up (if needed) | 1-2 hours | For units over 3 years old; includes motor lubrication where applicable. |
Timing tip: Perform maintenance during low-usage periods, like weekends, and always unplug the unit first. In high-pollution seasons (e.g., wildfire smoke or spring allergies), bump up to bi-weekly checks to maintain efficiency.
Complete Air Purifier Maintenance Process

Maintaining your air purifier involves a systematic approach to avoid damaging sensitive parts. This process applies to most tabletop or room models, but always consult your user manual for model-specific instructions—variations exist between ionic, HEPA, and UV purifiers. Expect the full routine to take 30-60 minutes initially, with quicker touch-ups later. Warning: Never submerge electrical components in water, and work in a well-ventilated area to avoid inhaling dislodged particles.
Step 1: Preparation and Safety Setup
Before diving in, gather your tools and ensure safety to prevent accidents or voiding warranties. This phase sets the foundation for effective cleaning.
- Unplug the unit: Always disconnect from power to avoid electrical hazards. Wait 10-15 minutes for any residual charge to dissipate.
- Gather supplies: Soft microfiber cloths, vacuum with brush attachment, mild dish soap, distilled water (to prevent mineral buildup), compressed air canister, and replacement filters if needed. For stubborn grime, use a 1:1 vinegar-water solution.
- Choose a workspace: Work on a flat, protected surface like a towel-covered table outdoors or in a garage to contain dust. Wear gloves and a mask if you’re sensitive to allergens.
Important: If your model has a UV light or ionizer, disable these features per the manual before opening the unit.
Step 2: Exterior and Pre-Filter Cleaning
The exterior and pre-filter catch the bulk of visible dirt, so start here for a quick win in improving airflow.
- Wipe the exterior: Dampen a microfiber cloth with distilled water and a drop of soap, then gently clean the housing, vents, and control panel. Avoid harsh chemicals that could damage plastic or screens. Dry immediately with a clean cloth to prevent streaks.
- Remove the pre-filter: Most models have a snap-off or slide-out pre-filter at the back or bottom. Rinse it under lukewarm water if washable (check label), or vacuum off debris. For non-washable ones, use compressed air to blow out dust.
- Inspect for damage: Look for tears or clogs. If damaged, replace immediately—pre-filters cost $10-20 and are crucial for protecting the main filter.
This step takes about 10 minutes and can boost performance by 20-30% right away. Test by running the unit briefly post-cleaning to check for unusual noises.
Step 3: Main Filter and Internal Component Maintenance
The heart of your air purifier is the HEPA or carbon filter, which needs careful handling to avoid cross-contamination.
- Remove the main filter: Open the access panel (usually a latch or screws) and slide out the filter. Handle by edges to minimize skin oils transferring.
- Clean or replace: For reusable filters, vacuum gently with a soft brush attachment from 2-3 inches away. If it’s a disposable HEPA, tap lightly outdoors to dislodge dust, but replace every 6-12 months (or sooner in high-use areas). Activated carbon filters absorb odors and should be swapped annually.
- Clean internal parts: Use compressed air to remove dust from the fan blades, motor housing, and sensors. For ionic models, wipe ionizer plates with a dry cloth—never wet. If accessible, vacuum the air intake and exhaust grilles.
Warning: Do not use water on HEPA filters, as it can cause mold. If your purifier has a water-based humidifier component (e.g., in some Dyson models), descale with vinegar monthly to prevent bacterial growth.
Step 4: Reassembly and Testing
Once cleaned, put everything back together and verify functionality.
- Reinstall filters securely: Ensure they click into place to maintain a tight seal—poor fit reduces efficiency by up to 40%.
- Plug in and power on: Run on a medium setting for 10-15 minutes in an empty room. Listen for smooth operation and check the air output for strength and cleanliness.
- Monitor indicators: Many models have filter replacement lights or app notifications—reset these after maintenance. Use a particle counter app (like those from AirVisual) to test air quality improvement.
If issues persist after reassembly, double-check for loose parts or revisit Step 3. This full process should be done every 3-6 months, with partial checks monthly.
Pro Tips for Optimal Air Purifier Maintenance
To elevate your routine beyond the basics, incorporate these expert strategies drawn from HVAC professionals and manufacturer best practices. These can help you avoid common pitfalls and maximize your purifier’s efficiency.
- Track usage with apps: Many modern units (e.g., Levoit Core series) connect to apps that remind you of maintenance schedules—set custom alerts for your environment to stay proactive.
- Avoid common mistakes: Don’t place your purifier near windows or heat sources, as this accelerates filter clogging. Also, never run it without filters installed, which can damage the motor and void warranties.
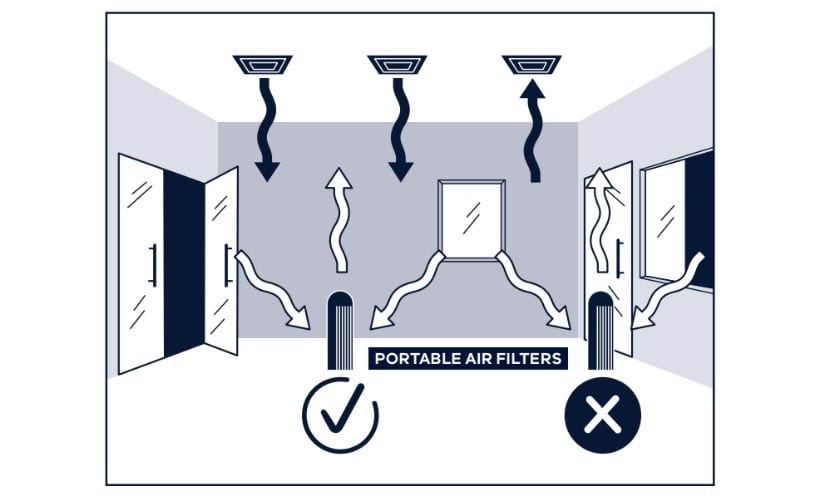
- Optimize placement for better results: Position 2-3 feet off the ground, away from walls, in the room’s center for 360-degree circulation. This reduces maintenance needs by 20% through even distribution.
- Use high-quality replacements: Opt for OEM filters over generics to ensure CADR (Clean Air Delivery Rate) ratings match—cheaper ones often underperform and require more frequent changes.
- Incorporate humidity control: In dry climates, pair with a humidifier to prevent static dust attraction; in humid ones, use silica gel packs near vents to absorb excess moisture.
- Seasonal deep cleans: Before allergy season, perform an extra internal wipe-down to handle pollen spikes— this can cut maintenance time long-term.
- Energy-saving tweak: Run on auto mode to adjust fan speed based on air quality, reducing wear and extending filter life by 25%.
By avoiding over-oiling motors (only if specified) and regularly calibrating sensors, you’ll keep your unit humming efficiently.
When to Call in Professional Help

While DIY air purifier maintenance handles most tasks, some signs indicate it’s time for a pro. Persistent unusual odors, reduced airflow despite cleaning, error codes that won’t reset, or visible sparks/noises suggest internal issues like motor failure or electrical faults—don’t ignore these, as they could pose fire risks.
Look for certified technicians through services like Angi or manufacturer-authorized centers (e.g., Honeywell’s network). They should have EPA or AHAM certifications and provide warranties on repairs. Expect costs of $50-150 for diagnostics and $100-300 for full services, depending on model complexity. If your unit is under warranty (typically 1-5 years), contact the manufacturer first to avoid voiding coverage—many offer free mail-in maintenance for the first year.
FAQ
Q: How often should I replace the HEPA filter in my air purifier?
A: For most models, replace every 6-12 months, but check the indicator light or manual. In homes with pets or smokers, aim for every 3-6 months to maintain filtration efficiency. Running costs are about $20-50 per filter, a small price for clean air.
Q: Can I clean a HEPA filter instead of replacing it?
A: No, traditional HEPA filters aren’t washable and cleaning them reduces their effectiveness by damaging the fibers. Vacuum gently for minor dust, but replacement is key. Some antimicrobial versions allow light rinsing—verify with your model’s specs.
Q: What if my air purifier makes a rattling noise after maintenance?
A: This often means a loose filter or debris in the fan. Re-check assembly, vacuum internals again, and ensure it’s on a stable surface. If it persists, it could be a bearing issue requiring professional lubrication.
Q: Is it safe to maintain my air purifier with pets or kids around?
A: Yes, but unplug and move the unit to a pet-free area during cleaning to avoid dislodging allergens. Use child-safe tools and supervise to prevent small hands from accessing internals. Post-maintenance, run it for 30 minutes to clear any airborne particles.
Q: How do I know if my air purifier maintenance is working effectively?
A: Monitor air quality with a built-in sensor or external device like a laser particle counter. You should see a 50-70% drop in PM2.5 levels within an hour of operation. Also, note fewer allergy symptoms or dust on surfaces.
Q: What’s the difference in maintenance for different air purifier types?
A: HEPA models focus on filter swaps; ionic ones need plate wiping to prevent ozone buildup; UV purifiers require bulb replacement every 6-9 months. Always follow type-specific guidelines to avoid health risks like excess ozone exposure.
Q: Can hard water affect my air purifier’s maintenance?
A: Yes, if it has a humidifier component, mineral deposits can clog it. Use distilled water and descale monthly with vinegar to prevent this, extending component life.
Alternative Solutions for Air Purifier Maintenance Challenges
If standard maintenance feels overwhelming or your model lacks easy access, consider these alternatives. For instance, if DIY cleaning isn’t feasible due to mobility issues, subscription services like FilterEasy deliver pre-cut replacements quarterly.
| Solution | Pros | Cons | Best For |
|---|---|---|---|
| Automated Filter Subscription | Convenient auto-delivery; ensures timely replacements | Higher upfront cost ($50-100/year) | Busy households with forgetful routines |
| Professional Cleaning Service | Thorough deep cleans; warranty-safe | Expensive ($75-150 per visit); scheduling required | Older or complex units like whole-home systems |
| Upgrading to Self-Cleaning Models (e.g., Dyson Pure Cool) | Built-in wash cycles reduce manual work | Premium price ($300+); limited to specific brands | Tech-savvy users wanting low-maintenance |
| DIY Kit Add-Ons (e.g., compressed air tools) | Affordable enhancement to standard process | Requires initial purchase ($20-30) | Budget-conscious owners of basic models |
These options shine when basic methods fall short, like in high-dust environments where filters clog faster.
Keep Your Air Purifier Running Smoothly
With this guide, you’ve got a complete roadmap for effective air purifier maintenance:
- Essential reasons for regular care and a customizable schedule
- Step-by-step processes from prep to testing
- Pro tips, FAQs, and alternatives for tailored solutions
Following these steps will not only restore your purifier’s performance but also ensure it provides healthier air year-round, potentially reducing allergy meds and cleaning time. Don’t wait for warning lights—start your next maintenance session today and breathe easier knowing you’re in control.
Have you tried these air purifier maintenance tips? Share your results or model-specific challenges in the comments below to help fellow readers!


