If you’ve ever stepped into your basement only to be hit with that musty, stale smell or felt a wave of stuffiness that makes your eyes water, you’re not alone. Basements are notorious for poor air quality due to dampness, mold, and limited ventilation, which can lead to health issues like allergies, respiratory problems, or even long-term mold exposure. The good news? You can purify air in basement spaces quickly with a simple setup like adding a dehumidifier and an air purifier, providing immediate relief from those airborne irritants.
In this comprehensive guide, we’ll go beyond the basics to cover everything you need to know about effectively purifying your basement air. From selecting the right tools and preparing your space to detailed step-by-step instructions and ongoing maintenance, you’ll discover multiple methods tailored to different basement sizes and issues. By the end, you’ll have the confidence to transform your basement into a breathable, healthy environment—no more worrying about hidden pollutants lurking in the corners.
What You’ll Need for Basement Air Purification

Before diving into the purification process, gathering the right materials and tools is essential. Basements often face unique challenges like high humidity, poor airflow, and potential mold growth, so your setup should address these head-on. We’ll focus on affordable, accessible items that can handle common contaminants such as dust, allergens, VOCs (volatile organic compounds), and mold spores.
Here’s a breakdown of key items in a handy table. Adjust quantities based on your basement’s square footage—for a standard 1,000 sq ft space, these recommendations work well. Budget around $200–$500 for starters, depending on quality.
| Item | Quantity | Specifications |
|---|---|---|
| Air Purifier | 1 | HEPA filter model with activated carbon (e.g., Levoit Core 300 or Honeywell HPA300); covers 200–500 sq ft; CADR rating of 200+ for smoke/dust/pollen |
| Dehumidifier | 1 | 30–50 pint capacity (e.g., Midea 50-Pint or Frigidaire FFAD5033W1); energy-efficient with auto-humidistat; suitable for damp basements |
| Ventilation Fan or Exhaust Fan | 1–2 | Inline duct fan (e.g., Vivosun 4-inch) or window fan; 100–200 CFM airflow; for improving circulation |
| Air Quality Monitor | 1 | Digital model (e.g., Temtop M10 or Amazon Smart Air Quality Monitor); measures PM2.5, VOCs, humidity, and temperature |
| Cleaning Supplies | As needed | HEPA vacuum (e.g., Dyson Ball Animal), microfiber cloths, mild detergent, and mold-killing spray (e.g., Concrobium Mold Control) |
| Tools | Basic set | Screwdriver set, duct tape, extension cord (heavy-duty, 12-gauge), and ladder for high-reach areas |
| Optional: HVAC Filter Upgrade | 1 pack | MERV 13 or higher pleated filters for central system; size matches your furnace (e.g., 20x25x1 inches) |
Important: Always choose ENERGY STAR-rated appliances to keep energy costs low—basement purification shouldn’t spike your utility bill. If your basement is unfinished or prone to flooding, prioritize waterproof or elevated models.
Preparing Your Basement for Air Purification
Proper preparation is key to successful basement air purification, as it ensures your efforts aren’t undermined by existing issues like leaks or clutter. Skipping this step could lead to recurring problems, so allocate 1–2 hours for assessment and cleanup. Start by empathizing with the frustration: basements collect junk and moisture over time, but a little upfront work pays off big in cleaner air.
Safety Considerations
Before anything, prioritize safety. Basements can have electrical hazards, poor lighting, and even radon gas buildup. Warning: Turn off power to the area if you’re dealing with wiring or outlets. Wear protective gear like gloves, a mask (N95 for mold), and goggles to avoid inhaling particles. Test for radon using a kit from the EPA (available for $10–$20 online)—if levels exceed 4 pCi/L, address it professionally before purifying.
Check for moisture sources: Inspect walls, floors, and windows for leaks or condensation. Use a moisture meter (under $20) to identify damp spots. If humidity is above 60%, a dehumidifier is non-negotiable, as it prevents mold regrowth. Clear clutter—remove boxes, old furniture, and carpets that trap dust. This improves airflow and makes installation easier.
Initial Assessment
Assess your basement’s current air quality with the monitor mentioned in the materials list. Run it for 24 hours to baseline readings: Aim for PM2.5 under 12 µg/m³, humidity 30–50%, and low VOCs. Note problem areas, like corners near windows or under stairs. If your basement connects to your HVAC system, inspect ducts for dust buildup—dirty ducts can recirculate pollutants.
For unfinished basements, seal cracks in concrete walls with hydraulic cement (about $15 per bag) to block moisture entry. In finished spaces, ensure vents are open and unobstructed. This prep phase sets the foundation for effective purification, reducing the workload on your devices.
Step-by-Step Basement Air Purification Process
Now, let’s get to the heart of how to purify air in basement environments. This process is broken into three logical phases: assessment and setup, installation and activation, and integration with ventilation. Expect the full setup to take 2–4 hours, plus ongoing monitoring. We’ll use a combination of passive (like sealing) and active (devices) methods for comprehensive results. Follow these steps sequentially for best outcomes.
Phase 1: Deep Cleaning and Sealing
Start by tackling visible contaminants to give your purifiers a clean slate. This phase alone can reduce airborne particles by 50% initially.
-
Vacuum and Wipe Surfaces: Use your HEPA vacuum to thoroughly clean floors, walls, and shelves. Focus on high-dust areas like behind appliances. For hard surfaces, damp-mop with a mild detergent solution (1:10 water ratio). Avoid over-wetting to prevent more moisture.
-
Address Mold and Mildew: Apply mold-killing spray to any spotted areas, letting it sit for 10 minutes before wiping. Warning: Never mix bleach with ammonia—toxic fumes can result. For extensive mold (over 10 sq ft), call a pro to avoid health risks.
-
Seal Entry Points: Caulk gaps around pipes, windows, and doors with silicone sealant. Cover floor drains with mesh screens if present. This prevents outdoor pollutants and humidity from infiltrating.
Test after this phase: Run your air quality monitor for 1 hour. You should see a drop in particulates— if not, recheck for hidden dust sources.
Phase 2: Installing Core Purification Devices
With the space prepped, install your main tools. Place devices strategically: Air purifier in the center or largest room, dehumidifier near the wettest spot, and fans for circulation.
Setting Up the Dehumidifier
- Position it on a level, elevated surface (like a sturdy shelf) away from walls for airflow.
- Plug in and fill the water tank if needed, then set the humidistat to 45–50% RH.
- Run a test cycle for 30 minutes—empty the reservoir and check for proper drainage (use a hose to a floor drain if continuous mode).
This step is crucial for basements, as excess humidity fuels 90% of air quality issues (per EPA guidelines).
Installing the Air Purifier
- Unbox and assemble per manual—insert the HEPA and carbon filters securely.
- Place it 1–2 feet from walls, ideally at breathing height (3–4 ft off ground).
- Power on and select auto mode; adjust fan speed based on monitor readings (high for initial purification, 8–12 hours daily).
For larger basements, use multiple units or one with app control for zoning.
Adding Ventilation
- Install the exhaust fan in a window or duct if venting outside—secure with screws and seal edges with duct tape.
- For inline fans, connect to existing vents following manufacturer specs (may require cutting ducts—use a jigsaw).
- Run the fan for 15–30 minutes to test airflow direction (outward to expel stale air).
Pro Tip: Integrate with smart plugs for scheduling—run purifiers during peak occupancy times.
Phase 3: System Integration and Initial Run
Combine everything for synergy. Connect your air purifier and dehumidifier to the same outlet circuit if possible, but use a surge protector. Run the full system for 24–48 hours continuously.
Monitor progress hourly at first: Adjust settings if humidity doesn’t drop or if VOCs persist. If your basement has central HVAC, swap in the MERV 13 filter now—turn off the system, slide out the old one, and insert the new (takes 5 minutes). This filters air throughout the house, benefiting the basement indirectly.
Address variations: In very cold basements (below 65°F), dehumidifiers work less efficiently—use a heater to warm the space first. For allergy sufferers, prioritize purifiers with UV sanitizers.
Post-Completion Testing and Troubleshooting

After setup, verify effectiveness to ensure your efforts to purify air in basement are paying off. Use your air quality monitor for ongoing checks: Re-test after 24 hours, aiming for sustained improvements (e.g., 20–30% reduction in PM2.5). Walk through the space—sniff for odors and feel for stuffiness.
Common issues and fixes:
– High Humidity Persists: Check seals or upgrade to a larger dehumidifier. Empty the tank regularly to avoid overflow.
– Purifier Not Reducing Particles: Clean or replace filters (every 3–6 months). Ensure it’s not blocked by furniture.
– Noisy Fans: Lubricate bearings or choose quieter models. If airflow is weak, clean ducts with a brush attachment.
– Radon or Chemical Odors: If tests show issues, install a mitigation system (fan-based, $800–$1,500 DIY kits available).
Log readings weekly in a notebook or app. If air quality doesn’t improve after a week, revisit Phase 1 for overlooked contaminants. This testing ensures long-term success and catches problems early.
Pro Tips for Optimal Basement Air Purification
To elevate your setup and avoid pitfalls, here are expert insights drawn from HVAC pros and air quality specialists. These go beyond basics to maximize efficiency and longevity.
- Layer Your Defenses: Combine HEPA purification with plants like snake plants or peace lilies—they naturally absorb VOCs and add oxygen, improving air by 10–15% in studies from NASA.
- Smart Scheduling: Use timers or apps to run devices only when needed—e.g., dehumidifier at night when humidity peaks. This saves 20–30% on energy.
- Filter Maintenance Hack: Vacuum purifier grills monthly to extend filter life; replace carbon filters quarterly for odor control.
- Avoid Common Mistakes: Don’t place devices near heat sources (reduces efficiency) or ignore pet dander—vacuum fur regularly. Overlooking CO2 buildup? Add an open window routine for fresh air exchange.
- Optimize for Seasons: In summer, boost dehumidification; winter, focus on circulation to prevent stagnation. Monitor for seasonal allergens like pollen entering via cracks.
- Eco-Friendly Boost: Opt for low-VOC paints if refinishing walls—reduces off-gassing. Track energy use with a watt meter to stay green.
- Allergy-Specific Tweaks: For severe cases, add a negative ion generator to the purifier—it clumps particles for easier filtration.
Following these, you’ll not only purify but enhance overall basement usability.
When to Call Professional Help
While DIY methods work for most, some situations demand experts to avoid health risks or structural damage. Signs include persistent mold (black spots spreading), radon levels above 4 pCi/L, or if your basement floods seasonally—these could indicate foundation issues.
Look for certified pros: HVAC technicians with IAQ (Indoor Air Quality) specialization, or mold remediation services via the IICRC directory. Check reviews on Angi or BBB, and ensure EPA lead-safe certification if dealing with old insulation.
Costs vary: Basic air duct cleaning runs $300–$500; full radon mitigation $800–$2,000; professional purification system install $1,000+. Factor in warranties—many cover 1–5 years. If under warranty from home builders, contact them first. Pros use advanced tools like borescopes for hidden issues, saving you time and ensuring compliance with local codes.
FAQ
Q: How long does it take to purify air in a basement after setup?
A: Initial improvements happen within 24–48 hours as devices cycle through the air, but full stabilization (e.g., consistent low humidity) takes 1–2 weeks. Run purifiers continuously at first, then taper to 8 hours daily. Factors like basement size and initial contamination levels affect speed—monitor with a device for precise tracking.
Q: Can I use essential oil diffusers to help purify basement air?
A: Yes, but sparingly—oils like eucalyptus or tea tree have antimicrobial properties that combat mold odors. Use a ultrasonic diffuser with 3–5 drops in a 500 sq ft space, running 30 minutes daily. Avoid overuse, as strong scents can irritate airways; always pair with mechanical purifiers for real particle removal, not just masking.
Q: What’s the best air purifier for a damp basement?
A: Look for models with both HEPA and carbon filters plus a built-in dehumidifier function, like the Blueair Blue Pure 211+. It handles 500 sq ft, removes 99.97% of particles, and resists moisture. Budget options like the Levoit work well too—check AHAM-verified CADR ratings for your space size to ensure effectiveness.
Q: Is a dehumidifier enough to purify air in basement without an air purifier?
A: It helps by reducing moisture (key for mold prevention), but no—dehumidifiers don’t filter particles or VOCs. Combine with an air purifier for comprehensive results; studies from the Asthma and Allergy Foundation show this duo cuts allergens by up to 70%. If budget-tight, start with dehumidification and add purification later.
Q: How do I know if my basement air purification is working?
A: Use an air quality monitor to track metrics like PM2.5 (should drop below 10 µg/m³), humidity (40–50%), and VOCs (under 0.5 ppm). Visual cues: Less dust settling, no musty smells, and easier breathing. Re-test monthly; if no change, troubleshoot filters or seals as outlined earlier.
Q: Are there natural ways to purify air in basement without buying devices?
A: Absolutely—start with ventilation (open windows 15 minutes daily) and baking soda boxes in corners to absorb odors. Add houseplants (e.g., ferns for humidity control) and white vinegar sprays for mold. These are low-cost starters but less effective for heavy contamination; upgrade to devices for 80–90% purification rates per environmental experts.
Q: What if my basement has asbestos or old insulation affecting air quality?
A: Stop DIY immediately—test via a lab kit ($30–$50). If positive, hire certified abatement pros (costs $1,500–$3,000) to remove safely. Temporary fix: Seal areas with plastic sheeting and run purifiers on high, but professional handling is essential to avoid releasing fibers into the air.
Alternative Solutions for Basement Air Purification
If a full device setup isn’t feasible (e.g., due to space or budget), consider these alternatives. They’re great backups when primary methods fall short, like in very large or irregularly shaped basements.
| Solution | Pros | Cons | Best For |
|---|---|---|---|
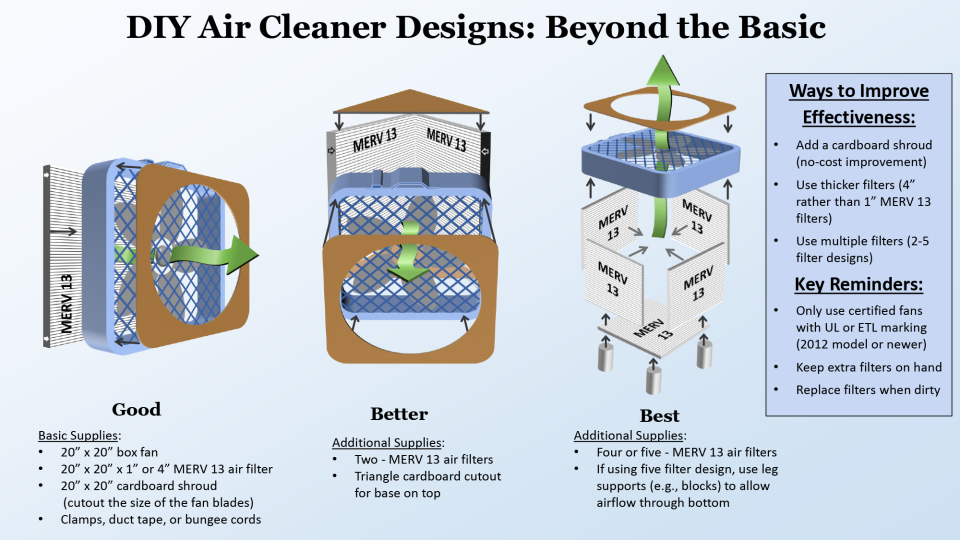
| DIY HVAC Whole-Home Filtration | Improves air throughout house; cost-effective long-term ($100–$200 for filters) | Requires central system access; doesn’t target basement specifically | Finished basements connected to main HVAC; allergy sufferers wanting broad coverage |
| Portable Ionic Purifiers | Compact, no filters to replace; generates negative ions to clump pollutants | Potential ozone emission (health risk in high use); less effective on odors | Small, unfinished basements; quick, low-maintenance option under $50 |
| Natural Ventilation Systems (e.g., Solar-Powered Vents) | Eco-friendly, passive airflow; reduces energy use | Weather-dependent; initial install $200–$400 | Sunny basements with roof access; off-grid or green-focused homes |
| Professional Ozone Generators | Kills mold and bacteria deeply; one-time treatment | Not for occupied spaces (ozone is harmful); short-term use only | Severe mold issues post-flood; as a reset before standard purification |
Weigh pros/cons based on your needs—e.g., ionic for portability, but stick to HEPA for proven safety.
Enjoy Cleaner Basement Air
With this guide, you’ve got everything to purify air in basement spaces effectively and sustainably:
– Essential materials and prep steps for a strong foundation
– Detailed phases from cleaning to full system integration
– Testing methods and pro tips to fine-tune results
– Alternatives and when to seek pros for tough cases
Following these actionable steps will transform your damp, stuffy basement into a fresh, healthy haven—reducing allergens, preventing mold, and boosting your comfort. Don’t wait for allergy season to hit; start today and breathe easier tomorrow.
Have you tried purifying your basement air? Share your setup or challenges in the comments below to help fellow readers!