
That persistent winter dryness—cracked lips, static shocks every time you touch a doorknob, and a throat that feels like sandpaper—isn’t inevitable. Your Aprilaire humidifier holds the solution, but only if you set it correctly. Many homeowners either leave it dormant all season or crank it too high, creating condensation that damages windows and walls. This guide delivers the exact settings and seasonal adjustments you need to transform your home into a comfortable sanctuary without risking moisture damage. You’ll learn to identify your specific humidistat type, set precise humidity levels based on outdoor temperature, and avoid costly seasonal mistakes.
Getting the how to set Aprilaire humidifier process right prevents health issues like bloody noses and preserves wood floors and musical instruments. Skip the guesswork—we’ll walk through manual dial adjustments for older models and automatic setup for newer units, all verified by Aprilaire’s technical specifications. Whether you’re battling Cleveland’s freezing winters or milder northern climates, these steps ensure optimal humidity from October through March.
Identify Your Aprilaire Humidistat Type Instantly
Manual vs Automatic Models: Find Your Control Type Now
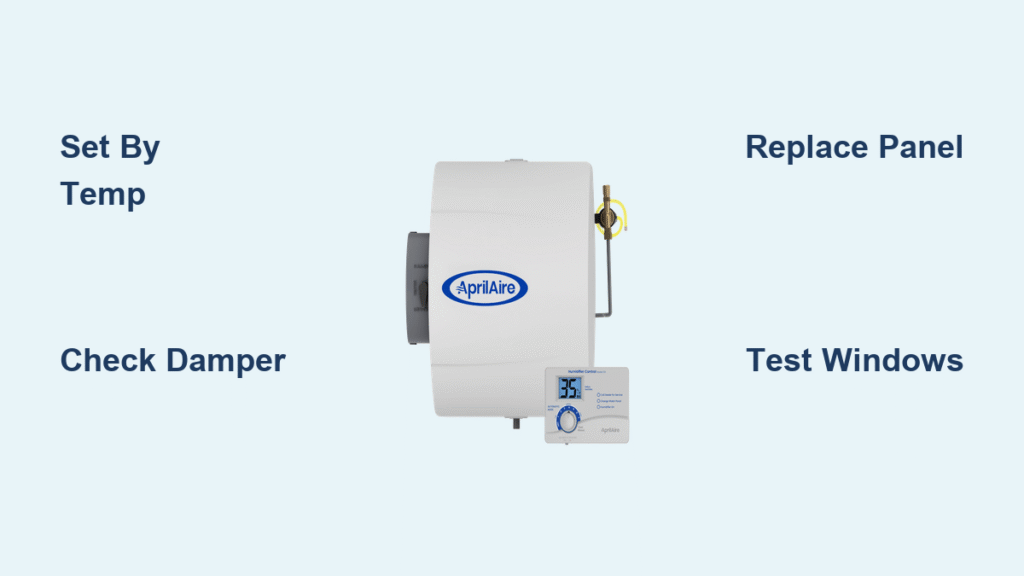
Your humidifier’s personality hinges on one critical detail: Does it have an “auto” setting? Manual humidistats feature only numbered percentage dials (0-100%) with no “auto” position. These demand your active involvement—you must adjust settings weekly as temperatures drop. Think of them as the manual transmission of humidity control: precise but requiring constant attention. Automatic humidistats eliminate this chore. They either display “auto” on analog dials or show digital readouts that self-adjust based on outdoor conditions. Crucially, automatic models come in two flavors: digital versions that activate your furnace fan independently, and analog types that wait for a thermostat heat call before adding moisture.
Grab a flashlight and inspect your unit right now. If you see “auto” between the numbers, you own an automatic model. If the dial shows only percentages without that magic word, you’re managing manually. This single distinction dictates every setting decision you’ll make this winter. Ignoring it risks either desert-dry air or window-crying condensation.
Quick Model Identification Guide: 30-Second Check
Manual humidistat red flags:
– Dial displays only numbers (no “auto” or “normal” positions)
– Requires physical adjustment with every 10°F outdoor temperature shift
– Common on older Aprilaire 500, 600, and 700 series models
Automatic humidistat green lights:
– “Auto” clearly marked on the dial or digital display present
– May show “normal” or construction-type settings (3, 4, 5)
– Self-regulates after initial setup—no weekly dial tweaking
Manual Humidistat Settings by Outdoor Temperature
Temperature-Based Setting Chart: Your Exact Dial Positions
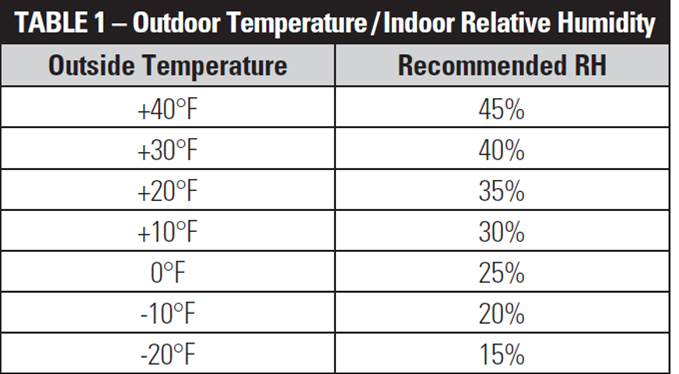
Manual humidistat owners must match settings to outdoor temperatures like a thermostat. Use this verified chart—based on Aprilaire’s engineering specs—for immediate relief:
| Outdoor Temperature | Dial Setting | Why This Works |
|---|---|---|
| -20°F or colder | 15% | Prevents frost on windows in extreme cold |
| 0°F | 25% | Balances comfort without condensation |
| 20°F | 35% | Max safe level for average homes |
Never exceed 35% at any temperature. Higher settings cause condensation that rots window frames and peels paint. These percentages assume average home construction—tighter homes can sometimes tolerate 5% higher settings, but only after rigorous testing.
Testing Your Home’s Sweet Spot: Avoid Window Damage
Step 1: When outdoor temps hit 0°F, set dial to 25-30%.
Step 2: Wait until evening (after sunset) to check windows—solar heat during daytime masks condensation.
Step 3: See moisture? Drop setting by 5% immediately. Too dry? Increase by 5% max.
Pro tip: High-performance windows (triple-pane, low-E coatings) let you safely run 30-35% at 0°F. Test conservatively: Start at 25%, monitor windows for 48 hours after sunset, then adjust upward in 5% increments. Stop immediately if fog appears. Homes with older single-pane windows must stay at 20% or lower.
Automatic Humidistat Setup Process
Initial Configuration Steps: First-Time Setup in 5 Minutes
Automatic models simplify your life but require precise initial setup. Do this every fall:
1. Rotate dial to “normal” position (bypasses temperature-based manual mode)
2. Select construction setting:
– “5”: Tight homes (new builds, spray-foam insulation)
– “4”: Average homes (standard insulation, minor drafts)
– “3”: Loose homes (older builds, visible air leaks)
This construction setting calibrates how aggressively your humidifier responds to cold. Choosing “5” in a drafty 1920s home invites window condensation; setting “3” in a modern airtight house leaves you with desert-dry air.
Fine-Tune Your Comfort Level: Eliminate Dry Skin or Window Sweating
Adjustment rule: Change by only one level (e.g., from 4 to 5) and wait 24-48 hours before reassessing. Rushing adjustments causes instability.
Too dry symptoms? (Static shocks, bloody noses):
– Increase setting by one level
– Wait two days—don’t tweak again prematurely
Too humid signs? (Water streaks on windows, musty odors):
– Decrease setting by one level immediately
– Check for hidden air leaks (attic hatches, electrical outlets)
Once dialed in, your automatic humidifier handles all temperature swings. No more midnight dashes to lower the dial during cold snaps.
Winter Operation Setup: October Activation Checklist
October Through March Checklist: Avoid Costly Oversights
Many homeowners skip these critical activation steps, rendering their humidifier useless:
1. Plug in the unit (often disconnected during summer)
2. Open bypass damper—turn handle horizontal (parallel to duct)
3. Verify water supply valve is fully open (¼ turn counterclockwise)
4. Set initial dial to 35% regardless of current temperature
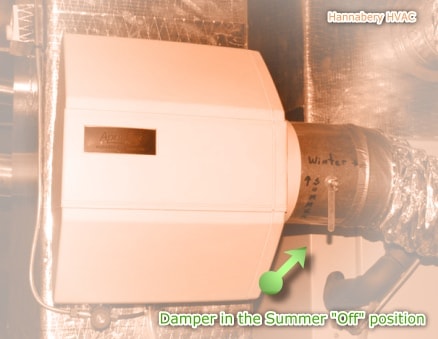
Location tip: Bypass dampers hide near furnace ducts—look for a metal lever on a rectangular duct section. Horizontal = open (humidification mode). Vertical = closed (summer mode). If your damper sticks, apply silicone lubricant—not WD-40—to the pivot point.
First Week Monitoring: Catch Problems Early
During the first 48 hours of operation:
– Success signs: Comfortable air, no visible window moisture after dark
– Adjust upward: If dry skin persists despite 35% setting
– Adjust downward: At first sign of window condensation
Never ignore window moisture—it means humidity is attacking your home’s structure. Lower the setting immediately and investigate air leaks.
Summer Shutdown Procedure: April Power-Down Steps
April Through September Steps: Protect Your AC System
Leaving your humidifier active in summer strains your air conditioner. Critical shutdown sequence:
1. Turn humidistat dial to “off” position
2. Close bypass damper (turn handle vertical)
3. Leave water supply valve open (prevents seal deterioration)
Why this matters: An open bypass damper forces cooled air into your humidifier, making your AC work 15-20% harder. This wastes $50-$150 annually on energy bills while reducing cooling capacity.
Seasonal Transition Reminders: Never Forget Again
Set phone alerts for:
– October 1: Winter activation (plug in unit, open damper, set to 35%)
– April 1: Summer shutdown (turn off, close damper)
Mark your optimal winter setting directly on the humidistat dial with a permanent marker. Write “MAX 35%” next to the dial—this prevents accidental over-humidification during cold snaps.
Optimal Humidity Targets: Health vs. Home Safety
ASHRAE recommends 40-60% humidity year-round, but winter demands compromise. In Cleveland and similar climates, never exceed 35% during heating season. This sweet spot delivers:
– Health protection: Eliminates 90% of dry-skin complaints and bloody noses
– Home preservation: Prevents wood floor gaps (common above 40% humidity)
– Energy savings: Makes 68°F feel like 71°F, cutting heating costs
Exceeding 35% risks condensation that rots window sills and promotes mold growth inside walls. Stick to this limit regardless of how “dry” you feel—it’s the maximum safe level for most homes.
Maintenance Essentials: Prevent Costly Failures

Annual Water Panel Replacement: Non-Negotiable Step
Replace your water panel every fall before heating season starts. A clogged panel reduces output by 50% and strains your furnace. Replacement signs:
– White mineral crust covering 30%+ of panel surface
– Humidifier runs constantly without raising indoor humidity
– Musty odor during operation
Pro tip: Soak new panels in vinegar for 10 minutes before installation to delay mineral buildup. Always use genuine Aprilaire replacement panels—generic versions clog faster.
Quick Pre-Season Inspection: 5-Minute Safety Check
Before setting your humidifier each October:
1. Confirm electrical cord is fully plugged in
2. Verify water valve turns smoothly (replace if stiff)
3. Ensure bypass damper moves freely through full range
4. Check drain line for clogs (pour 1 cup water down tube)
Troubleshooting Common Issues: Fix It Yourself
When Settings Don’t Work: 3 Critical Checks
Problem: No humidity increase after 48 hours
Immediate fixes:
– Check if unit is plugged in (most common oversight)
– Confirm water valve is fully open (¼ turn counterclockwise)
– Ensure bypass damper is horizontal (open position)
Problem: Windows sweating at 25% setting
Diagnosis:
– Drafty windows (apply weatherstripping)
– Setting too high for your home’s construction (drop to 20%)
– Hidden air leaks (seal attic hatches and basement rim joists)
Professional Intervention Signs: Don’t Risk Damage
Call an HVAC technician immediately if:
– Condensation appears at 15% setting (indicates severe air leaks)
– Water pools on furnace floor (damaged drain pan)
– Humidifier clicks but never activates (faulty solenoid valve)
– Musty odors persist after panel replacement (mold in ducts)
Your Aprilaire humidifier transforms winter discomfort when set precisely. Start with the temperature-appropriate dial position, monitor windows for 48 hours after activation, and fine-tune based on your home’s response. Automatic models require only annual construction-type verification, while manual units need weekly temperature-based adjustments. Mark your optimal setting visibly, set seasonal phone alerts, and replace the water panel every fall. Within days, you’ll banish static shocks and dry throats—without risking a single drop of window condensation. This is the exact routine Cleveland HVAC technicians use in their own homes, and it works.


