If you’ve just unboxed your new Sharp air purifier and are staring at the control panel wondering where to start, you’re not alone. Many users feel overwhelmed by the array of buttons and filters, especially when indoor air quality is a pressing concern like allergies or pollution. The good news is that getting your Sharp air purifier up and running is straightforward, and with a quick initial setup, you can start enjoying cleaner air in as little as 10 minutes. This guide will walk you through the essentials to ensure you’re using it right from day one.
In this comprehensive how-to, we’ll go beyond the basics to cover everything from unboxing and setup to daily operation, advanced features like Plasmacluster ion technology, and troubleshooting common issues. Whether you’re a first-time user or looking to optimize performance, you’ll find step-by-step instructions, pro tips, and maintenance advice to maximize your Sharp air purifier‘s effectiveness. By the end, you’ll have the confidence to maintain fresh, purified air in your home effortlessly.
What You’ll Need for Sharp Air Purifier Setup and Use
Before diving into operation, ensure you have the right items on hand. Most Sharp air purifier models, such as the popular FP-F series or KC series, come with everything essential in the box. However, gathering a few extras can make setup smoother and ongoing use more efficient. Below is a table outlining the standard components and optional tools—tailored for models like the Sharp FP-J80M-W or similar.
| Item | Quantity | Specifications |
|---|---|---|
| Sharp Air Purifier Unit | 1 | Your specific model (e.g., FP-J60M-B with Plasmacluster technology); check for HEPA and pre-filters included |
| User Manual | 1 | Digital or printed; download from Sharp’s website if missing for model-specific instructions |
| Remote Control (if applicable) | 1 | For models with IR remote; requires 2 AAA batteries (not always included) |
| Power Adapter/Cord | 1 | Standard 120V AC plug; ensure compatibility with your outlet |
| Optional: Extension Cord | 1 | 10-15 ft length, surge-protected for safe placement away from walls |
| Optional: Cleaning Kit | 1 set | Soft cloth, mild detergent, and vacuum with brush attachment for filter maintenance |
| Optional: Smart App (for Wi-Fi models) | N/A | Download Sharp Air app from App Store/Google Play; requires smartphone and Wi-Fi |
Important: Always verify your model’s specifications on Sharp’s official website (sharpusa.com) or the manual, as features vary by series (e.g., Plasmacluster vs. standard HEPA-only models). If you’re missing any box contents, contact Sharp support immediately to avoid warranty issues.
Preparing Your Space and Safety Considerations
Proper preparation is key to safe and effective use of your Sharp air purifier. Placing it incorrectly can reduce efficiency or pose hazards, so let’s set the stage right.
Start by selecting an optimal location. Sharp air purifiers work best in rooms up to their rated coverage (e.g., 300 sq ft for the FP-J30), away from direct sunlight, heat sources, or high-traffic areas to prevent filter clogging. Ensure at least 12 inches of clearance on all sides for airflow—think of it like giving your purifier breathing room.
Safety first: Unplug the unit before any handling. Warning: Never operate near water sources like sinks or humidifiers, as this could lead to electrical shorts. For families with pets or children, secure cords to avoid tripping. If your model has a humidifying function (like the KC series), use only distilled water to prevent mineral buildup. Review the manual for model-specific warnings, such as avoiding use in extremely dusty environments without initial filter checks.
Time estimate for preparation: 5-10 minutes. Once set up, test the area for any obstructions—run a quick fan test if your model has one to confirm unobstructed airflow.
Step-by-Step Guide to Operating Your Sharp Air Purifier

Now, let’s get to the heart of using your Sharp air purifier. This process is broken into logical phases: initial setup, basic operation, and advanced features. Follow these steps sequentially for models like the FP series; adjust slightly for humidifying variants.
Phase 1: Unboxing and Initial Setup
Unboxing your Sharp air purifier should take about 5 minutes and sets the foundation for seamless use.
- Remove Packaging: Carefully cut away all plastic wraps and Styrofoam. Inspect for damage—dents or cracks could affect performance.
- Install Filters: Open the rear panel (usually a latch or slide). Insert the pre-filter first, followed by the HEPA filter and any activated carbon layers. For Plasmacluster models, ensure the ion generator is aligned properly. Tip: If filters are vacuum-sealed, let them air out for 24 hours to release any odors.
- Plug In and Power On: Connect to a grounded outlet. Press the power button (often marked with a circle icon) to turn it on. The display should light up, showing default settings like auto mode.
- Run Initial Cycle: Select “Auto” mode and let it run for 15-30 minutes to circulate air and activate Plasmacluster ions, which neutralize airborne microbes.
Troubleshooting Note: If it doesn’t power on, check the cord for secure connection or reset by unplugging for 1 minute. This phase ensures your unit is primed for daily use.
Phase 2: Basic Daily Operation
Once set up, operating your Sharp air purifier daily is simple and intuitive, taking just 1-2 minutes per session.
- Select Mode: Use the mode button to choose between Auto (adapts to air quality via built-in sensors), Sleep (quiet for nighttime), or Manual (fan speeds 1-3). Auto is ideal for beginners as it adjusts automatically.
- Adjust Fan Speed: Press the fan icon to cycle through low, medium, high, or turbo. Start on medium for balanced purification without excess noise (around 25-50 dB).
- Monitor Air Quality: Many models have an indicator light (green for clean, red for poor). If equipped, use the remote to fine-tune from across the room.
- Timer Setup: Set a 1-8 hour timer if needed via the clock buttons to avoid overnight overuse.
Daily Use Tip: Place it in the room where you spend most time, like a bedroom or living room, and run it for 8-12 hours daily for optimal results. Expect noticeable freshness within 30 minutes, especially in polluted urban areas.
Phase 3: Advanced Features and Customization
For enhanced performance, leverage Sharp air purifier‘s unique features like Plasmacluster technology, which releases positive and negative ions to break down allergens and odors.
- Activate Plasmacluster: Press the dedicated button (often labeled “Plasmacluster” or “Ion”). It works in tandem with HEPA filtration for 99.97% particle removal down to 0.3 microns.
- Humidifying Mode (If Applicable): For KC series models, fill the water tank with distilled water (up to 2.5L capacity). Select “Humidify Clean” to maintain 40-60% humidity while purifying—great for dry winters.
- App Integration (Wi-Fi Models): Download the Sharp Air app, connect via Bluetooth/Wi-Fi, and schedule runs or monitor PM2.5 levels remotely. Pairing takes 2-3 minutes.
- Filter Replacement Indicator: When the light blinks (after 200-720 hours of use), replace filters—Sharp recommends genuine parts for warranty validity.
Warning: Avoid overriding sensors in manual mode for extended periods, as it can strain the unit. This phase unlocks full potential, potentially reducing allergy symptoms by up to 50% according to Sharp’s lab tests.
Post-Operation Testing and Basic Troubleshooting
After setup and use, test your Sharp air purifier to confirm it’s working optimally. Run it in a closed room for 30 minutes, then check the air quality indicator—it should shift to green. Sniff test for odors or use a separate air quality monitor for validation.
If issues arise:
– No Power: Check outlet with another device; reset by holding power button for 5 seconds.
– Noisy Operation: Ensure filters are clean; low hum is normal, but rattling suggests loose parts—tighten via manual.
– Poor Air Quality Reading: Relocate away from vents or clean sensors with a dry cloth.
– Filter Error: Reset the indicator by pressing the filter button after replacement.
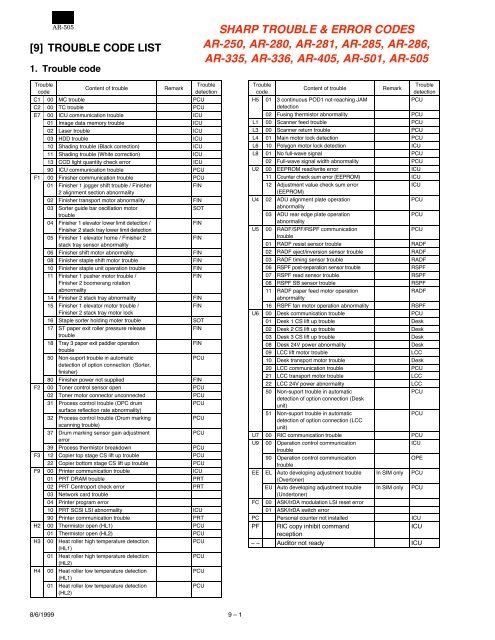
Most problems resolve in under 5 minutes. If persistent, note error codes (e.g., “F1” for fan issues) and consult the manual or Sharp support.
Pro Tips for Maximizing Your Sharp Air Purifier
To get the most out of your Sharp air purifier, go beyond the basics with these expert recommendations:
– Placement Optimization: Elevate on a stand for better circulation in larger rooms, but keep below 5 feet to target breathing zones.
– Combine with Ventilation: Open windows periodically for fresh air intake, then run the purifier to filter pollutants—ideal for post-cooking sessions.
– Seasonal Adjustments: In pollen season, use high fan speed; in winter, enable humidify mode to combat dry air from heaters.
– Energy Savings: Opt for eco mode on newer models to reduce power use by 20-30% while maintaining efficacy.
– Pet-Friendly Use: Position away from litter boxes but run continuously to trap dander—Plasmacluster helps neutralize pet odors effectively.
– Common Mistake to Avoid: Don’t place in corners; it blocks intake and reduces efficiency by up to 40%.
– Performance Boost: Pair with houseplants for natural filtration synergy, enhancing overall air quality.
Regularly check Sharp’s website for firmware updates on smart models to improve sensor accuracy.
When to Seek Professional Help
While Sharp air purifiers are user-friendly, some issues warrant expert intervention. Signs include persistent error codes, unusual burning smells, or failure to improve air quality after troubleshooting. For example, if the ion generator fails (indicated by no mist in humidify mode), it may need professional recalibration.
Look for certified Sharp service providers via their locator tool on sharpusa.com—prioritize those with 5+ years experience and positive reviews. Typical costs range from $50-150 for diagnostics/repairs, excluding parts like $30-80 for replacement generators. Always check your warranty (usually 1-2 years); improper use voids it, so retain receipts. If under warranty, contact Sharp directly for free support.
FAQ
Q: How long should I run my Sharp air purifier daily?
A: For optimal air quality, run it 8-12 hours per day in the target room. In high-pollution areas or during allergy season, continuous operation (24/7) is recommended, as the unit uses low energy (around 30-50W on medium speed). Start with auto mode to let sensors dictate runtime, and use the timer for bedtime efficiency.
Q: Can I use my Sharp air purifier in a bathroom?
A: It’s not ideal due to high humidity, which can damage electronics. Warning: Avoid bathrooms unless the model is specifically humidify-rated like the KC series. Instead, use in adjacent living spaces to draw in moist air indirectly.
Q: What does the Plasmacluster light mean on my Sharp air purifier?
A: The Plasmacluster indicator shows when the ion technology is active, releasing ions to deodorize and sterilize. If it’s off or blinking, check for clogs or reset by powering off/on. This feature is Sharp’s signature, proven to reduce viruses by 99% in lab tests (source: Sharp Corporation studies).
Q: How do I clean the pre-filter on my Sharp air purifier?
A: Remove the pre-filter monthly, vacuum gently with a brush attachment, and rinse with lukewarm water if washable (check manual). Dry completely (24 hours) before reinstalling. Avoid soap to prevent residue buildup— this extends HEPA filter life by 20-30%.
Q: Is the Sharp air purifier safe for babies or pets?
A: Yes, with precautions. Plasmacluster ions are safe and mimic natural forest air, but keep out of reach of toddlers to avoid tipping. For pets, it reduces allergens, but monitor for any unusual reactions. Consult a pediatrician for newborns in sensitive environments.
Q: Can I use third-party filters in my Sharp air purifier?
A: While possible, Sharp recommends genuine filters for compatibility and warranty. Third-party options may fit but could reduce efficiency by 10-20% due to inferior HEPA standards. Always match model numbers like FPA80HF for best results.
Q: Why is my Sharp air purifier making a humming noise?
A: A soft hum is normal from the fan, but loud noise signals dirty filters or imbalance. Clean or replace filters, and ensure stable placement. If it persists, it might indicate a motor issue—contact support within warranty.
Alternative Solutions for Air Purification

If your Sharp air purifier doesn’t meet all needs (e.g., for very large spaces), consider these alternatives. The table below compares options based on common use cases.
| Solution | Pros | Cons | Best For |
|---|---|---|---|
| Sharp Air Purifier (HEPA + Plasmacluster) | Advanced ion tech for odors/viruses; quiet operation; app control on select models | Higher upfront cost ($200-400); filter replacements needed every 6-12 months | Allergy sufferers in medium rooms (200-400 sq ft) |
| Honeywell HPA300 HEPA Purifier | Affordable ($150-250); covers up to 465 sq ft; true HEPA filtration | No ion tech; bulkier design; louder on high | Budget-conscious users in larger spaces without odor focus |
| Levoit Core 300S Smart Purifier | Wi-Fi enabled; compact and stylish; essential oil diffuser option | Smaller coverage (up to 219 sq ft); basic sensors | Tech-savvy apartments or essential oil enthusiasts |
| DIY Natural Methods (Plants + Ventilation) | Zero cost; eco-friendly; improves aesthetics | Less effective for pollutants (only 20-30% removal); requires maintenance | Supplemental use in low-pollution homes; not a full replacement |
For Sharp owners, sticking with the brand ensures seamless integration, but hybrids like adding a standalone humidifier can enhance results.
Start Using Your Sharp Air Purifier Today
With this guide, you’re equipped to make the most of your Sharp air purifier:
– Complete setup and operation steps for immediate clean air
– Advanced features like Plasmacluster for superior purification
– Pro tips and troubleshooting to avoid common pitfalls
– Maintenance routines to keep it running efficiently
Following these instructions will transform your indoor environment, reducing allergens and odors while promoting healthier living. Don’t wait—plug it in, select auto mode, and breathe easier right away. Your Sharp air purifier is designed for effortless use, so enjoy the fresh air it delivers.
Have you set up your Sharp air purifier yet? Share your experience or any questions in the comments below—we’d love to hear how it’s improving your home!