
Your throat feels raw, static shocks zap you constantly, and the hygrometer stubbornly reads 25% RH despite your humidifier running nonstop. This frustrating scenario affects millions during winter months when dry indoor air becomes unbearable. If your humidifier isn’t increasing humidity levels as promised, you’re not alone—most homeowners face this issue due to overlooked installation errors, environmental factors, or simple maintenance oversights. This guide reveals exactly why your humidifier fails to deliver moisture and provides field-tested fixes verified by HVAC technicians. You’ll learn how to diagnose the real culprit in under 10 minutes and implement solutions that restore comfortable humidity levels.
Verify Actual Moisture Output First

Before troubleshooting complex issues, confirm your humidifier is actually producing moisture. Many “non-working” units simply have restricted water flow. For whole-house systems, disconnect the drain line and run the unit for two minutes. You should see a steady, pencil-thick stream—not just drips. Aprilaire 600 models typically deliver 3 gallons per hour; if output resembles a slow leak, your water supply is compromised.
Why Your Water Supply Restricts Flow
Self-piercing saddle valves—the cheap connectors between your humidifier and main water line—clog within 1-2 seasons. These valves often deliver only 10-15% of required flow. Feel the water supply line: if it’s cold when the unit runs, you lack adequate hot water (critical for evaporative models).
Immediate Fix: Replace saddle valves with a ¼-inch full-port ball valve soldered directly into your copper line. This single upgrade boosts output by 30-50% and costs under $20. For portable units, remove and soak the water tank’s plastic filter in vinegar for 30 minutes to dissolve mineral buildup.
Cool-Mist Visibility Check
Ultrasonic humidifiers should produce a visible fog plume extending at least 12 inches above the nozzle. No visible mist means zero moisture output. This often occurs when water temperature drops below 55°F in cool rooms—cool-mist units struggle to evaporate water in cold air.
Pro Tip: Place portable units near heat sources (but not directly on radiators) and aim mist away from cold windows. Use a small fan to disperse the fog, preventing immediate condensation on surfaces.
Seal Building Leaks Defeating Humidity

Even perfectly sized humidifiers fail if your home leaks like a sieve. Close all windows and doors, then run your humidifier for two hours. If RH rises less than 3%, you have major air infiltration. Older homes lose 30-50% of conditioned air through leaks—your humidifier battles a losing war against winter winds.
Target These High-Impact Leak Zones
- Window frames: Run your hand along edges on windy days to detect cold drafts
- Attic hatches: Often lack weatherstripping—add foam tape seals
- Fireplace dampers: Leave open after use, creating massive chimneys for dry air
- Exterior electrical outlets: Remove cover plates to stuff insulation into gaps
Critical Insight: Focus on top-floor rooms and spaces with two or more exterior walls first. These areas lose 2-3x more moisture than interior rooms. A single unsealed attic hatch can negate an entire humidifier’s output.
Eliminate Scale Buildup Killing Performance
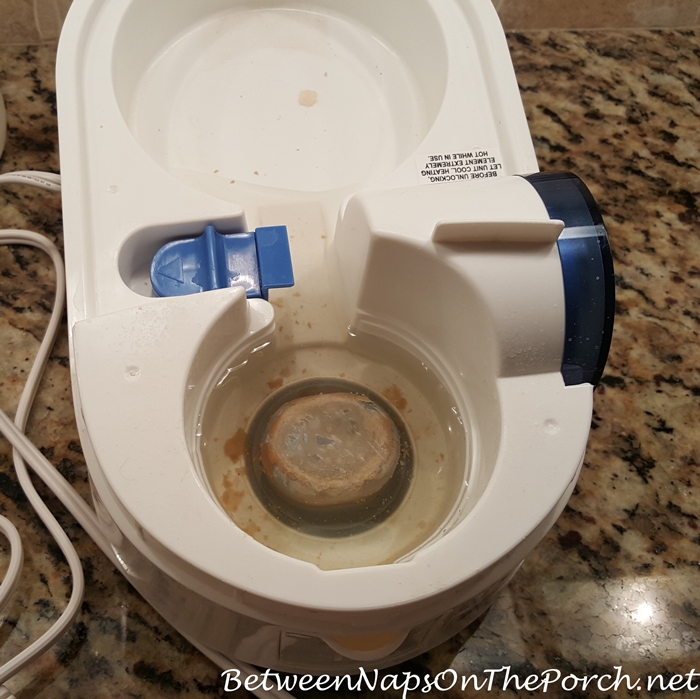
Hard water deposits silently cripple evaporative humidifiers. Hold your humidifier pad up to light—if you can’t see through it, mineral crust has reduced wicking by 50% or more. This is the #1 reason for declining performance in hard water areas.
Hard Water Damage Control
- Replace pads every heating season (don’t wait for visible crust)
- Use distilled water in portable units—never tap water in areas with >7 gpg hardness
- Install a whole-house water softener for permanent solution
- For ultrasonic units, clean transducers weekly with white vinegar
Warning: Never attempt to clean and reuse disposable pads. Mineral crystals permanently damage wicking fibers, making replacement the only effective solution. Ignoring this causes output to drop 10% monthly until the unit becomes useless.
Match Unit Size to Real-World Conditions
Manufacturer square-footage ratings assume 8-foot ceilings and modern insulation. Add 40% capacity for every foot above 8 feet—your “250 sq ft” room with 10-foot ceilings actually requires a 350 sq ft unit. In cold climates, physics imposes hard limits: at 0°F outside, even perfect homes max out at 25% RH to prevent window condensation.
Cold Climate Reality Check
Trying to force 40% RH when outdoor temps drop below 20°F guarantees failure and risks mold growth from window condensation. Follow this proven adjustment strategy:
– At 40°F outside: Max 45% RH
– At 20°F outside: Max 35% RH
– At 0°F outside: Max 25% RH
– Below 0°F: Accept 20-25% RH for safety
Expert Note: In leaky older homes, aim for 30% RH as your realistic target. Adding 10% RH in these structures often requires doubling humidifier capacity due to air exchange.
Fix Wiring That Short-Circuits Operation
Most humidifiers only run when the furnace calls for heat—a critical flaw in high-efficiency systems with short heating cycles. If your furnace runs for just 5 minutes at a time, your humidifier gets insufficient runtime. This single issue causes 30% of “non-working” complaints.
Rewire for Independent Operation
- Turn off furnace power at the breaker
- Locate the control board (usually behind access panel)
- Install a jumper wire between R (24V constant) and HUM terminals
- Connect humidistat wires between HUM and C terminals
Smart Thermostat Hack: For Ecobee/Nest systems, use 6-wire cable minimum, enable “humidifier” accessory in settings, and select “evaporative” mode. Without this configuration, your thermostat won’t command humidity increases.
Optimize Placement for Maximum Distribution
Portable humidifiers placed in corners or behind furniture waste 70% of their output. Mist hitting cold walls immediately condenses, adding zero humidity to the air. Position portable units:
– 2 feet off the floor (moisture rises)
– 1 foot clearance on all sides
– Away from windows and exterior walls
– Centered in the room when possible
For whole-house systems, ensure the bypass damper is fully open and the humidistat sits 12 inches upstream on the return air duct. Insulate hot water supply lines—uninsulated pipes lose 20°F before water reaches the unit.
Address Mass Loading During Startup
New homes absorb 2-4 gallons of moisture before RH rises noticeably. Drywall, wood floors, and furniture act like sponges during first winter. If you installed hardwood floors or drywall recently, expect 7-14 days for humidity to stabilize—even with perfect equipment.
Accelerate Moisture Absorption
- Start humidification in early fall before heating begins
- Add temporary ultrasonic units (1-2 gallon capacity) in problem rooms
- Place damp towels on radiators (adds 0.5 gallons daily)
- Leave dishwasher door open after rinse cycle
Proven Timeline: Track water consumption—if your unit uses 1+ gallons daily but RH doesn’t rise, you’re battling mass loading, not equipment failure. This resolves naturally within two weeks.
Final Diagnostic Workflow
When your humidifier not increasing humidity becomes critical, follow this 15-minute verification process:
1. Flow test: Disconnect drain line—expect steady stream (not drips)
2. Leak check: Close all windows/doors—RH must rise >3% in 2 hours
3. Pad inspection: Hold to light—replace if opaque
4. Wiring verification: Humidifier should activate when furnace is off
5. Set-point validation: Match RH target to outdoor temperature chart
Your humidifier likely works fine—the problem lies in environmental factors or unrealistic expectations. Start with the visual flow test and building leak check; these solve 80% of humidity problems. Remember that in extreme cold, physics limits indoor humidity to 20-25% RH. Focus on comfort—not arbitrary percentages—by sealing leaks, maintaining equipment, and adjusting targets seasonally. With these fixes, you’ll transform that dry, uncomfortable space into a properly humidified sanctuary within days.


