
Are you noticing your Austin Air purifier isn’t performing as well as it used to? A drop in air quality or a noticeable increase in dust might signal it’s time for a filter cleaning. While Austin Air purifiers are known for their long-lasting filters, regular maintenance is crucial for maximizing their effectiveness and extending their lifespan. A quick fix often involves a simple vacuuming of the pre-filter, restoring airflow immediately.
This comprehensive guide will walk you through everything you need to know about cleaning your Austin Air purifier, from quick pre-filter maintenance to deep cleaning and understanding when it’s time for a full filter replacement. We’ll cover different models, common issues, and pro tips to ensure your Austin Air purifier continues to deliver the clean, healthy air you expect. You’ll gain the confidence to maintain your purifier and breathe easier knowing you’re doing everything possible to keep your air quality optimal.
Understanding Your Austin Air Purifier Filters
Austin Air purifiers typically have a multi-stage filtration system. Knowing the components is key to proper cleaning:
- Pre-filter: This is the first line of defense, capturing large particles like dust, pet dander, and pollen.
- HEPA Filter: The heart of the system, capturing 99.97% of particles down to 0.3 microns, including allergens, bacteria, and viruses.
- Gas/Chemical Adsorber: This layer removes odors, gases, and volatile organic compounds (VOCs). (Not all models have this)
How to Clean the Austin Air Purifier Pre-Filter

The pre-filter requires the most frequent attention. Here’s how to keep it clean:
Frequency of Cleaning
- Light Use: Every 2-4 weeks
- Moderate Use: Every 1-2 weeks
- Heavy Use (Pets, Smokers): Weekly
Method 1: Vacuuming the Pre-Filter
Diagnosing the Issue
A clogged pre-filter reduces airflow and strains the motor. You’ll notice reduced output or increased fan noise.
Fix Steps
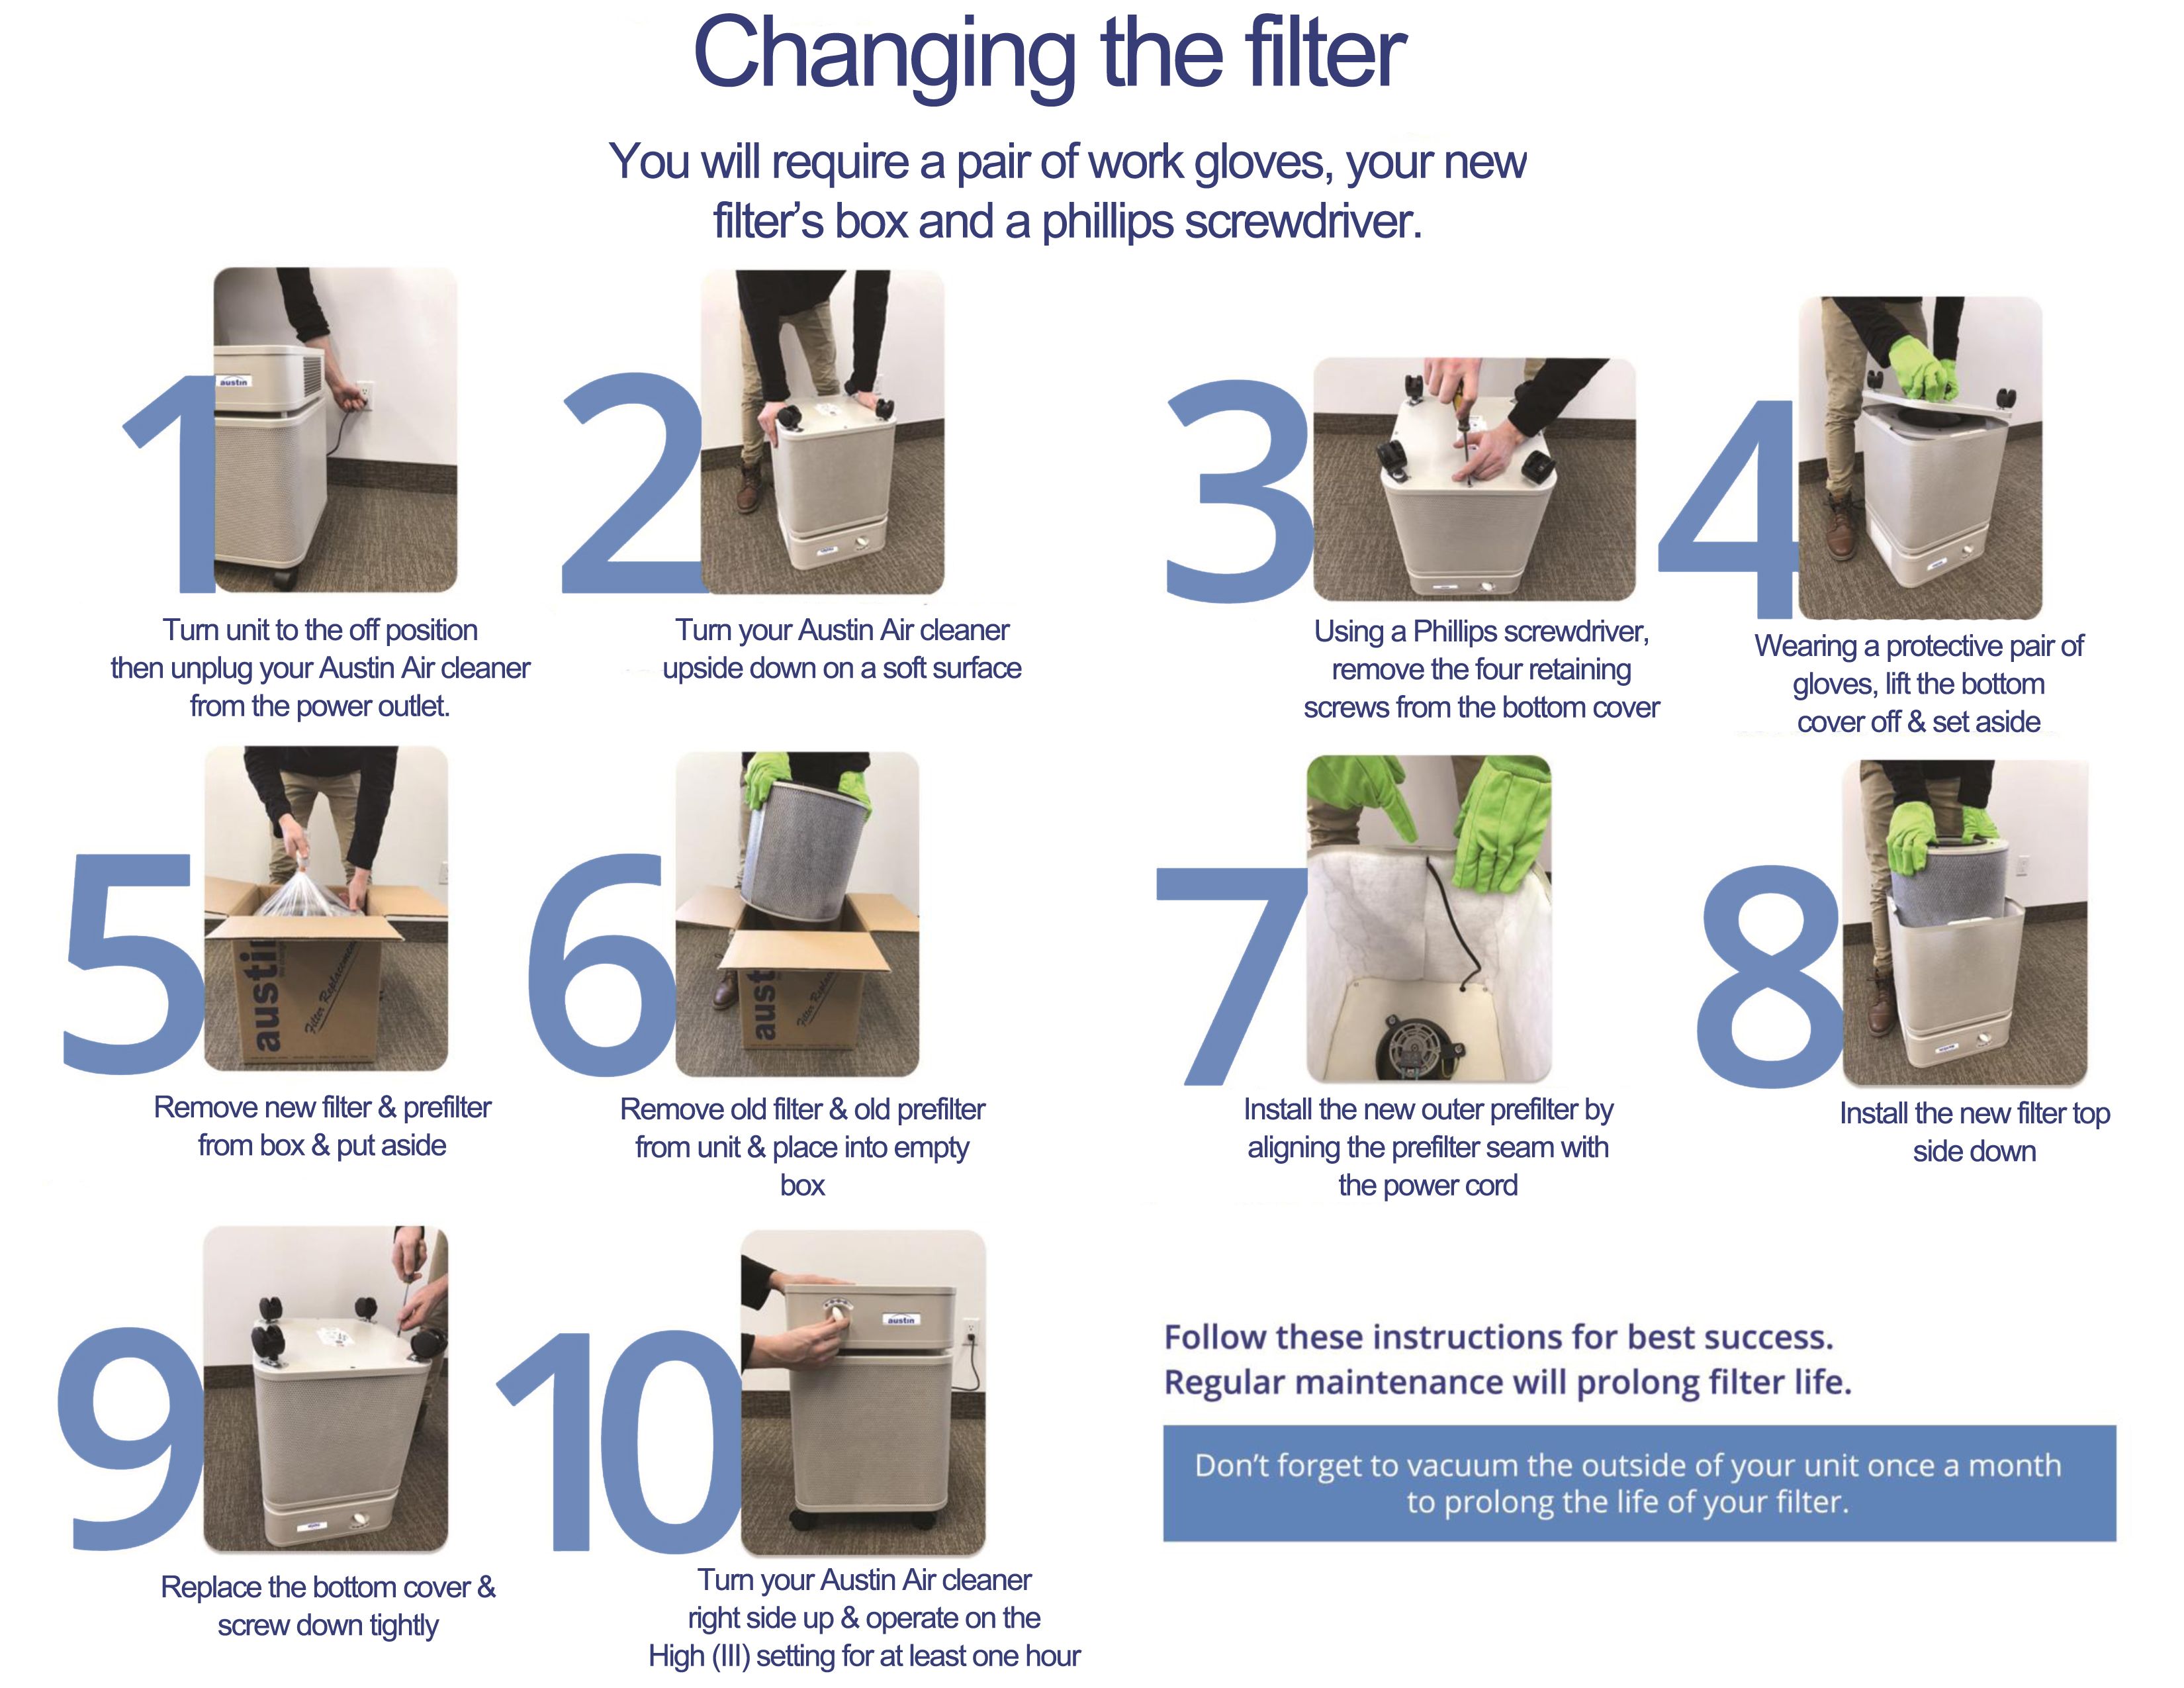
- Power Off: Turn off and unplug your Austin Air purifier.
- Remove the Filter Cover: Locate the filter cover (usually on the side or back of the unit) and remove it. Refer to your model’s manual if needed.
- Remove the Pre-Filter: Gently remove the pre-filter.
- Vacuum: Use a brush attachment on your vacuum cleaner to gently vacuum both sides of the pre-filter. Avoid excessive pressure.
- Reinstall: Place the pre-filter back into its slot, secure the filter cover, and plug in the purifier.
Testing
Turn on the purifier and listen for normal operation. Check for improved airflow.
Method 2: Gentle Hand Washing (When Needed)
Diagnosing the Issue
If vacuuming isn’t enough to remove stubborn grime, a gentle hand wash may be necessary.
Fix Steps
- Follow Steps 1-3 from Method 1.
- Hand Wash: Use lukewarm water and a mild detergent (dish soap works well). Gently wash both sides of the pre-filter. Avoid harsh chemicals or abrasive cleaners.
- Rinse Thoroughly: Rinse the pre-filter under clean, lukewarm water until all soap residue is gone.
- Air Dry: Let the pre-filter air dry completely before reinstalling. Do not use a hairdryer or other heat source.
- Reinstall: Follow step 5 from Method 1.
Testing
Ensure the pre-filter is completely dry before turning on the purifier.
Cleaning the HEPA and Gas/Chemical Filters (Limited Cleaning)
Important: Austin Air HEPA and Gas/Chemical filters are not designed for routine cleaning. Attempting to wash or vacuum these filters can damage them and reduce their effectiveness.
When to Consider Limited Cleaning
- Visible debris stuck on the surface of the filter.
- Mild odor contamination.
Method: Gentle Surface Vacuuming (Use with Caution)
Diagnosing the Issue
Visible dust or debris on the outer surface of the HEPA or Gas/Chemical filter.
Fix Steps
- Power Off and Unplug: Turn off and unplug the purifier.
- Remove Filter Cover and Filters: Remove the filter cover and carefully remove both the HEPA and Gas/Chemical filters.
- Gentle Vacuuming: Using the brush attachment on your vacuum, very gently vacuum the outer surface of the filters. Do not apply pressure, and avoid vacuuming the pleats.
- Reinstall: Carefully reinstall the filters in the correct order (HEPA first, then Gas/Chemical if applicable), secure the filter cover, and plug in the purifier.
Testing
Observe for normal operation. If you notice reduced airflow or a strange odor, the filters may be damaged and need replacing.
When to Replace Your Austin Air Purifier Filters
Filters have a limited lifespan. Here’s a guide:
| Filter Type | Typical Lifespan | Replacement Indicator |
|---|---|---|
| Pre-filter | 6-12 months (with regular cleaning) | Visible damage, reduced airflow even after cleaning |
| HEPA Filter | 2-5 years | Significantly reduced airflow, noticeable increase in allergens |
| Gas/Chemical Filter | 1-3 years | Loss of odor control, noticeable chemical smells |
Pro Tips for Austin Air Purifier Maintenance
- Location Matters: Place your purifier in a central location with good airflow, away from obstructions.
- Filter Life Tracking: Keep a record of when you installed your filters to accurately track their lifespan.
- Pre-Filter Washing: If you hand wash your pre-filter, ensure it’s completely dry to prevent mold growth.
- Model Specifics: Always refer to your Austin Air purifier’s user manual for specific cleaning and replacement instructions.
- Avoid Harsh Chemicals: Never use harsh chemicals, abrasive cleaners, or solvents on any part of your purifier.
Professional Help
When to Call a Professional
- Your purifier is making unusual noises.
- You suspect a motor problem.
- You’ve tried cleaning the filters, but the air quality hasn’t improved.
Finding a Qualified Technician
Contact Austin Air directly for authorized service providers in your area. Typical repair costs vary depending on the issue.
FAQ
Q: Can I use a compressed air can to clean the filters?
A: No, compressed air can damage the delicate fibers of the HEPA filter.
Q: How do I know if my Gas/Chemical filter needs replacing?
A: If you notice odors returning or if you’re experiencing increased sensitivity to VOCs, it’s likely time for a replacement.
Q: Is it okay to run my Austin Air purifier without a pre-filter?
A: No, the pre-filter protects the HEPA filter from larger particles and extends its lifespan.
Q: How often should I vacuum the area around my air purifier?
A: Weekly vacuuming around the purifier helps prevent dust from recirculating.
Alternative Solutions
If you’re facing persistent air quality issues despite cleaning and maintaining your Austin Air purifier, consider these alternatives:
| Solution | Pros | Cons | Best For |
|---|---|---|---|
| Additional Air Purifiers | Increased coverage, faster air cleaning | Higher cost, more maintenance | Larger homes or areas with severe air quality issues |
| Whole-House Air Purifier | Filters all air circulating through your HVAC system | Higher installation cost, requires professional installation | Comprehensive air purification for the entire home |
| Air Quality Monitor | Provides real-time data on air quality levels | Doesn’t solve the problem, only provides information | Identifying specific pollutants and tracking improvement |
Keep Your Austin Air Purifier Running Smoothly
By following this guide, you can effectively clean and maintain your Austin Air purifier, ensuring it delivers clean, healthy air for years to come. Remember, regular pre-filter cleaning is key, and replace filters according to the recommended schedule.
Have you found this guide helpful? Share your experience with cleaning your Austin Air purifier in the comments below! What other air purification tips would you like to see us cover?


